Restoring a Lake Placid Blue '63 Bass VI
-
HNB

- PAT. # 2.972.923

- Posts: 13617
- Joined: Tue May 10, 2011 7:55 am
- Location: Puyallup, Washington
- Contact:
Re: Restoring a Lake Placid Blue '63 Bass VI
I agree with sanding it smooth. It will make painting it easier. You can always tape off cavities to keep the original finish, but that layer of paint sitting there would make it super annoying to paint and not have a weird edge from paint and from that new body piece. I would just get it nice and flush.
Christopher
Lilith Guitars
Lilith Guitars
-
Highnumbers
- PAT. # 2.972.923
- Posts: 645
- Joined: Sat Apr 25, 2009 1:21 am
- Location: Orange County, CA
Re: Restoring a Lake Placid Blue '63 Bass VI
Let's lay this theory to rest.
I can assure you with 100% certainty that it would NOT have been easier making straight cuts, while saving the original cavities. . In fact, it would have been a complete nightmare. Imagine trying to make at least six angled straight cuts (possibly seven) and making sure that all five joining angles hit a 100% perfect miter with NO gaps? And then making sure that the same exact angles were hit on all six straight cuts on the repair slab (unless using six different pieces of wood joined together, which adds additional seams to deal with, and is a hack job).
I'm telling ya, it would have looked like complete shit and would be overly complicated. I took the only sensible route for repairing that body.
Here's a demonstration of the six straight cuts that would have been necessary (possibly even seven).

-
Highnumbers
- PAT. # 2.972.923
- Posts: 645
- Joined: Sat Apr 25, 2009 1:21 am
- Location: Orange County, CA
Re: Restoring a Lake Placid Blue '63 Bass VI
HNB wrote: ↑Tue Oct 03, 2023 7:37 amI agree with sanding it smooth. It will make painting it easier. You can always tape off cavities to keep the original finish, but that layer of paint sitting there would make it super annoying to paint and not have a weird edge from paint and from that new body piece. I would just get it nice and flush.
Thanks gents, I'm leaning this way as well. Sometimes it's easy to get carried away in "preservation mode" and original paint is so important (especially a custom color) that it's easy to understand wanting to save it at nearly any cost.JVG wrote: ↑Tue Oct 03, 2023 12:49 amLove the way this is progressing.
Perhaps an unpopular view, but i wouldn’t worry about preserving the areas of paint under the control plate and between pickups. Sand that bugger smooth!
There’s not really anything to be gained by leaving those bits of paint, except to get fuzzy feelings from looking at 60+ year old paint next time someone removes the hardware. The original paint inside the control cavities can provide that link to the past.
But not at the cost of doing a sloppy job on the restoration. It'll hurt removing the paint in those sections but worth it to get the rest of the body blocked nice and straight, not to mention easier for the guy doing the respray on it (more on that soon, I have landed on the right person for the job).
-
HNB
- PAT. # 2.972.923
- Posts: 13617
- Joined: Tue May 10, 2011 7:55 am
- Location: Puyallup, Washington
- Contact:
Re: Restoring a Lake Placid Blue '63 Bass VI
Might need to rip that bandaid off. 
I know what you mean wanting to preserve as much as you can, but you are right that it will make everything harder to make look good. Even if you were able to sand the rest smooth avoiding those painted areas, I am not sure how it would work taping it off and then having to wetsand and polish up to that previous finish without touching it. That would be a massive headache to save something people wouldn't see with parts on.
I know what you mean wanting to preserve as much as you can, but you are right that it will make everything harder to make look good. Even if you were able to sand the rest smooth avoiding those painted areas, I am not sure how it would work taping it off and then having to wetsand and polish up to that previous finish without touching it. That would be a massive headache to save something people wouldn't see with parts on.
Christopher
Lilith Guitars
Lilith Guitars
-
Fiddy

- PAT. # 2.972.923
- Posts: 12440
- Joined: Thu Nov 29, 2007 11:38 am
- Location: Canada Dry
Re: Restoring a Lake Placid Blue '63 Bass VI
Excellent work. You’re going to end up with a fantastic instrument.
-
ryandennis

- PAT. # 2.972.923
- Posts: 101
- Joined: Tue Sep 28, 2021 5:37 pm
- Location: TX
Re: Restoring a Lake Placid Blue '63 Bass VI
I'm so excited to see this one finished out. Aged lake placid blue has got to be one of my top favorite colors.
https://linktr.ee/newheroesband
-
OffYourFace

- Mods

- Posts: 13798
- Joined: Thu May 03, 2007 2:59 pm
- Location: Los Angeles, CA
Re: Restoring a Lake Placid Blue '63 Bass VI
Are you going to use Joe again?
-
Highnumbers
- PAT. # 2.972.923
- Posts: 645
- Joined: Sat Apr 25, 2009 1:21 am
- Location: Orange County, CA
Re: Restoring a Lake Placid Blue '63 Bass VI
Nope, Joe is amazing but it's hard to get his availability. He has my '62 Jazzmaster restoration currently in the queue for paint anyway, so I'm sending this one elsewhere. Details on that soon!
-
clintburgess

- PAT. # 2.972.923
- Posts: 60
- Joined: Mon Feb 02, 2015 3:18 pm
- Location: Pacific Northwest USA
- Contact:
Re: Restoring a Lake Placid Blue '63 Bass VI
Finally, you get an idea of what the body shape will be, and how much is added on versus original. Next up is flat sanding the backside, fixing some small stuff, then cutting out the body and shaping/contouring everything. I must admit it's going to be extremely difficult to accomplish a nice flat body while still preserving the LPB under the switch plates and between the pickups. We'll see, at least the finish in the cavities will remain intact.

This restoration just continues to captivate. Round 2 of creating the repair slab did not disappoint. Can't wait to see more and hear about who will doing the finish once the woodwork is complete.
This restoration just continues to captivate. Round 2 of creating the repair slab did not disappoint. Can't wait to see more and hear about who will doing the finish once the woodwork is complete.
-
Highnumbers
- PAT. # 2.972.923
- Posts: 645
- Joined: Sat Apr 25, 2009 1:21 am
- Location: Orange County, CA
Re: Restoring a Lake Placid Blue '63 Bass VI
Thank you!clintburgess wrote: ↑Fri Oct 06, 2023 7:48 amFinally, you get an idea of what the body shape will be, and how much is added on versus original. Next up is flat sanding the backside, fixing some small stuff, then cutting out the body and shaping/contouring everything. I must admit it's going to be extremely difficult to accomplish a nice flat body while still preserving the LPB under the switch plates and between the pickups. We'll see, at least the finish in the cavities will remain intact.
[/url]
This restoration just continues to captivate. Round 2 of creating the repair slab did not disappoint. Can't wait to see more and hear about who will doing the finish once the woodwork is complete.
It's been a busy week with non-guitar work but I'm itching to get back in the workshop and keep going on this. Should have an update this weekend, finally cutting the body shape!
-
Highnumbers
- PAT. # 2.972.923
- Posts: 645
- Joined: Sat Apr 25, 2009 1:21 am
- Location: Orange County, CA
-
SuperAxe

- PAT. # 2.972.923
- Posts: 294
- Joined: Tue Sep 04, 2012 1:46 am
- Contact:
Re: Restoring a Lake Placid Blue '63 Bass VI
Re hide glue - Stewmac sell a fish glue which has a 15 minute or so working slot. On my last two guitar builts I only used the fish glue. Fantastic glue imo.Highnumbers wrote: ↑Mon Oct 02, 2023 7:44 pmThanks! Yep, to an extent the wood glue contracted slightly, pulling the seam tighter. You get a decent working time with PVA glues, but once the moisture draws out, it really sticks.MattK wrote: ↑Mon Oct 02, 2023 5:40 pmBrilliant fix - and an immaculate result! I like that the seam is matched as well.
On a technical note, did the wood glue also contract slightly as it set/dried to form a more snug joint? I know you mentioned the grain fanning slightly but I wondered if it also added a bit of self-clamping as it dried.
The other option would have been hot hide glue, which I use for neck sets and other guitar repairs. But it has an extremely short working time (like a matter of seconds), making it a poor choice for complicated clamping situations like this, where it all needs to be flush and square.
Love your work !
-
Highnumbers
- PAT. # 2.972.923
- Posts: 645
- Joined: Sat Apr 25, 2009 1:21 am
- Location: Orange County, CA
Re: Restoring a Lake Placid Blue '63 Bass VI
Post-weekend update:
At this point, I block-sanded the front and back of the guitar body. While using my neighbors drum sander (thickness sander) seemed appealing, I wanted to do this by hand to control the amount taken off. In the end, it really didn't require much sanding and only a negligible amount of thickness, using 180-grit paper. Thanks mostly to clamping it up nice and flush on both sides.

Unfortunately, block sanding this guitar without having any long unlevel dips required removing the LPB finish under the control plate. I was already bracing for it. Hard to see it go, but it's no big deal in the bigger picture.

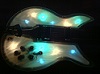
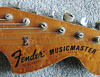
I made sure to document the color under different lighting and even compare against the headstock. You can see here there is a very light amount of ambering on the headstock due to UV exposure while under the guard is how it looked straight out of the paint booth.

One smaller task I had was filling in this crudely cut (gouged?) access for a truss rod wrench. Thankfully they left the pickguard intact but this hole needed to be dealt with. The approach here was making a small router template to make the hole square (aided by a chisel in the corners), fill that with a snug-fitting alder block and then trimming the neck pocket edge. There was also a tiny square patch adjacent to this larger hole, which I patched with alder. The control cavity is intact now and the repaired area is nice and clean.


At this point, I block-sanded the front and back of the guitar body. While using my neighbors drum sander (thickness sander) seemed appealing, I wanted to do this by hand to control the amount taken off. In the end, it really didn't require much sanding and only a negligible amount of thickness, using 180-grit paper. Thanks mostly to clamping it up nice and flush on both sides.
Unfortunately, block sanding this guitar without having any long unlevel dips required removing the LPB finish under the control plate. I was already bracing for it. Hard to see it go, but it's no big deal in the bigger picture.
I made sure to document the color under different lighting and even compare against the headstock. You can see here there is a very light amount of ambering on the headstock due to UV exposure while under the guard is how it looked straight out of the paint booth.
One smaller task I had was filling in this crudely cut (gouged?) access for a truss rod wrench. Thankfully they left the pickguard intact but this hole needed to be dealt with. The approach here was making a small router template to make the hole square (aided by a chisel in the corners), fill that with a snug-fitting alder block and then trimming the neck pocket edge. There was also a tiny square patch adjacent to this larger hole, which I patched with alder. The control cavity is intact now and the repaired area is nice and clean.
-
MattK
- PAT. # 2.972.923
- Posts: 3695
- Joined: Sun Aug 10, 2008 9:51 pm
- Location: Hobart, Australia
Re: Restoring a Lake Placid Blue '63 Bass VI
I’m loving the care and attention evident here (and throughout).
-
Highnumbers
- PAT. # 2.972.923
- Posts: 645
- Joined: Sat Apr 25, 2009 1:21 am
- Location: Orange County, CA
Re: Restoring a Lake Placid Blue '63 Bass VI
BIG day on the project -- turning this slab back into a guitar-shaped object. 
Thanks to several helpful folks both here and on IG who shared measurements of their 60s Bass VI models. I gathered input from a few folks to confirm dimensions on the body. The originals varied a very small amount, but overall the 60s models are slightly smaller than the Bass VI templates available online - just an FYI for anybody building or restoring one of these.

Three minutes with a bandsaw later...

It's starting to look like a guitar! I cleaned up the bandsaw cuts with a large disc sander and oscillating spindle sander, freehand up to my pencil line.

Next up is doing the roundover on the body. It's critical at this step to have the edges/outline of the guitar perfectly smooth. I even ran a hand sanding block over this entire edge to get smooth. Any dips or unlevel areas will be picked up by the roundover bit bearing and cause uneven contours.

Here is the body after using the 1/2" roundover bit. Important tip: most template makers will tell you that offset Fenders have a 7/16" roundover on the edge. While that *may* be true of reissues, Squiers or aftermarket, it's not true of 60s era offsets. The factory used the same 1/2" roundover for Strats, P-Basses and everything else on the offset models. The "lip" on the edge was hand-sanded so there is a continuous round profile along the edge.


The backside sure looks weird like this (before I sand the piece down to match the belly contour). It was important to keep this piece attached for now because the router edge guide bearing needs material to do it's thing. Otherwise the router would mangle the top roundover edge above the belly contour.

Speaking of router guide bearings.....
Alder is a very soft wood. Even if you push the wood against the bearing gently while rounding over the body edge, the bearing can easily leave "tracks" on the side of the body that are basically long dents where the wood is pushed in. This is pretty common knowledge, but if anybody needs to get a dent out of wood, it's a cake walk. Just heat a soldering iron up and dip a towel in water, then place the soldering iron over the dent for 15-20 seconds (don't let it burn). You're basically forcing steam into the dent, which raises the grain almost like a sponge drying out. Repeat as needed, until it's flush again and can be fine-sanded smooth. This works for almost any shallow dent in most woods.


Terrible photo, but it's smooth to the touch and the track lines are gone. It's be perfect after prep sanding for finish.

Next up is shaping the belly contour and cutting/shaping the forearm contour. My favorite part.
Thanks to several helpful folks both here and on IG who shared measurements of their 60s Bass VI models. I gathered input from a few folks to confirm dimensions on the body. The originals varied a very small amount, but overall the 60s models are slightly smaller than the Bass VI templates available online - just an FYI for anybody building or restoring one of these.
Three minutes with a bandsaw later...
It's starting to look like a guitar! I cleaned up the bandsaw cuts with a large disc sander and oscillating spindle sander, freehand up to my pencil line.
Next up is doing the roundover on the body. It's critical at this step to have the edges/outline of the guitar perfectly smooth. I even ran a hand sanding block over this entire edge to get smooth. Any dips or unlevel areas will be picked up by the roundover bit bearing and cause uneven contours.
Here is the body after using the 1/2" roundover bit. Important tip: most template makers will tell you that offset Fenders have a 7/16" roundover on the edge. While that *may* be true of reissues, Squiers or aftermarket, it's not true of 60s era offsets. The factory used the same 1/2" roundover for Strats, P-Basses and everything else on the offset models. The "lip" on the edge was hand-sanded so there is a continuous round profile along the edge.
The backside sure looks weird like this (before I sand the piece down to match the belly contour). It was important to keep this piece attached for now because the router edge guide bearing needs material to do it's thing. Otherwise the router would mangle the top roundover edge above the belly contour.
Speaking of router guide bearings.....
Alder is a very soft wood. Even if you push the wood against the bearing gently while rounding over the body edge, the bearing can easily leave "tracks" on the side of the body that are basically long dents where the wood is pushed in. This is pretty common knowledge, but if anybody needs to get a dent out of wood, it's a cake walk. Just heat a soldering iron up and dip a towel in water, then place the soldering iron over the dent for 15-20 seconds (don't let it burn). You're basically forcing steam into the dent, which raises the grain almost like a sponge drying out. Repeat as needed, until it's flush again and can be fine-sanded smooth. This works for almost any shallow dent in most woods.
Terrible photo, but it's smooth to the touch and the track lines are gone. It's be perfect after prep sanding for finish.
Next up is shaping the belly contour and cutting/shaping the forearm contour. My favorite part.
Thank you! I truly appreciate that. It's a labor of love, and a lot more fun now that it's looking like a guitar again.
Last edited by Highnumbers on Mon Oct 09, 2023 8:03 pm, edited 1 time in total.