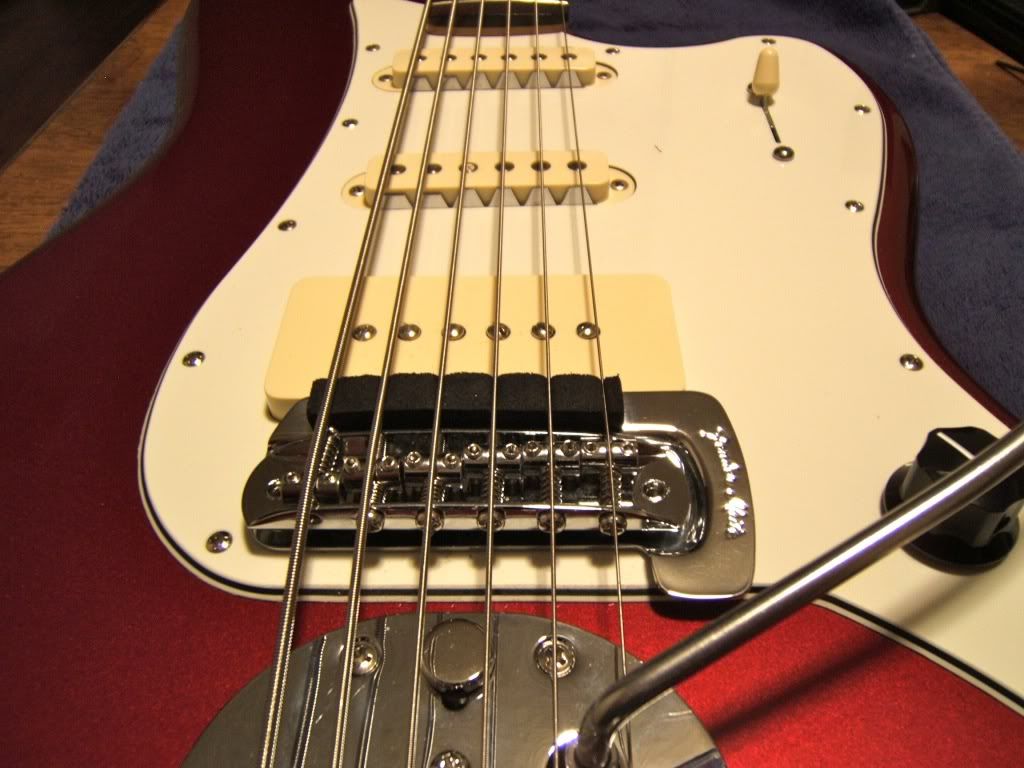
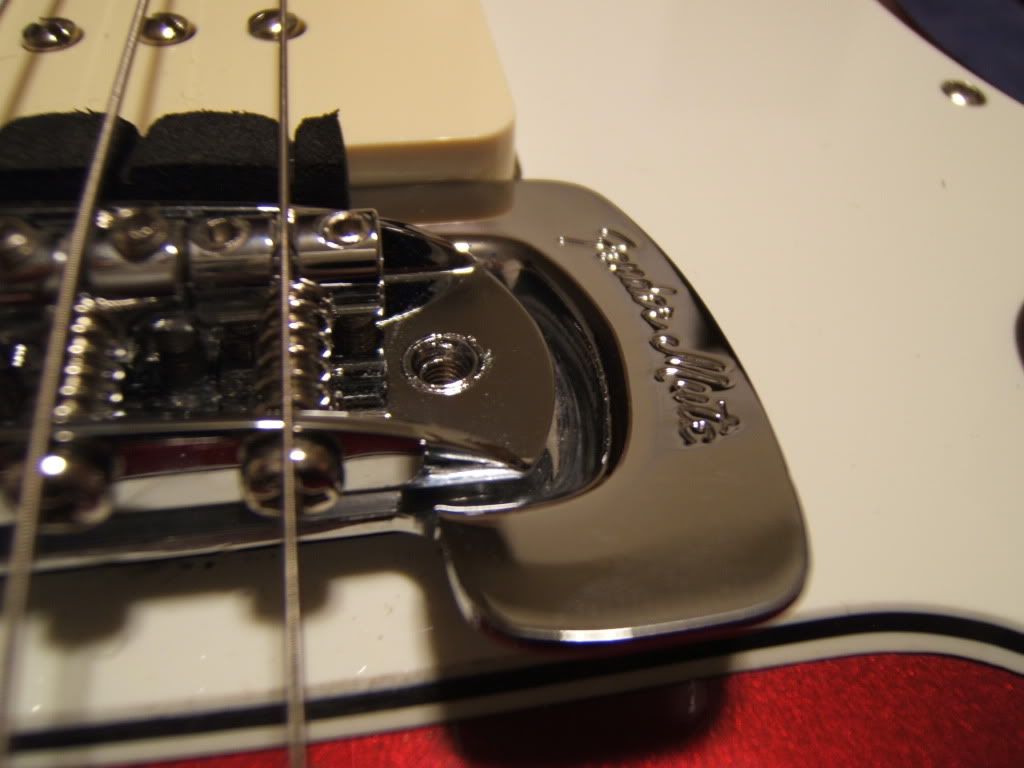
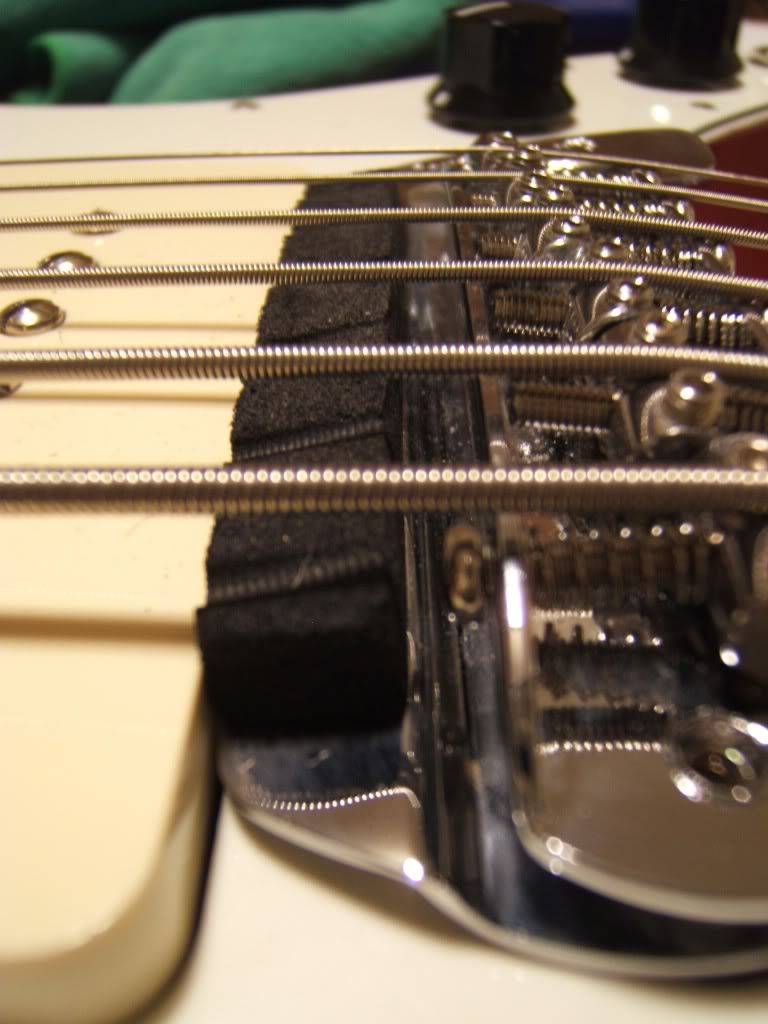
Update: I was waiting to get my new strings in before doing anything else to the bass. They took an unfortunate detour, from New York to Texas by way of Hawaii. Postal service at its finest. Once they got here I took the bass apart and adjusted the mute. I did a couple of things to get it to work smoother and stay in tune. Strangely no one seems to mention this but you really need to let the foam break in before trying to adjust it to stay in tune. When I first installed the mute it was pushing the strings quite sharp. I left mine engaged for a few days when I wasn't playing it and played it quite a bit with it engaged as well. Once it had broken in sufficiently I had to raise it quite a bit to get it to sound muted at all. It now gives a great mute sound and only pushes around a couple of cents sharp. It also functioned more smoothly now that it was raised but not as smooth as I would like so I took it off again. I took a file to the bottom of the screw and rounded it off. I went back and added some grease but still needed to grind the screw down more to get it a smooth as I would like (guess I should have drilled to original spec but it works either way). Luckily I had a vintage Jag nearby to compare. It should engage/disengage without much pressure at all. I'm quite pleased with it now. Was a good learning experience too
As I was playing the bass with a pick I noticed a weird popping noise coming through the amp. It became pretty obvious that it was static building up on the pickguard and coming through the electronics. I have seen this on a few guitars in the past (weirdly only Mexican ones and only with a strat style switch). I knew this was no big deal as it is easily fixed with a properly shielded pickguard. I had planned on just waiting until I built a new guard to go with the new plates but I've gotten pretty busy and that may not happen for a few months. I went ahead and shielded it while I had it apart. I went with my usual aluminum foil and spray adhesive and covered the back of the entire guard. Immediately the difference was apparent. Not only was the static problem completely gone but the single coils were almost completely silent when soloed. This is my first instrument with "claws". I am quite surprised at how well the work when used in a properly shielded instrument. Which leads me to a question: Why don’t companies properly shield their pickguards any more? This seems like such a cheap corner to cut. Anyway as I do with all my instruments now days I highly recommend shielding the pickguard when you get it.
Edit: pictures below
Updated PSVI mods including Conversion Guard, bridge, mute
-
SneakyT

- PAT. # 2.972.923

- Posts: 946
- Joined: Thu Sep 20, 2012 3:10 am
- Location: Roanoke TX
- Contact:
Fender Mute and shielding
Last edited by SneakyT on Tue Mar 05, 2013 6:42 pm, edited 2 times in total.
Troy Neagle Luthiery & Custom Pickguards
Please contact me at Reverb
https://reverb.com/shop/neagle-luthier
Please contact me at Reverb
https://reverb.com/shop/neagle-luthier
-
brianjdc

- PAT. # 2.972.923
- Posts: 1245
- Joined: Tue Apr 24, 2007 1:41 pm
- Location: buffalo
Re: Bass VI Bridge Mod
contact paul (stereordinary) he makes the bass vi plates and any other customs you can want or think of. i got my set from him awhile back and they are top notchJoeybreaksstuff wrote:Any chance you have or know of source for control plates? Huort doesn't seem to supply them any more. I used a Jag 3 switch plate for mine but made a control plate out of pickguard material from a tracing and covered it with adhesive foil tape. Looks fine but I'd like a real metal one. If anyone would like me to fashion a plastic one for them to get a build going I'd be happy to do some cheap
-
SneakyT
- PAT. # 2.972.923
- Posts: 946
- Joined: Thu Sep 20, 2012 3:10 am
- Location: Roanoke TX
- Contact:
Mute photos
Sorry these took so long to post. I wish I had documented the process but alas I did not.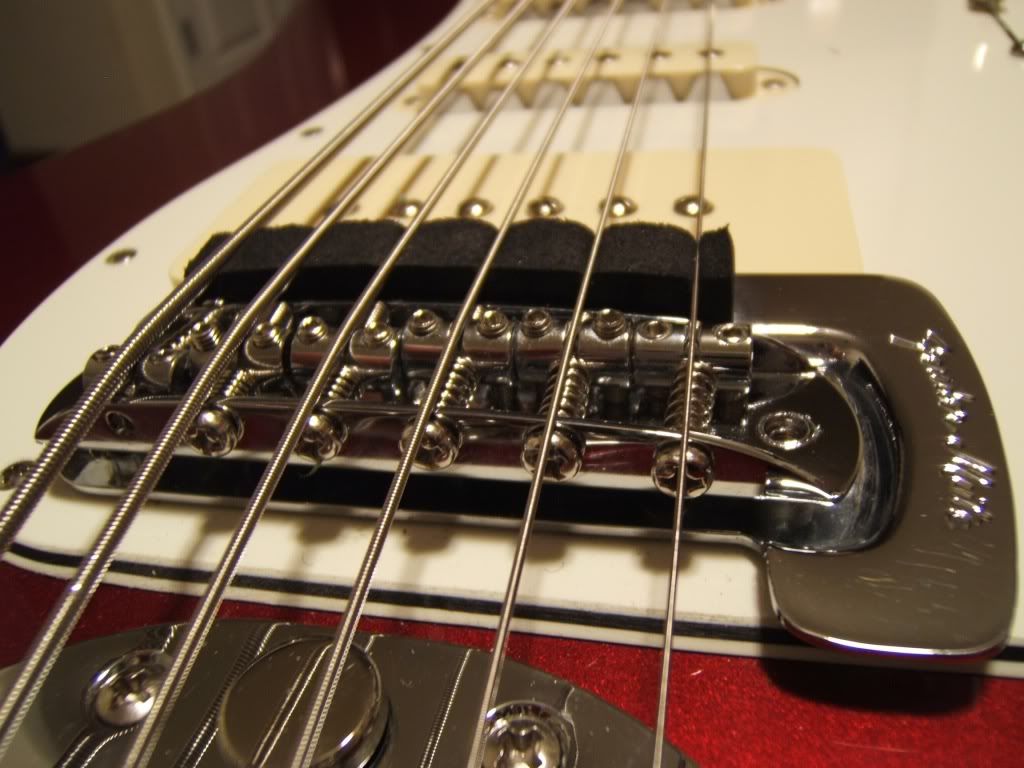
Troy Neagle Luthiery & Custom Pickguards
Please contact me at Reverb
https://reverb.com/shop/neagle-luthier
Please contact me at Reverb
https://reverb.com/shop/neagle-luthier
-
Drewbertca

- PAT. # 2.972.923
- Posts: 417
- Joined: Fri Feb 08, 2013 6:15 pm
- Location: Timmins, ON, CA
Re: Mute photos
Now that looks killer.....SneakyT wrote:Sorry these took so long to post. I wish I had documented the process but alas I did not.
-
SneakyT
- PAT. # 2.972.923
- Posts: 946
- Joined: Thu Sep 20, 2012 3:10 am
- Location: Roanoke TX
- Contact:
Re: Mute photos
Thanks man, it really sounds killer. You can really get some cool R&B tones with it engaged and the tone rolled off. Surprisingly it sounds cool with slapping stuff too. I need to put some Youtube stuff up but so little time right now.Drewbertca wrote: Now that looks killer.....
Last edited by SneakyT on Wed Mar 06, 2013 1:14 am, edited 1 time in total.
Troy Neagle Luthiery & Custom Pickguards
Please contact me at Reverb
https://reverb.com/shop/neagle-luthier
Please contact me at Reverb
https://reverb.com/shop/neagle-luthier
-
maximee

- PAT. # 2.972.923
- Posts: 926
- Joined: Mon Mar 05, 2012 2:07 pm
- Location: Germany
Re: Pawnshop Bass VI bridge mod and other mods
Sweet mod. Now I wish I could score a real Bass VI mute for my 2012 MIJ RI.
I really like that sound.
I really like that sound.
-
SneakyT
- PAT. # 2.972.923
- Posts: 946
- Joined: Thu Sep 20, 2012 3:10 am
- Location: Roanoke TX
- Contact:
Re: Pawnshop Bass VI bridge mod and other mods
I feel you. If it were me, I'd go ahead and buy a Jag bridge, mod it and install the mute as it really is cool. I can't imagine a Bass VI without it now.maximee wrote:Sweet mod. Now I wish I could score a real Bass VI mute for my 2012 MIJ RI.
I really like that sound.
Last edited by SneakyT on Wed Mar 06, 2013 9:59 pm, edited 2 times in total.
Troy Neagle Luthiery & Custom Pickguards
Please contact me at Reverb
https://reverb.com/shop/neagle-luthier
Please contact me at Reverb
https://reverb.com/shop/neagle-luthier
-
SneakyT
- PAT. # 2.972.923
- Posts: 946
- Joined: Thu Sep 20, 2012 3:10 am
- Location: Roanoke TX
- Contact:
New parts. Good and Bad news.
Well I got in some new parts today. First up was the order from Angela that included a new bridge pickup (AVRI Jag neck pickup as to keep with the rwrp of the middle pickup). Next four Switchcraft off/on switches. Finally a nice laser cut Bass VI template set from Ponoko (courtesy of Paul and Kevin [Stereordinary]. Thanks Guys). These templates are great (and smell great too).
Let's get the bad news out of the way:
The PS Bass VI lines up to the template horribly. One screw hole matches. That's it. The routes are all different including the trem location and switch route. The middle pickup route is close. So this will be a custom conversion pickguard. I will be starting from scratch. Guess I'm gonna have to get good with CAD. I'll ask some opinions at a later date when I move forward with this as I am planning on selling these conversion guards to others as well. I'm considering a bunch of different alternatives (such as a guard with four switches and a single coil with no chrome pieces all the way to a guard that will require routing to get the chrome pieces in as close to the proper areas as possible). That is still a bit off though so on to the next topic...
Next, good news:
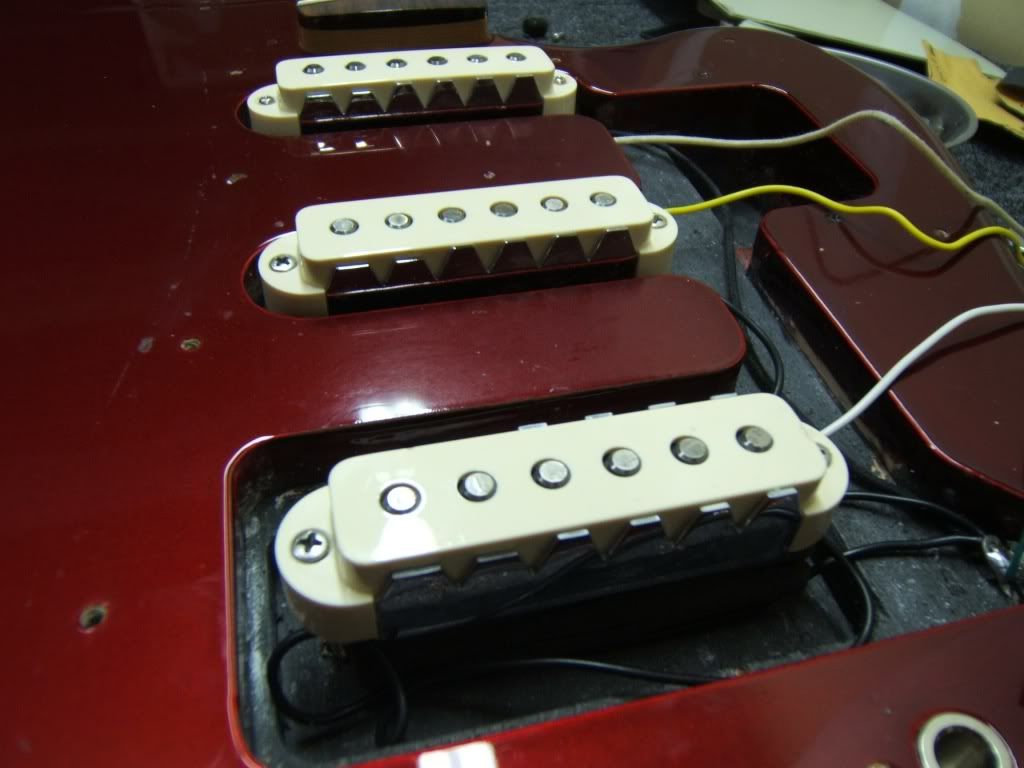
I installed the bridge pickup by removing the Jag cover and fitting it under the Jazzmaster cover (claw and all) with some weatherstripping foam. After some height adjustments it is obvious that this pickup kills the humbucker. It is much clearer and really adds the twang that this was missing. I can't wait to try all the combinations once the switches are done. The downside to this is that the new pickup makes it obvious that the other two are a bit overwound. I didn't take any measurements but the output was a bit lower than the other two and the clarity is better hence the thought that the others were overwound. With the pickup height adjustments I made it is not too noticeable but it has me wondering if it would be worth upgrading the other two. I certainly haven't spent much time with the three together so this is just me thinking out loud. It certainly matches better than the humbucker did.
More to come in the following week. Stay tuned...
Let's get the bad news out of the way:
The PS Bass VI lines up to the template horribly. One screw hole matches. That's it. The routes are all different including the trem location and switch route. The middle pickup route is close. So this will be a custom conversion pickguard. I will be starting from scratch. Guess I'm gonna have to get good with CAD. I'll ask some opinions at a later date when I move forward with this as I am planning on selling these conversion guards to others as well. I'm considering a bunch of different alternatives (such as a guard with four switches and a single coil with no chrome pieces all the way to a guard that will require routing to get the chrome pieces in as close to the proper areas as possible). That is still a bit off though so on to the next topic...
Next, good news:
I installed the bridge pickup by removing the Jag cover and fitting it under the Jazzmaster cover (claw and all) with some weatherstripping foam. After some height adjustments it is obvious that this pickup kills the humbucker. It is much clearer and really adds the twang that this was missing. I can't wait to try all the combinations once the switches are done. The downside to this is that the new pickup makes it obvious that the other two are a bit overwound. I didn't take any measurements but the output was a bit lower than the other two and the clarity is better hence the thought that the others were overwound. With the pickup height adjustments I made it is not too noticeable but it has me wondering if it would be worth upgrading the other two. I certainly haven't spent much time with the three together so this is just me thinking out loud. It certainly matches better than the humbucker did.
More to come in the following week. Stay tuned...
Troy Neagle Luthiery & Custom Pickguards
Please contact me at Reverb
https://reverb.com/shop/neagle-luthier
Please contact me at Reverb
https://reverb.com/shop/neagle-luthier
-
maximee
- PAT. # 2.972.923
- Posts: 926
- Joined: Mon Mar 05, 2012 2:07 pm
- Location: Germany
Re: Updates! Pawnshop Bass VI bridge mod and other mods
Yeah not a bad idea. Will consider that - or maybe come up with some smart hack myself. We'll see...
-
SneakyT
- PAT. # 2.972.923
- Posts: 946
- Joined: Thu Sep 20, 2012 3:10 am
- Location: Roanoke TX
- Contact:
Re: Updates! Pawnshop Bass VI bridge mod and other mods
latest update. http://www.offsetguitars.com/forums/vie ... =8&t=68558
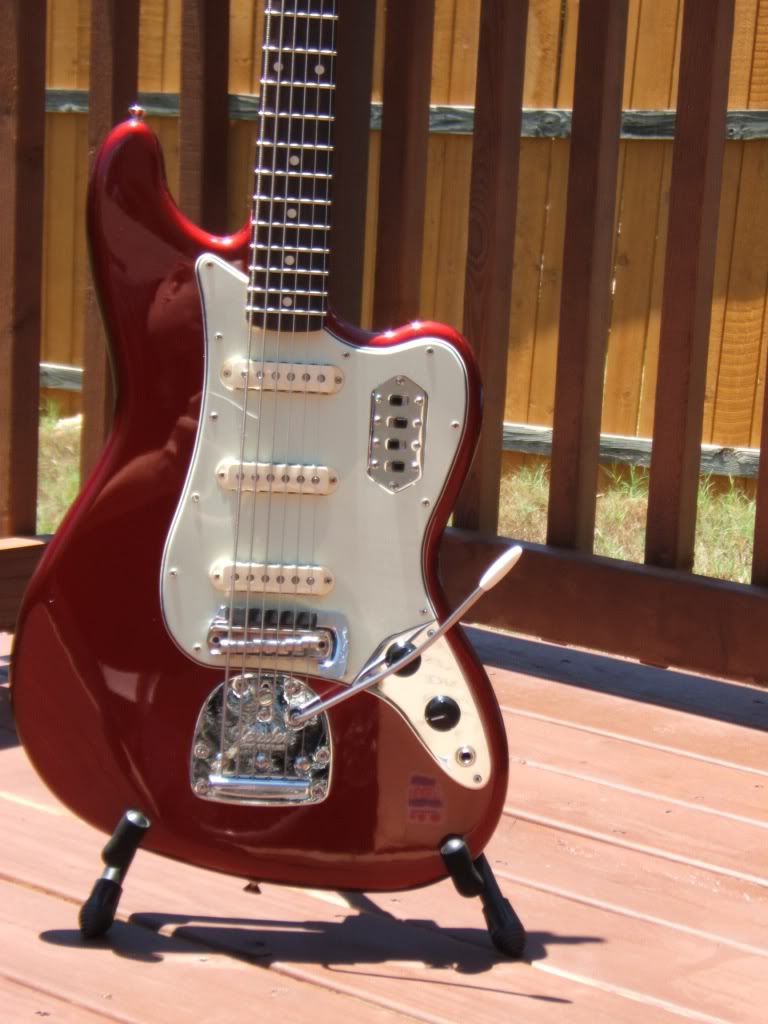
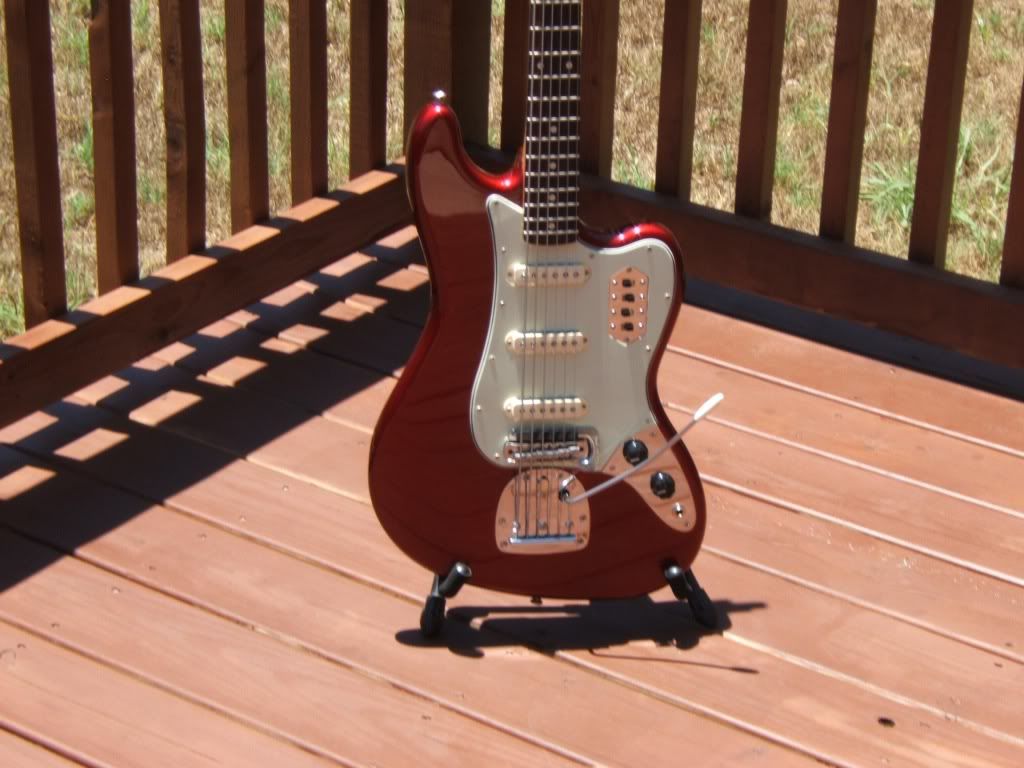
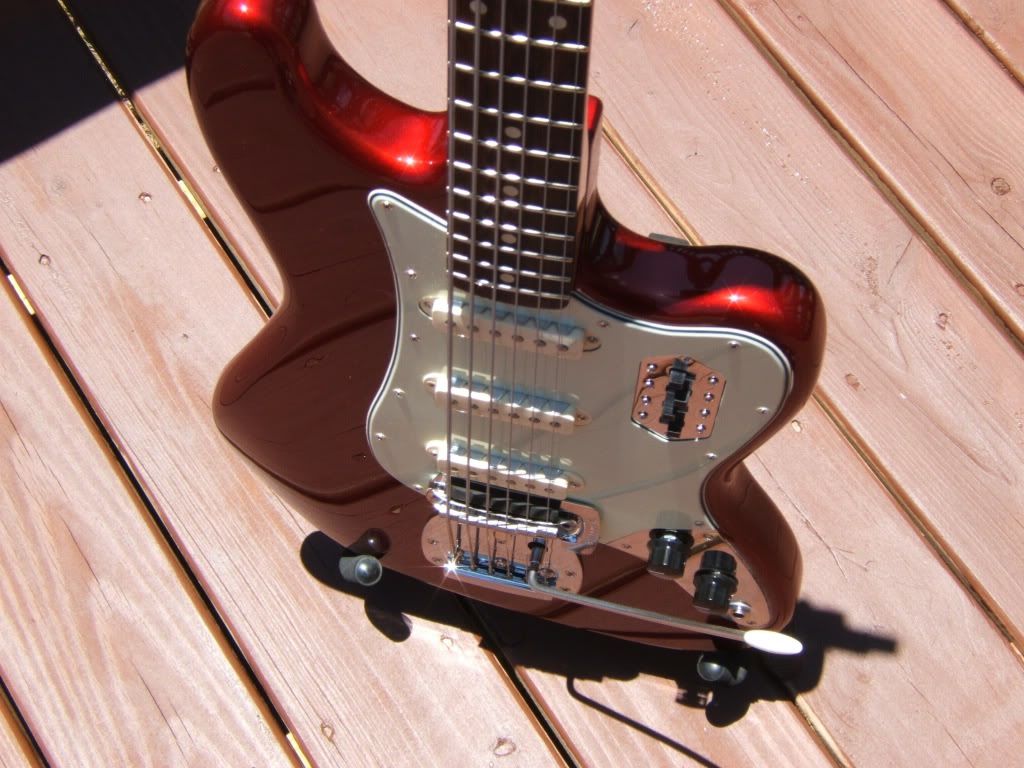
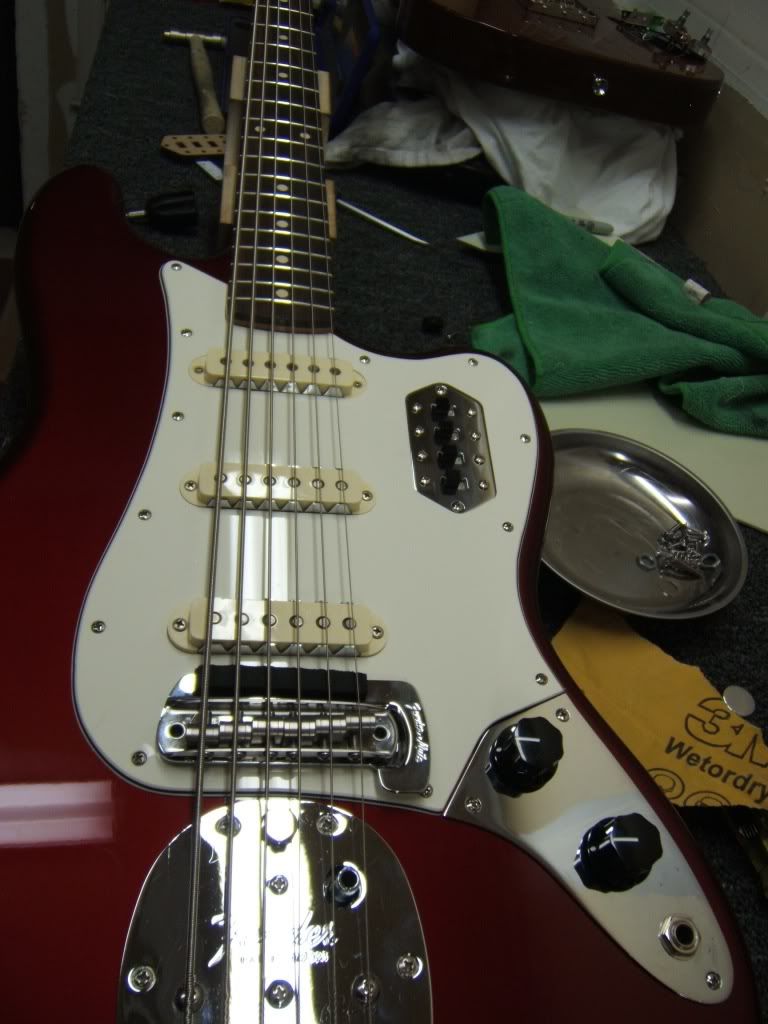
Ok it's been a long time coming but I've finally designed a conversion pickguard for the Pawnshop Bass VI. It took some time as it had to be designed from scratch. I was also waiting for the plates to become available again and now they are. You can get them from Marc Rutters. He doesn't have them on his site yet so you have to email him info@ruttersguitars.com. The pricing is $35.00 control plate $20.00 switch plate or $50.00 for both. I haven't quite settled on a price for the guards but will have these available in the for sale section in the next couple of days. I have ample black material and limited amounts of celluloid tort, black pearloid and parchment. The guard in the picture is mint but it's a bit too green for my tastes so i'll be sourcing a new supplier for mint (I really like eyguitars mint but their recent shipping hike has priced it out). I can do modern or vintage bevel (pictured is vintage). The guard was designed to do as little modification as possible (i.e. no body routing) so it will not be completely vintage correct. It will require some rewiring and drilling of a couple of new holes as well as swapping out the tone potentiometer for a smaller one in order to get the bottom plate to fit. Only two of the screw holes are not covered by the original guard if you are worried about returning it to original condition. I will offer the three jag pickup configuration as well as the PSVI pickup configuration.
Without further ado..


Last edited by SneakyT on Thu Jul 25, 2013 9:51 pm, edited 1 time in total.
Troy Neagle Luthiery & Custom Pickguards
Please contact me at Reverb
https://reverb.com/shop/neagle-luthier
Please contact me at Reverb
https://reverb.com/shop/neagle-luthier
-
017493816
- PAT. # 2.972.923
- Posts: 2590
- Joined: Tue Oct 09, 2012 5:36 pm
Re: Updated PSVI mods including Conversion Guard, bridge, mu
Oh Lawdy. Mm. Mmm. MmmmmmmmmmmmmmamamamamaLUST.

Umm... Can I play it?
Umm... Can I play it?
-
SneakyT
- PAT. # 2.972.923
- Posts: 946
- Joined: Thu Sep 20, 2012 3:10 am
- Location: Roanoke TX
- Contact:
Re: Updated PSVI mods including Conversion Guard, bridge, mu
You can come check it out for sure.
Troy Neagle Luthiery & Custom Pickguards
Please contact me at Reverb
https://reverb.com/shop/neagle-luthier
Please contact me at Reverb
https://reverb.com/shop/neagle-luthier
-
017493816
- PAT. # 2.972.923
- Posts: 2590
- Joined: Tue Oct 09, 2012 5:36 pm
Re: Updated PSVI mods including Conversion Guard, bridge, mu
PM coming your way!
-
SneakyT
- PAT. # 2.972.923
- Posts: 946
- Joined: Thu Sep 20, 2012 3:10 am
- Location: Roanoke TX
- Contact:
Re: Updated PSVI mods including Conversion Guard, bridge, mu
Prices in the for sale section for guards.
Troy Neagle Luthiery & Custom Pickguards
Please contact me at Reverb
https://reverb.com/shop/neagle-luthier
Please contact me at Reverb
https://reverb.com/shop/neagle-luthier
-
SneakyT
- PAT. # 2.972.923
- Posts: 946
- Joined: Thu Sep 20, 2012 3:10 am
- Location: Roanoke TX
- Contact:
Conversion Guard install process.
As promised I am going to document the process of the conversion. No one took me up on my offer of a free install so I'll just be taking mine back apart and installing my new parchment guard as I was not too happy with the mint stock that I got.
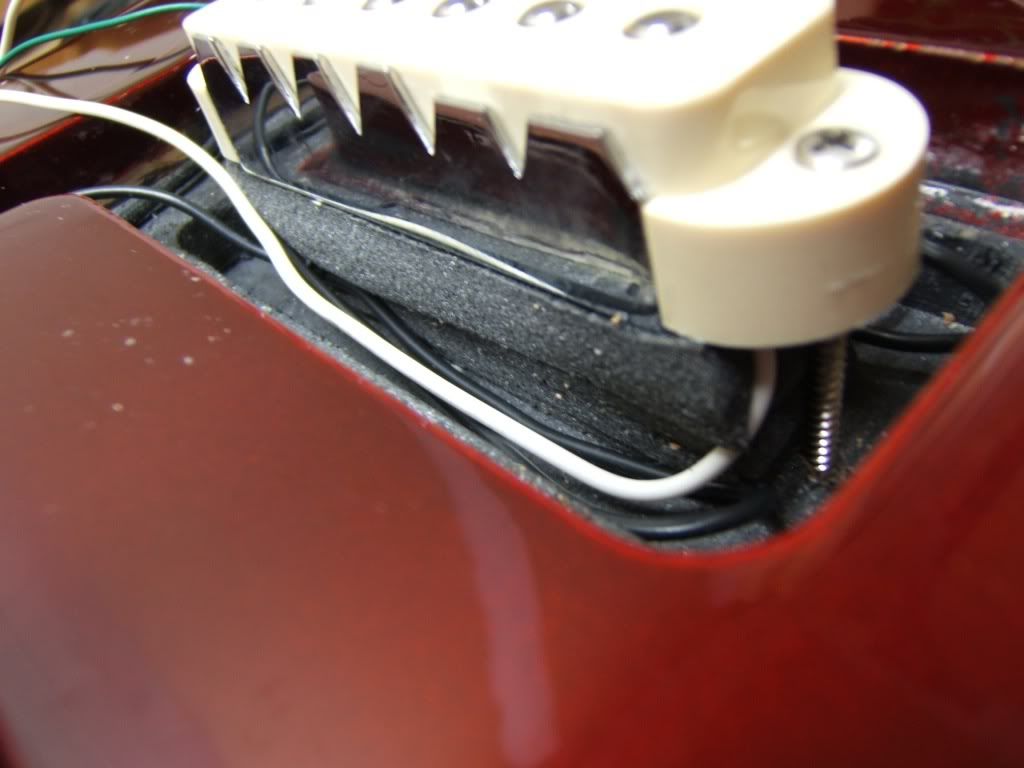
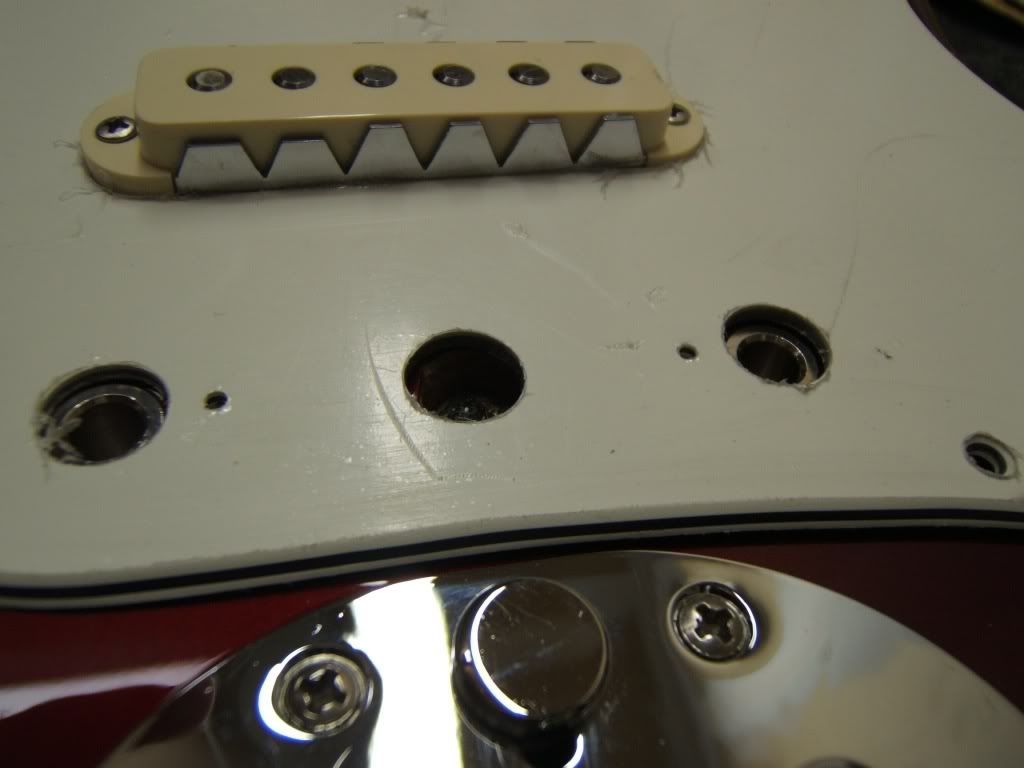
First thing to do is remove the old guard and de-solder all of the pickups from the 5-way . Next remove the humbucker and put the new guard over the two left over pickups. Take the time to make sure all the screw holes line up. With that in place you can take the new single coil and push it into place in the empty hole. The new guard should hold it in place but if not go ahead and put some foam behind it to keep it from falling into the cavity. Once it is in place dill the new holes with a 5/64 bit.
Remove the guard and install the foam and screw it down. I use thick adehasive backed weather stripping foam from the local home improvement place. It will take quite a bit due to the large route for the old humbucker. Make sure to use enough to keep it stiff as it can become microphonic if not.
I took the opportunity to centralize my grounds. I used the lug that they used to ground the cavity paint. All of my pickups grounds and pot ground went there and the green wire is for the new switch plate. The small foil piece is to ground the shielding on the guard.
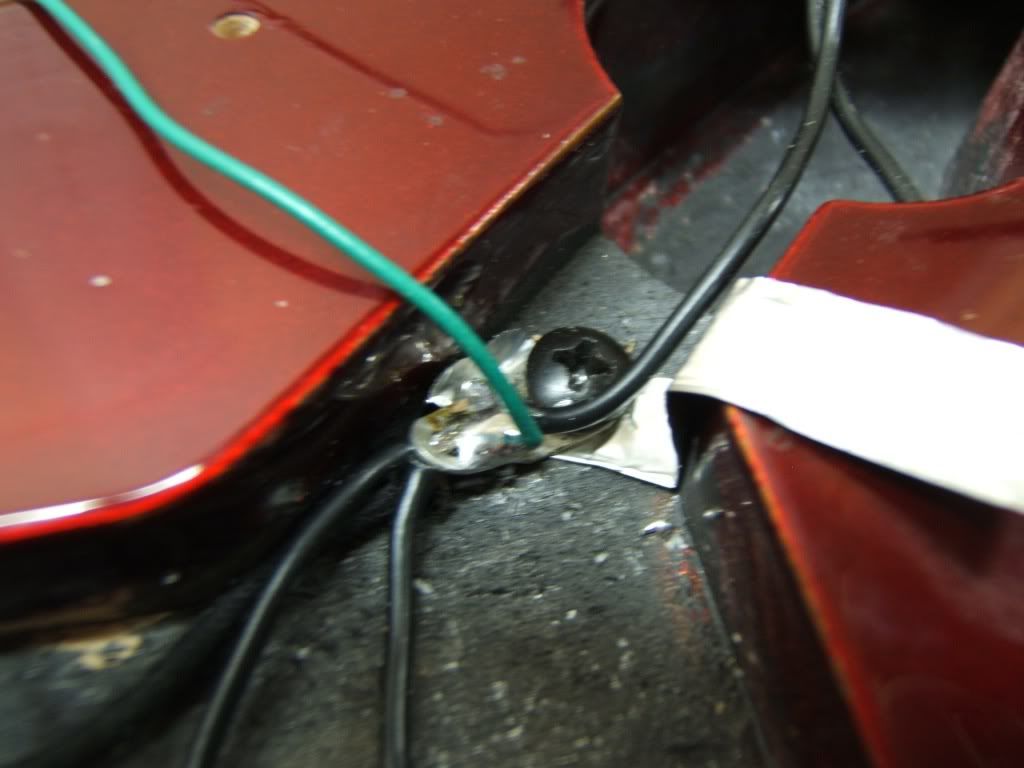
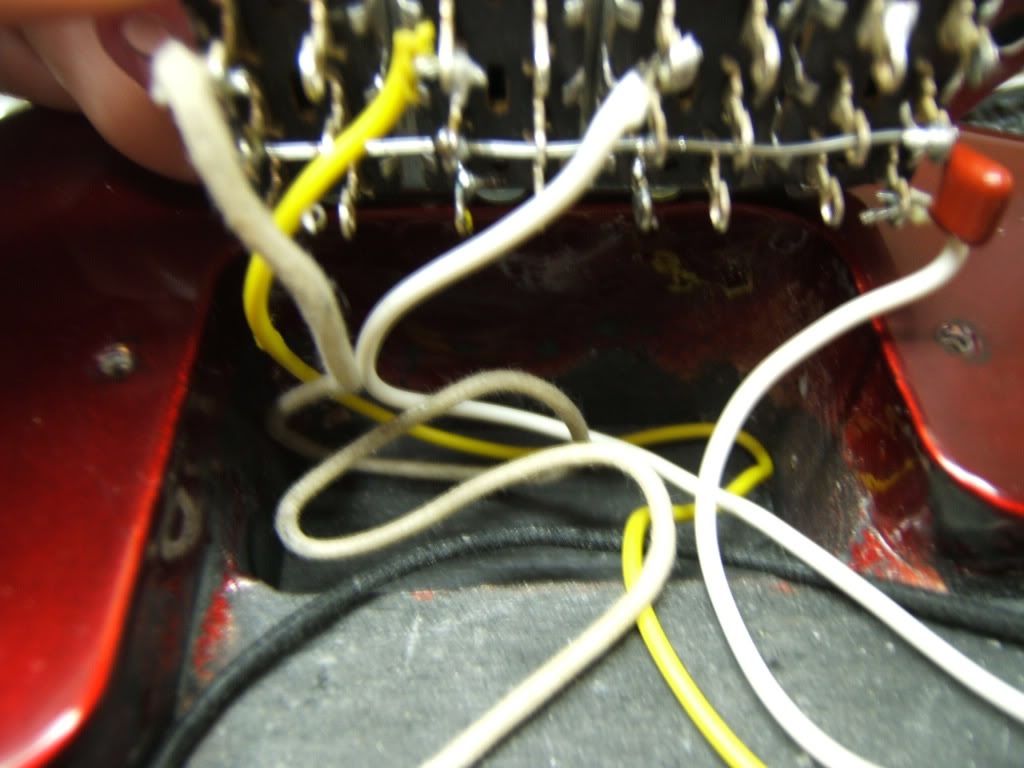
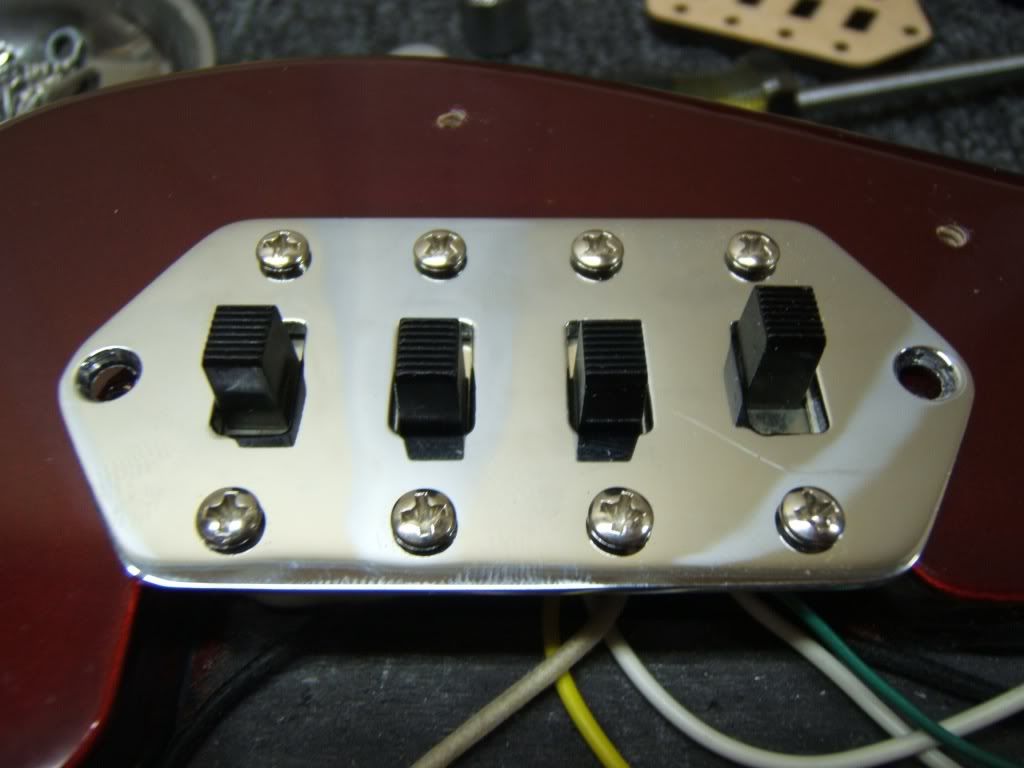
Install the switches into the new plate and solder the leads from the pickup. The green ground wire is is just wired to casing of the switch (the picture kinda makes it look like its soldered to a lug as well, it's not)

This is shown with the fourth switch wired for "strangle".

There are other options as well like this.

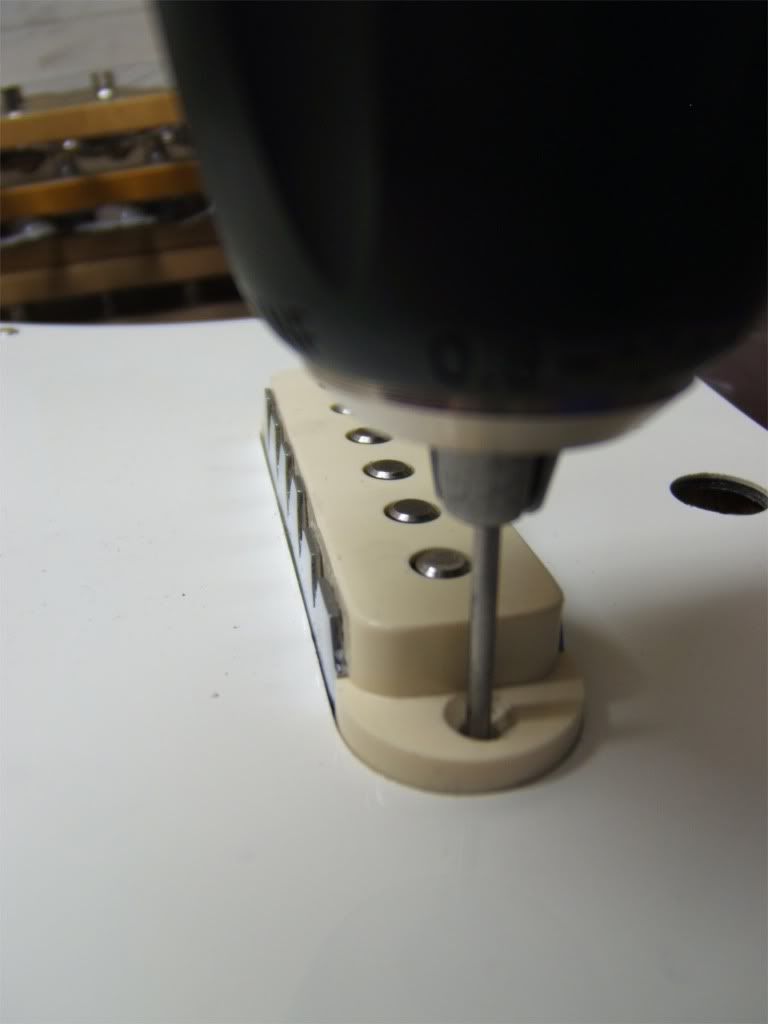
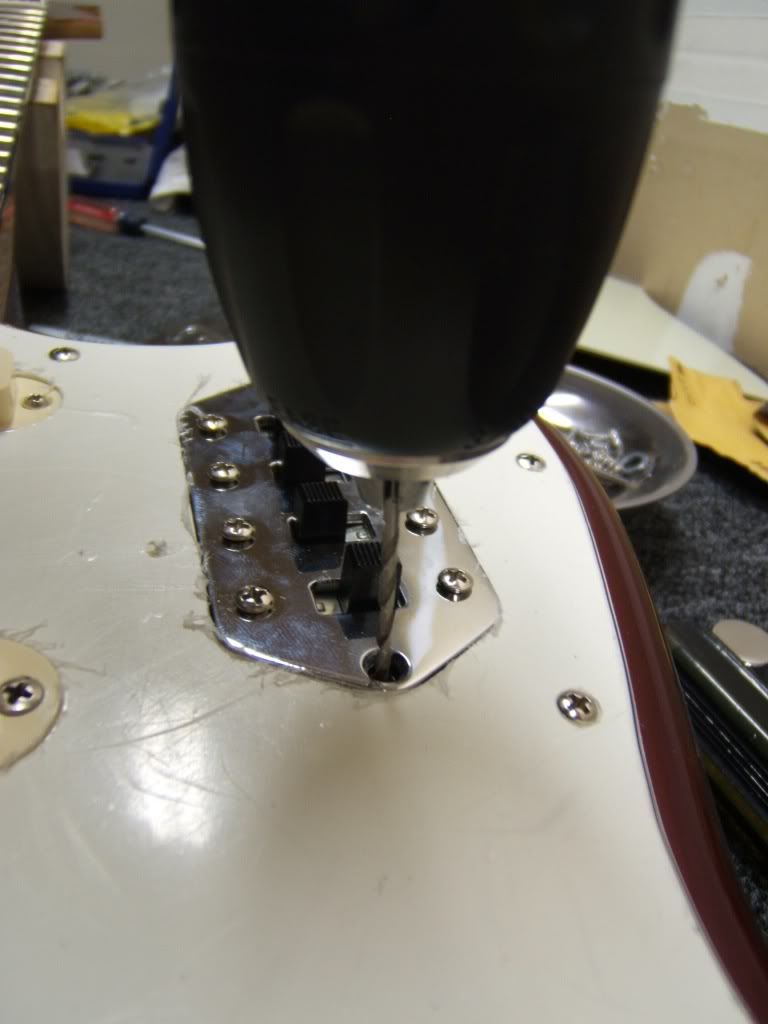
Once it is wired push all of your extra leads into the switch cavity and just set the switch plate in the cavity. Don't drill it yet (mine shows to be drilled because I already had it installed before documenting this).
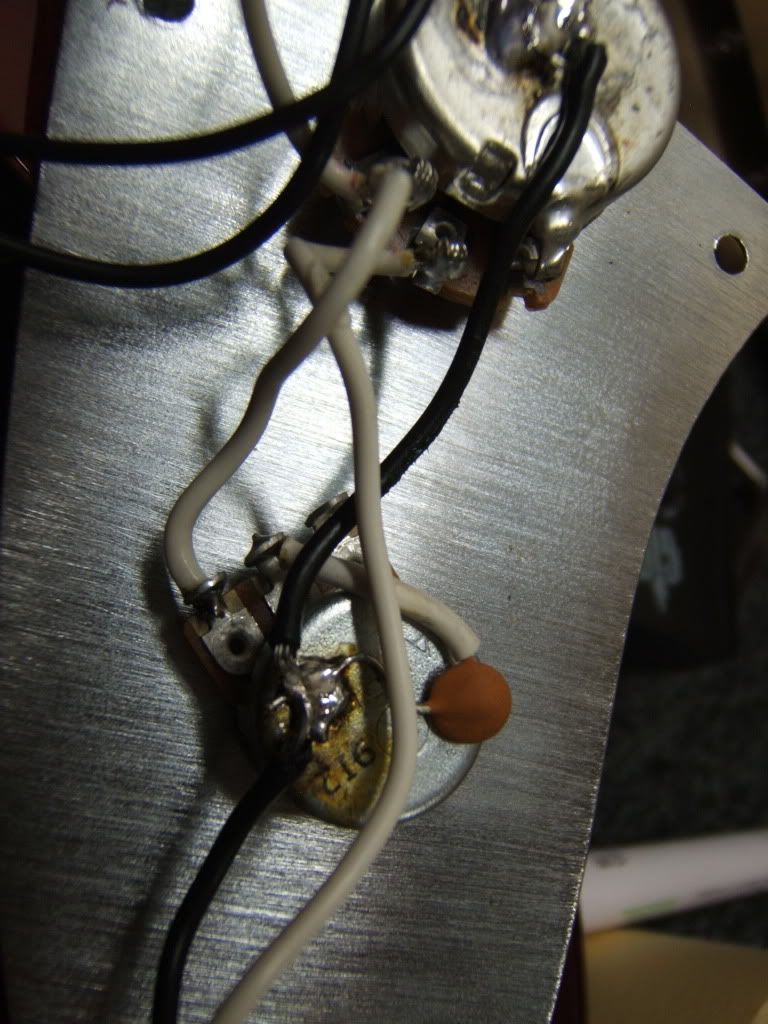
Now wire up the lower control plate.
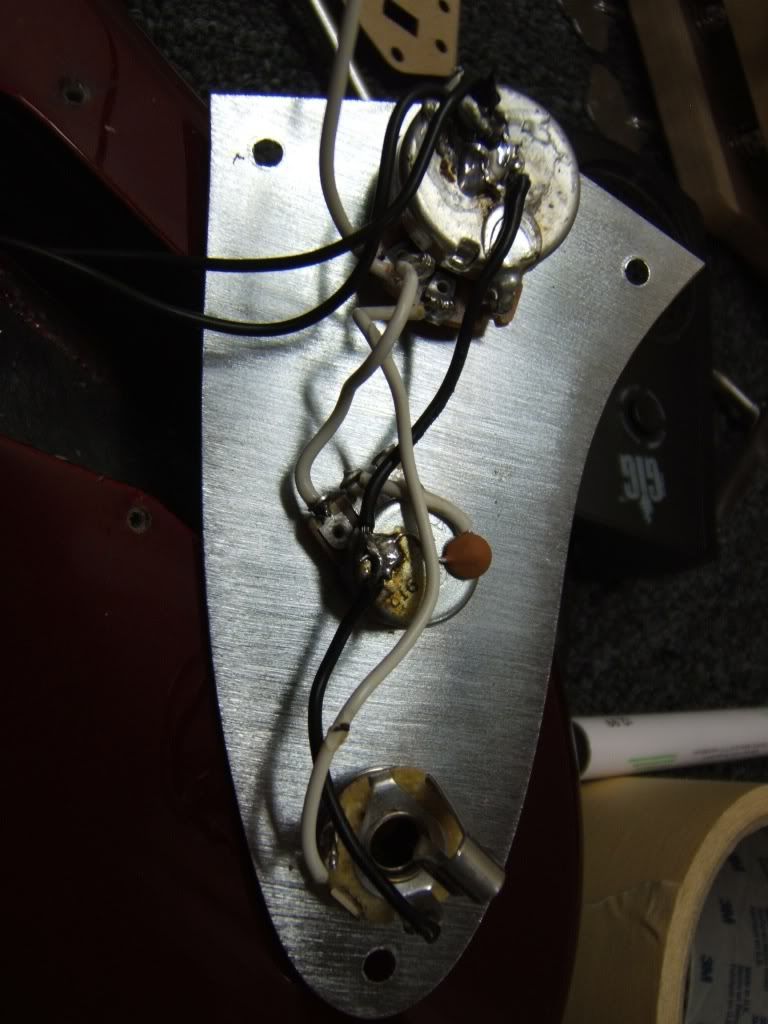
You will need to use a small pot for the tone pot due to cavity space constraints.
You should also make sure the jack is positioned with the tip connection facing away from the edge of the cavity.
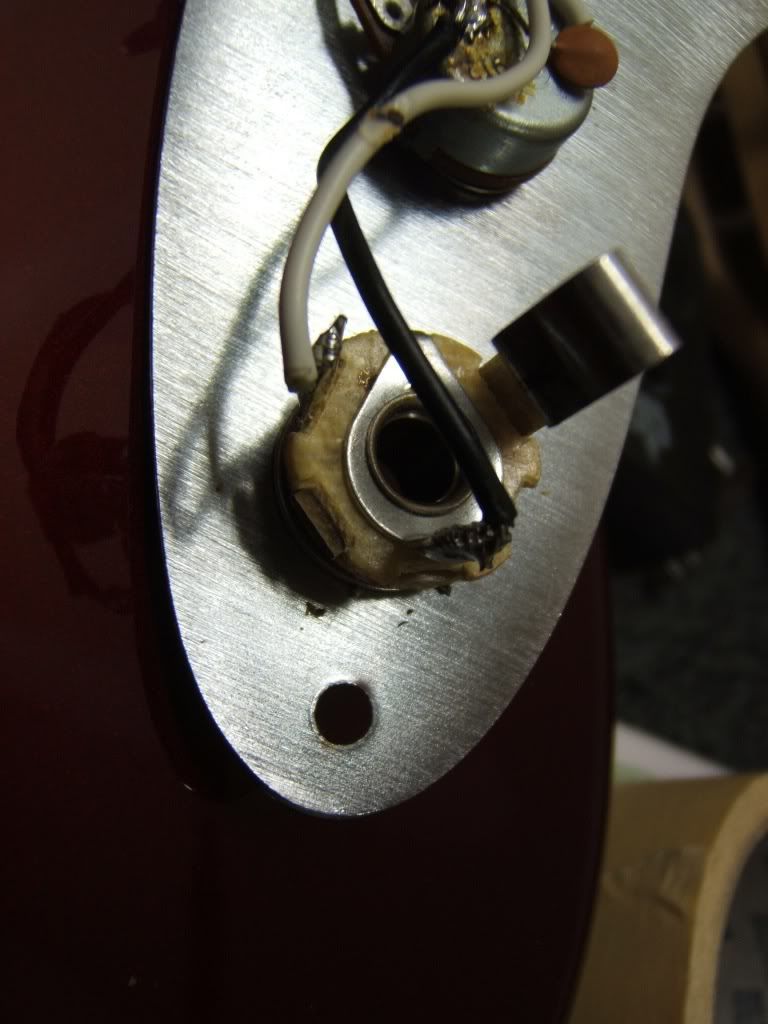
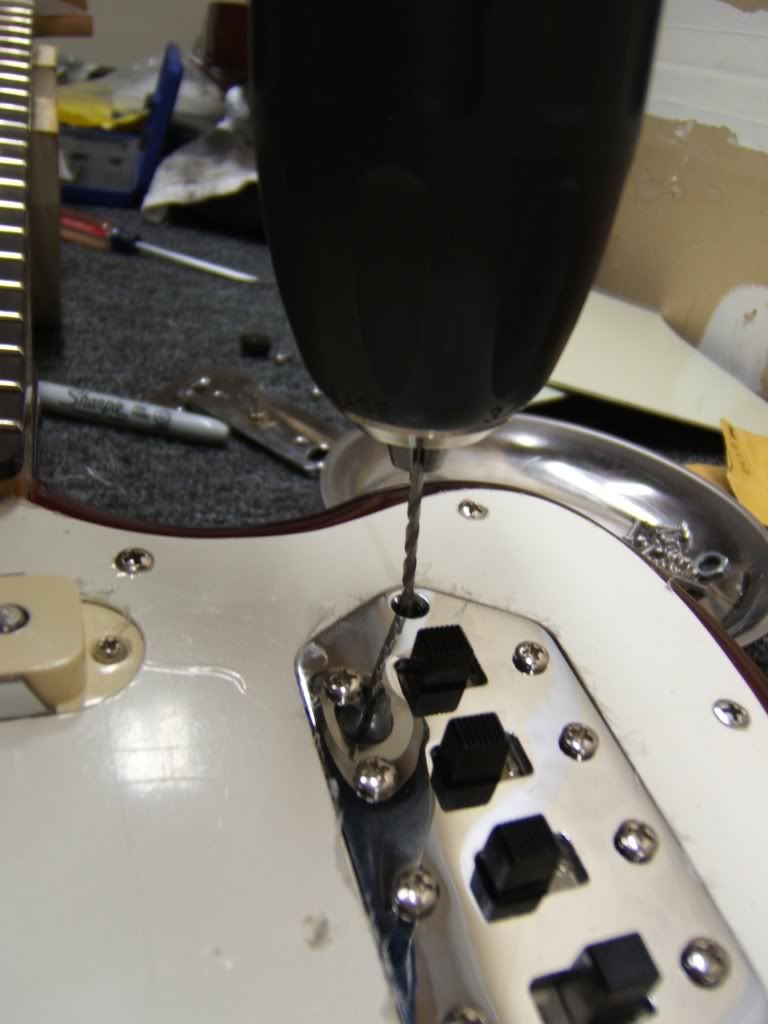
Again just set the lower control plate in place. Don't drill yet.
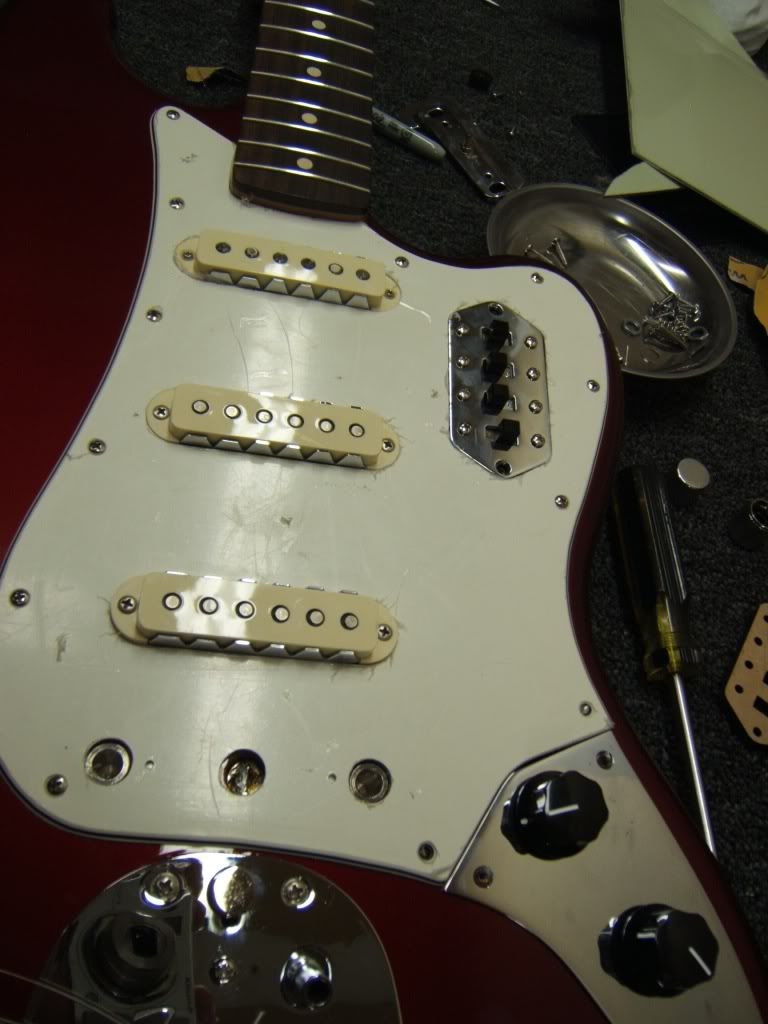
Now position the new guard in place and install all the screws that have pre-existing holes. That includes the bottom screw on the lower control plate.
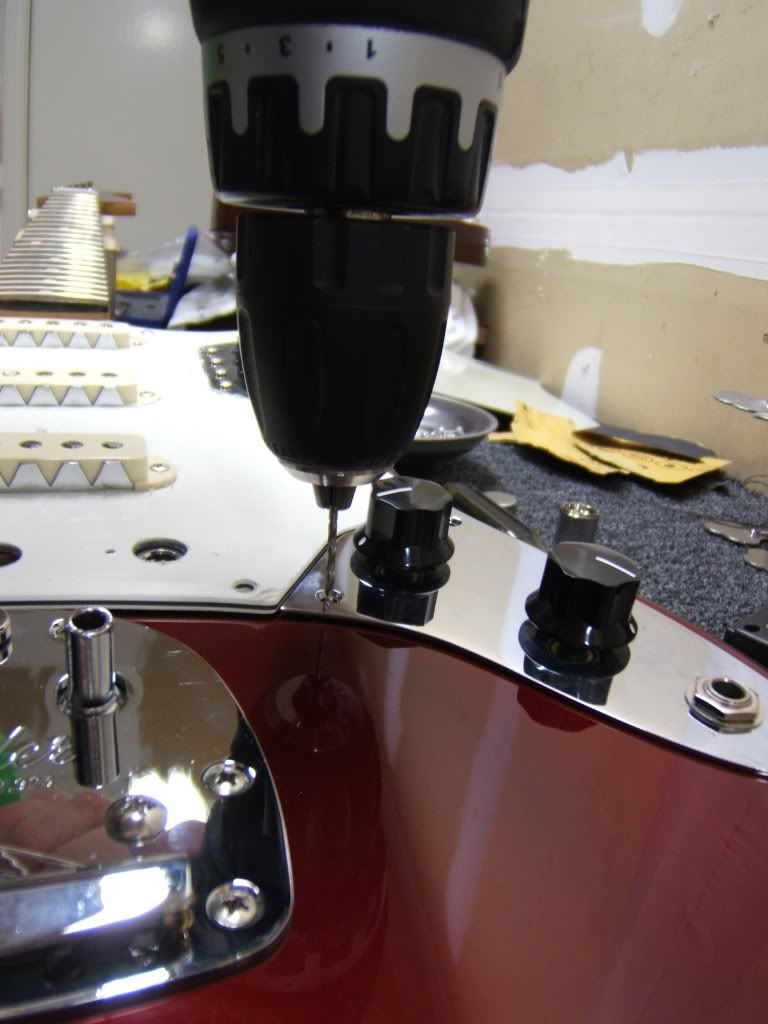
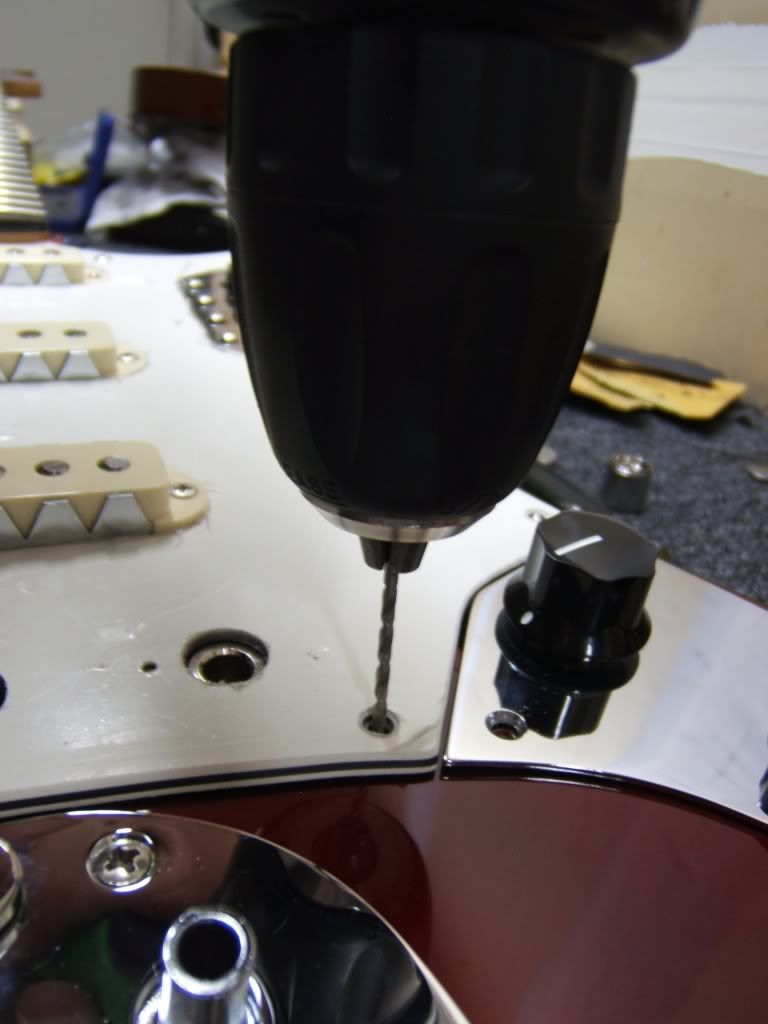
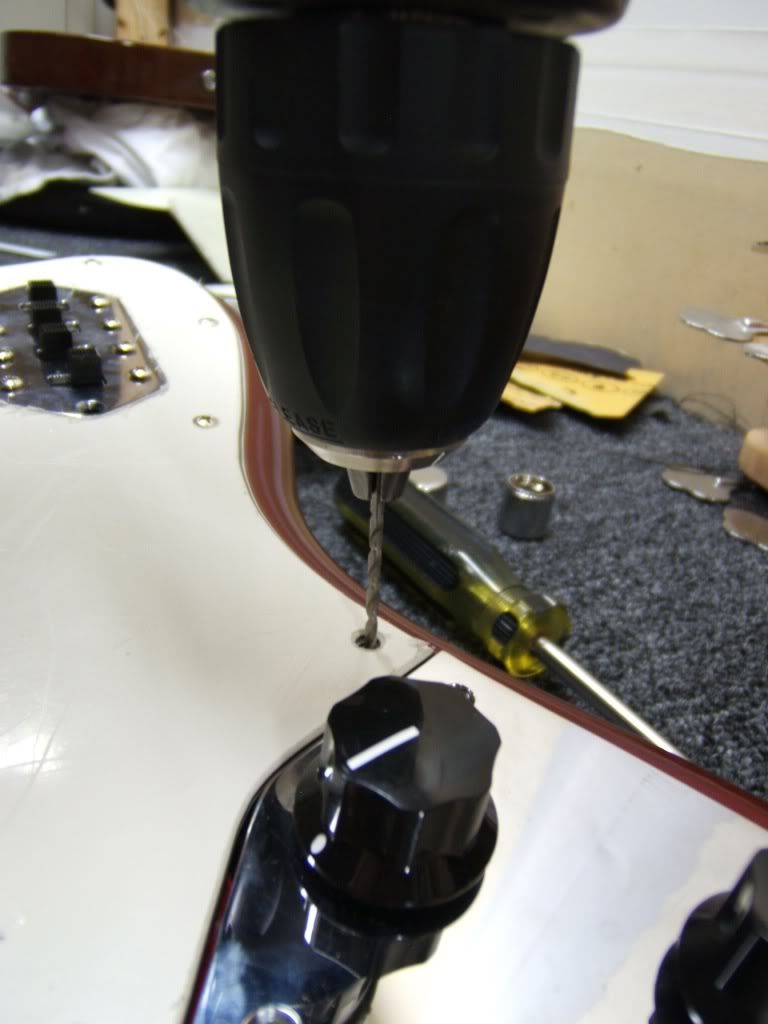
Move both of the plates till they line up then drill the new holes with a 5/64 drill bit.
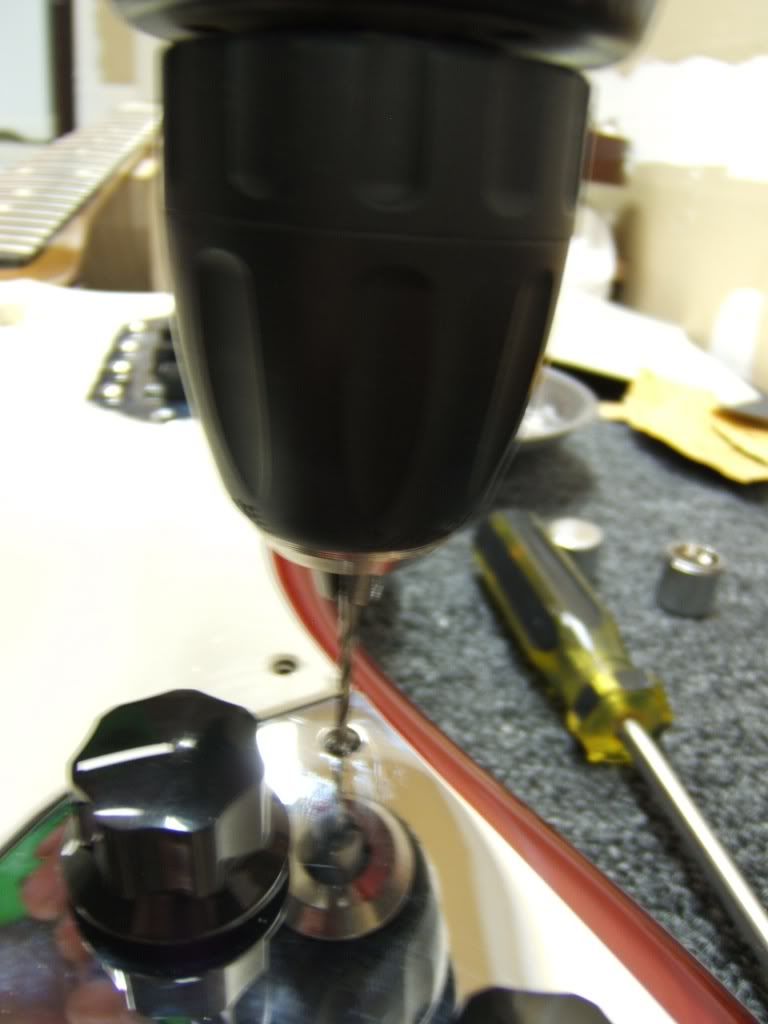
Install the last six screws
If you want to install a mute this would be a good time as the guard has the hole for one.
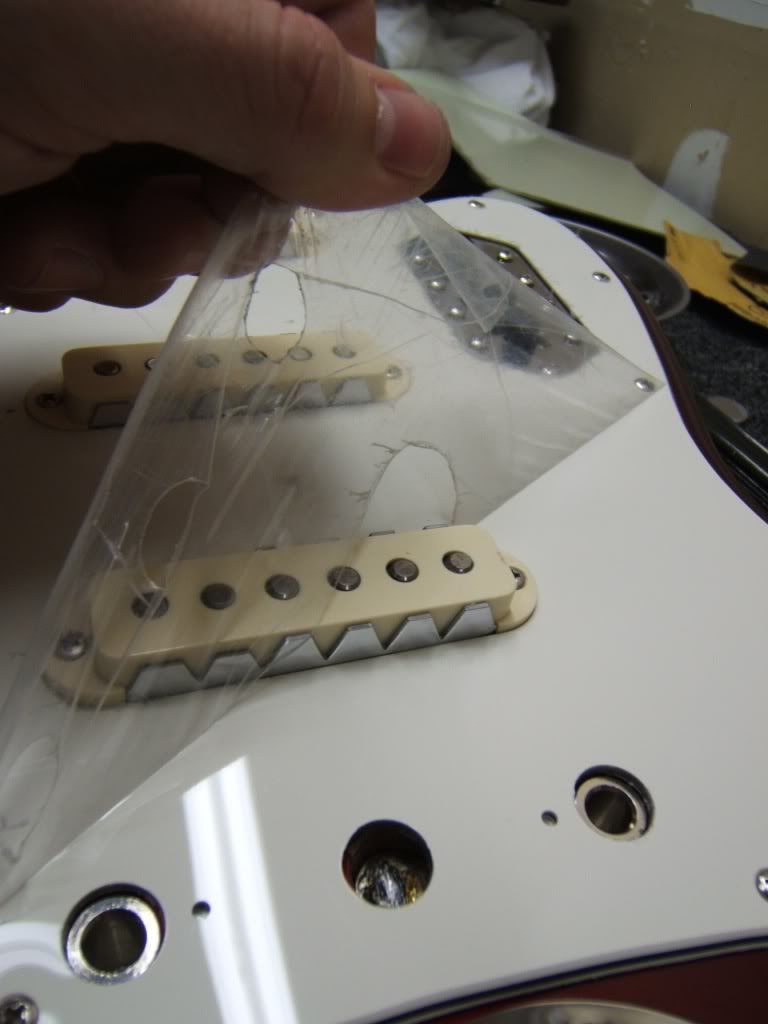
Remove the protective film.
Put bridge back on and restring.
First thing to do is remove the old guard and de-solder all of the pickups from the 5-way . Next remove the humbucker and put the new guard over the two left over pickups. Take the time to make sure all the screw holes line up. With that in place you can take the new single coil and push it into place in the empty hole. The new guard should hold it in place but if not go ahead and put some foam behind it to keep it from falling into the cavity. Once it is in place dill the new holes with a 5/64 bit.
Remove the guard and install the foam and screw it down. I use thick adehasive backed weather stripping foam from the local home improvement place. It will take quite a bit due to the large route for the old humbucker. Make sure to use enough to keep it stiff as it can become microphonic if not.
I took the opportunity to centralize my grounds. I used the lug that they used to ground the cavity paint. All of my pickups grounds and pot ground went there and the green wire is for the new switch plate. The small foil piece is to ground the shielding on the guard.
Install the switches into the new plate and solder the leads from the pickup. The green ground wire is is just wired to casing of the switch (the picture kinda makes it look like its soldered to a lug as well, it's not)
This is shown with the fourth switch wired for "strangle".
There are other options as well like this.
Once it is wired push all of your extra leads into the switch cavity and just set the switch plate in the cavity. Don't drill it yet (mine shows to be drilled because I already had it installed before documenting this).
Now wire up the lower control plate.
You will need to use a small pot for the tone pot due to cavity space constraints.
You should also make sure the jack is positioned with the tip connection facing away from the edge of the cavity.
Again just set the lower control plate in place. Don't drill yet.
Now position the new guard in place and install all the screws that have pre-existing holes. That includes the bottom screw on the lower control plate.
Move both of the plates till they line up then drill the new holes with a 5/64 drill bit.
Install the last six screws
If you want to install a mute this would be a good time as the guard has the hole for one.
Remove the protective film.
Put bridge back on and restring.
Last edited by SneakyT on Thu Dec 11, 2014 7:39 am, edited 1 time in total.
Troy Neagle Luthiery & Custom Pickguards
Please contact me at Reverb
https://reverb.com/shop/neagle-luthier
Please contact me at Reverb
https://reverb.com/shop/neagle-luthier