Background:
After reading about JETSET’s “Long neck 3 pickup Jaguar” project here on the forum, I decided to build one myself. I love Stratocasters and Jaguars and making a hybrid of the two seemed like a great project to work on. This was not going to be a “project on a budget” and as I had no time restraints I decided to see if I could create a guitar that had all the good things that I liked about strats and jags.
Another reason for doing this project, which has been on a more subliminal level, is that I really like the first version of the Fender Marauder, and in a way this long neck Jaguar has some similar attributes to the Marauder.

Essentially all parts for this guitar needed to be sourced from the USA (and then shipped to Australia) and after some discussions with John (Jetset), US Custom Guitars was where I ordered the body and the neck.
The hardware was from Angela’s and Guitar Parts Resource. The strat pick ups were specially made for me by Curtis Novak. The pick guard was sourced from Pickguardian. Painting/finishing was from a local guitar painter here in Melbourne. Neck and body routing/modifications were done by me with the assistance of my father and a good friend Carl. [it’s always good to have people you know who know about wood / machining].
Doug (Fullerplast) put me onto an ebay seller who has blemished Fender cases which are superb. The decal came from friends who shall remain nameless. A number of vintage parts were used, but this was kept to a minimum, as it was not intended to be anything but a modern creation.
John (Jetset) created the first one of these which lead to this project, I thank him for a gem of an idea.
Sourcing Parts – Hardware
Basically everything you want can be sourced from Angelas or Guitar Parts Resource. For overseas buyers Angelas charges a large "minimum shipping charge" even if you are buy a single volume pot, so when buying from Angelas do your homework and order a large amount, once, then the shipping costs can be amortized over a large number of parts. [Although I will say if you contact Steve at Angelas like I have on a few occasions and said that all I want is this small xyz part and please ship it USPS First-Class Mail rather than GLOBAL EXPRESS, he has done it. Steve is always friendly to deal with.]
Guitar Parts Resource (GPR) on the other hand charges a flat rate (no matter the size/weight) of US$5.95 for shipping overseas. (except for large item like bodies) so I had no problem with ordering numerous times from GPR as I would spend more in petrol just looking for these parts (if they were available here) anyway.
Basically you really need both GPR and Angelas (or some other parts seller) as not one place had all the parts required.
[Edit 3 June 07: I need to re-evaluate my comments. I would now recommend very strongly that you purchase as much as you can from Angelas. GPR has just added a US$25 up charge ontop of the postage they charge, if your order is over US$100 and it is shipped outside of the USA. The person who runs GPR appears far from communitive and when emails do arrive they contain very strange accusations and do not address the issues at hand. For your own sanity, go for one big order of parts through Angelas.
2nd Edit 20 June 07: I've just had a personal experience of GPR's new postal regime. If you order more than $100 worth of goods and pay for it on line GPR's checkout system does not account for the fact that you are overseas and the goods cost more than $100 and only charges $5.95 for postage. A day later I received an email/Paypal invoice for an additional $25 to cover GLOBAL EXPRESS postage. This $25 is ontop of the already paid US$5.95.
When I questioned GPR as to why I was being charged this extra $25 and explained that the checkout system did not say I had to pay it, I was rudely informed that I had to go searching for some link in the GPR site and click on the overseas/greater than $100 link and this will add it to the checkout button. It would have been nice to know this before I ordered the items
When I requested that I would like the order split into 3 "smaller than $100" lots, the return email from GPR was full of accusations implying that I was wroughting her postal charges ... wtf ... I was also informed that the up charge of $25 gave me the insurance factor and the delivery time of 3 - 5 days anywhere in the world. I informed GPR that I have no need of insurrance ... ever tried getting your money out of the postal/courier companies ... and that GLOBAL EXPRESS is no quicker as it travels on exactly the same aircraft as normal airmail
13 days after I had received the notification from GLOBAL EXPRESS that my package had entered their system the parts arrived. Plus GPR had only insured the items for $99, rather than the $265 which I was charged
For peace of mind, go with Angelas rather than GPR]
Hardware was the same as that used on the American Vintage Jaguar. It is interesting to note that the repro Kluson tuners used for the AV series are actually manufactured in Japan.
Vintage style cloth covered wire was from Angelas and can be bought in any lengths you desire in colours of white/black/green/red/yellow/blue. As it is near impossible to locate this type of wire here in Australia I bought enough to last a lifetime.

The upper bout Rhythm controls were to be the same as that of a standard AV Jaguar and can be bought off the shelf already wired … essentially plug and play.
The pick up selector control for the lower bought can also be purchased already wired (including the earth connector tab and the black insulation gasket) or the chrome plate and switches can be purchased as separate items. I was uncertain however whether the black insulation gasket came with the chrome plate or where the earth connector tab could be bought, so I again went with the pre-wired pickup selector plate and switches. I did however also purchase some loose switches “just incase” which as it turned out was quite fortuitous.
When I received the pre-wired pickup selector plate and switches from GPR, two of the switches were dodgy. I informed GPR of the problem with two of the switches, purely for his own info and with no desire for any refund (I had purchased a large number of items and this was the only issue with any of them). I received the following response from GPR:
“That is 100 percent not true. There is no chance you got two bad switches...those are US made switches”.
This response just blew me away, I was totally amazed how he could tell from 12,000 miles away that the switches I had in my hand were 100% true. Plus the fact that because they were made in the USA, it allows them never to have any chance of any failures was totally incredible. I must tell my colleagues at GM in Detroit to contact GPR so we can improve the quality of the vehicles we make.
I followed up his reply with the following … which I felt was sufficient:
If you are ordering parts like this, especially from overseas, expect that some will not be working correctly, the right part or just not there. Both Angela’s and GPR have shipped orders to me, when only part of the order could be filled, letting me know by email after the order was sent. This resulted in additional postage/time being wasted trying to locate the item (or an alternate item). Again beware.“I don't want to argue about this and for the record I will order other stuff from you when I need it... but.... I just am letting you know two of the switches are dodgy. One just slips up and down with no "click" and the other just "clicks" in one direction and is stiff in the other. I have the control plate and switches right in front of me now and they are as I have said they are. It's got nothing to do with being made in or out of the USA, I am just telling you what I have seen/felt/heard when I opened up the package and looked at the parts. “

I bought a couple of dozen star washes, “vanity” washes and nuts that are just good to have spare in your parts box.
This leads to screws. Sourcing screws can be a minefield, both in deciding which screws are correct and what colour you want. I had previously sourced a bucket load of pickguard screws so I did not need to get any this time, but depending upon whether you go for the vintage, modern, alternate, republican, democrat type pickguard screws they can be chrome coloured, dark chrome coloured, nickel or even stainless steel. So have a think about what colour you want before handing over the $$$.
Mounting screws for the hardware items was also a pain. The screws that came with AV trem unit had the correct rounded head, but had a thread all the way up the shank. The heads were also slightly smaller than those used on vintage offsets from the 60s and seemed to sit “in” the trem unit screw holes. Also available (from Angelas) were screws purporting to be genuine Fender Offset trem mounting screws. These had a section of the shank without thread, similar to what was used in the 60s and the head was ever so slightly larger than those used in the 60s. I felt the latter ones fitted into the trem unit better, so they were selected to be used.

The mounting screws that came with the trem unit (but not used for that purpose) were used for mounting the mute.

The mute unit I purchased from GPR only came with the screw in the center. No mounting screws, foam, slug or screws were included. The foam can be found on the GPR website, as can the slug, but the spring is as scarce as rocking horse shit. In the end I sourced a spring from work (I believe it is from GMs HFV6 engine) and enlarged the hole in the slug to accommodate it.

AV bridge was used, along with AV thimbles. However I dislike the look of the AV bridge cover, so I selected a vintage bridge cover from my stash.

Angelas still has some NOS vintage brass pieces for the upper and lower bouts, which I used. For the main volume/tone control cavity I used a Japanese repro brass piece. For the additional routing that is required to interconnect the PUPs, PUP switches and main volume/tone routes, I used a second Japanese repro brass piece and shaped it to fit the smaller routing.
There are plenty of neck plates available from Fender, but most have the hole for the tilt feature, which this neck did not have (I will use the standard shim method). So for a four bolt neck the plates that are suitable are either AV neck plates with the “F” logo or modern Jazz bass neck plates, which have Corona on them. I personally have no issue with fitting a modern (new) Fender neck plate as the design of the guitar is based on a Jaguar/Jazzmaster, most of the hardware is Fender and besides, I am never going to sell the guitar. Still haven’t decided which plate I will use. There is also a choice of chrome or nickel neck screws.

Sourcing Parts – plastic parts
Sourcing the plastic components also requires some thought, as there are usually a number of colours available: white, parchment, cream (vintage) white, mint green. Not all are available in each part though.

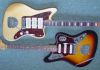
I had selected Shell Pink (or as my guitarist likes to call it “light nipple pink”) as the colour for the guitar. For once I actually liked the colour sample Fender had on their web site. Having not fully decided as to which combo of colours I would use with the shell pink finish, I bought a set of each colour of the pup covers and trem tip.

The pickguard was totally another matter. The guard that Jetset had used on his guitar was the result of his modification of an existing Jazzmaster guard to fit to the 3 Strat pup style configuration. Jetset had eventually provided the Pickguardian with a template and had one made up. I contacted Tony Dudzik at the Pickguardian and he informed me that he still had the template that Jetset had sent him. So I asked him to make me three guards, one white, one mint green and one parchment colour (this last colour is real nitrocellulose). In addition to the routing / mounting hole placements I also asked for the little curved notch to allow access to the truss rod, plus holes for the mute slug and mounting screws. [I had no idea whether there was enough space to fit a mute between the bridge and the angled stratocaster pickup. If there wasn’t enough room, the whole in the guard for the mute slug would be covered by the bridge anyway. As it turned out there was plenty of room for fitment of the mute.]
Tony Dudzik was extremely helpful and the guards arrived 3 weeks later (including however long it took to fly across the Pacific Ocean). The standard plastic material guards were US$35 each and the nitro guard was US$45

The guards fitted perfectly to the body routes and neck pocket, which is not necessarily the first assumption I would have gone with given that they are made from a template supplied by someone else based on a body he had and not the body I have.
I did have to spend some time sanding out the hole for the 3 PUP switch plate as it was a little tight in each of the three guards, but this was no big deal. Just sat down and watched my Get Smart DVDs with a guard in one hand and some 800 grit paper in the other. I am also a bit unsure about the lower bridge PUP mounting screw hole. It appears to be too off centre, but things seemed to line up ok, so no further mods were required.
Sourcing Parts – Pickups and pots
I already have 3 Jaguars and seven strats, so I didn’t want to build a long neck Jaguar and just use “normal” Jaguar PUPs. So I asked Curtis Novak make me some special stratocaster pickups which have the quack and twang of a great strat sound, plus the colour and intensity of the Jaguar sound. I didn’t care what magnets, wire type, wire gauge or whether he swung a dead chicken over the pups or even if he shaved his beard off before he wound them. I just cared for the sound. [if you are interested … the sound of Steve Gaines strat in the Lynyrd Skynyrd track “I Never Dreamed” from the “Street Survivors” album is what I was looking for as far as the strat part of the sound. The Jaguar part of the sound is self evident… a jaguar it is what it is.] I also asked for the PUPs to have extra long leads to allow routing through to the PUP selector switch plate. The PUPs were US$210, which from where I am standing is a damn bargain especially for hand wound/specified PUPs. Curtis also supplied me the pots and capacitor/resistor.
Even allowing for the snow storm that the area Curtis lives in experienced, from my initial email to Curtis asking him for a quote through to actually getting the PUPs in the mail was about 4 weeks. Again from where I am standing that is amazing service. It takes Fender Australia months just to get a standard replacement part.
The mounting holes in the strat PUPs were a little narrow, so I sharpened a PUP mounting screw and use it to tap a thread into the bobbin.

Sourcing Parts – Other parts

The reissue case was bought from the ebay seller called largeal [http://search.ebay.com/_W0QQsassZlargealQQhtZ-1 ]. One of the items he sells is blemish genuine Fender cases. The blonde Jazzmaster case I received was in A1 perfect condition except for a 3mm “dent” in the blonde tolex near the handle, nothing more than what normally occurs within the first week of carting round a guitar in a case. A great deal for US$159.00.
I had two vintage style decals to choose from. One came from Europe via some unnamed friends and is an excellent decal, but with the letters of J A G U A R being a little larger than the orginals and the J of Jaguar being ever so slightly the wrong font typer The second decal came from Gordys Music via ebay and althoughit’s lettering is spaced a little closer, the front itself seems a tad thicker than the first version. In the end I chose the first version from Europe for this project.

I purchased some thin aluminium sheet, cut out a shape and had the PUP holes routed on a milling machine owned by a friend who has an engineering business. [btw the smallest sheet of aluminium I could purchase was 2m x 1.5m. Although it cost me less than the cost of a normal AV jaguar aluminium shield, and it was delivered to my front door for free, I still have enough left for another 100 guitars !!]

The shielding for the strat pup routes was cut out of a thin sheet of copper, using household scissors.
Sourcing Parts – Body & neck
The Body and neck were ordered from US Custom Guitars. Rob Stone (support@usacustomguitars.com) there was extremely helpful. After initial couple of emails discussing what USCG could and could not provide, the order went through without a hitch.
As John had found when he did his project, USCG cannot route a JM body with the control routes for a Jaguar. They haven’t set up the program in their CNC machines for this.
The choice of options for the body wood and features for the neck are quite extensive and do take a couple of hours to work through if you are not accustomed to ordering guitar necks/bodies. In particular the area for selection of fret type took me a while to understand as I have no reference in my past to the various numbers that describe the frets. [hey I’m a keyboard player] I had to cross reference the Fender site with a number of other information sites on the web to work out what numbers corresponded to what frets. In the end it worked out fine, but would have been much quicker if they had have just said “same as AmSe strats” or “same as AV jaguar”
The following are the specs of the parts ordered
Body Specs.
USA Custom Guitars Jazzymaster body with:
- Jazzymaster Trem routing
- Jazzymaster Bridge holes/thimble routing
- stratocaster style Pick-up routing (3 single coil with bridge PUP slanted)
- Wood: Alder
1 ea @ 190.00 plus shipping
Neck
Headstock - US-3
Woods - Indian Rosewood/Maple (1/4 sawn)
Scale Length - 25.5"
Nut Width - Modern 1-11/16" (42.86 mm)
Frets - 21, 6125
Contour - C, 0.830"
FB Radius - Standard USA Custom Guitars conical 7-1/4" - 9-1/2" radius
Headstock Ream - Kluson
FD/SD - cream/cream
Truss Rod Adjust - Heel
Heel - curved/rounded
Rounded edges
1 ea @ 260.00 plus shipping
As I am intended to have a matching headstock, I didn’t bother with any of the birds eye wood options.
Just a point of note, even though I requested cream side dot markings on the neck, apparently USCG only do white side dot markings
Initially Rob Stone said it would take 8 weeks to manufacture the neck and body, in the end it took just over 3 weeks and I had the body and neck here in Australia in just under 5 weeks after the first email to USCG. Again brilliant service.
Modifying / Sanding the neck
The neck that USCG created for me is a delight to hold just by itself and whether it is by design or by chance the shape of the USCG US-3 headstock allows for the headstock to be sanded into a standard Jaguar headstock shape.
But how does one create the correct shape of a Jaguar headstock ? I initially thought about tracing the headstock of one of my Jaguars, but no matter how good one is at tracing it is fraught with inaccuracies. In the end I down loaded the layout plans/drawings for the AV Jaguar as a PDF from the Fender web site. Then I extracted the headstock section of the drawing, scaled it to be 1 : 1 with the real guitar and printed it out on thick card.
Fender AV layout drawing PDF
A couple of minutes with a sharp cutting knife and a pair of scissors and I had the perfect stencil of the Jaguar headstock. Transferred it to both sides of the USCG headstock and then I was ready for the sanding to start.
In some areas of the headstock there was up to 10mm of wood that needed to be removed. Initially I thought about (and tried) using a wood file but it did not seem comfortable. I then decided to used small pieces of 100 grit sand/glass paper and a hand sanding block. Then when I got close to the stenciled line, I switched to 400 and then 800 grit glass paper. By then end I was just using 2 inch square pieces of sand paper and my thumb to get to the areas I wanted to.
I was quite concerned about getting the correct curvature on the underside of the headstock [just where the “AR” of Jaguar would be]. But I was surprised to see that when I checked my two vintage 1966 jaguars, this curvature was not exactly the same on each headstock. Further both were also marginally different to the AV jaguar I have. So mid 60s manufacturing methods had certain tolerances in them that modern CNC machines would not have.
In the end I decided to get as close to the AV Jaguar shape as possible and as long as it “looked” ok, I would be happy. To sand this complex curve area at the bottom of the headstock, I rolled up various grades of sand paper and used them in a cross hand motion, tearing off sections of the sandpaper as it became “used”, which in turn reduced the diameter of the rolled up sandpaper and allowed for a smaller radius to be sanded.
The area on top of the headstock, near the nut (where players normally stick a cigarette and burns the headstock) has some very complex 3-D curvatures and this must be sanded slowly by hand as well.
All of the effort and time (about 4.5 hours sitting on the couch watching TV and slowly sanding by hand) was worth it.


Modifying / Routing the body
I started with having to widen the holes for the bridge thimbles and the mute slug. This was relatively painless. Align the body with the drill in the drill stand and drill.

Next was the routing and this is where I hit my first road block. Like everybody I am always interested when people present guitars that have restored, modded or even built from scratch. A lot of the times over the years I have read about how great the hand tool known as a Dremel was for routing this or routing that. Maybe I miss read or misinterpreted or maybe some vital information was just left out or went over my head, but my experience with the Dremel was the worst since I bent my fathers chisels on his engineering vice when I was 8 years old.
I had this plan to use the Dremel (and a cutting bit) to cut the outline of the routes that were required, use a chisel or similar to remove the majority of the wood, then clean up the routes and achieve the correct shape using the flat bottomed Dremel routing bit. Simple plan , good plan, right up to the point where I started to burn the wood.
The Dremel is a small hand held router that uses small bits and runs up to 25 or 30,000 rpm. One of the bits I bought for the Dremel is a “cutting bit” which can be used for cutting wood, tiles, plaster board, cement sheeting. The length of the bit allows for a 35mm depth to be reached. This seemed perfect to cut the initial rough outline of the routes in the body.
The actual (flat bottomed) routing bits have only a 10 – 15 mm depth but could easily be used with the smaller hand adapter to get to the bottom of the routes to “clean things up”
I also purchased from StewMac an adapter for mounting the Dremel in which allows for a more precise method of setting the height of the routes being cut and assists in holding/moving the Dremel. The adapter is a neat unit, well designed/manufactured.

I thought I’d start on some scrap wood first to get used to the Dremel. Some soft pine was chosen, I traced the brass plate for the upper rhythm circuit and started to cut the shape. That’s where the wheels fell off the wagon.
The cutting bit I was using, while great for cutting through walls, masonry or tiles, only seems to work if you are continually pulling in and out the bit to allow the wood dust to be removed. So if you imagine someone making a hole in a wall for a new light switch, they would use this bit to cut the hole in the wall and use it almost like a saw. Pushing and pulling.
However in my plan, I wanted to push the bit sideways, which didn’t allow for the removal of the saw dust. So the dust got jammed into the thread of the bit, then it started to burn. At this point I didn’t need to be hit on the back of the head with a piece of 2x1, I knew my plan wasn’t working. I tried this for a couple of hours, my father also tried with similar results. The cutting bit just didn’t cut the muster.
Plan B was then to just use the routing bit, because surely routing bits are designed to be pushed sideways … that’s their want in life. But again after an hour of this, the routing bit was blackened.


I have obviously not understood or appreciated the finer points of what others have done, as I could not use the Dremel to route the required routes in the scrap piece of wood, let alone even attempt anything on the body. So the Dremel is now on my shelf in my spare room, ready for when I want to install a new light switch or engrave my name onto the back of the headstock of the next 60s vintage guitar I buy.
I toyed for a few days with the idea of using the “normal” size router that my father has, until I spoke to my friend who had routed the PUP holes on the aluminium shield.
So it was decided Carl would write a program to automatically mill the required routes on the guitar body using his CNC mill.
===============================
Well it is now the middle of June 2007 and my friend Carl has his CNC mill up and working. His wife is away over the weekend which will allow us to spend some time routing the body.
The first thing is to take a digital photo of the body with a steel rule placed upon it for reference. Then the body is digitised along with the penciled in routes. It is this whole process of building up a computer model of the body and the require routes which takes most of the time, However time spent getting this part of the process correct, saved time and tears later.


The body is affixed to the bed plate via metal discs which are then braced back to the plate. Making sure the body was in the correct alignment with the plate was achieve by an iterative process of running the milling program a number of times with out the cutting bit being lower. [next time besides selection of one of the bridge leg holes as the zero point, we shall also mark one of the neck screw holes as another “known point”. This will allow a quicker alignment of the body]

The lower route for the pickup switches was worked on first. Oil dripped from the mill onto the body (which scared the crap out of me). It was wiped off quickly and looks 100x worse in this flash photo than it really is. [rubbing with a tissue and sanding with 1600 grit later removed the surface traces]. Again for future reference I now know to let the mill operate for 5 or 10 minutes before the system will move the oil around and stop dripping any oil.
It was really exciting (I know I don’t have a life …) watching the mill route the hole, layer by layer. The result was a perfect fit for the switch plate.

The remaining routes were then worked upon, again after checking the alignment via a dummy run through of the milling program.


After the routing was completed, the connecting holes were drilled using a 30cm long 8mm wide bit which Carl just happen to have in his workshop. (This was especiallay useful for drilling the hole from the trem route to the main control route.)


Time spent routing, including coffee and lunch break : 6.5 hours ... a good days work
So the body and neck are ready for painting. This will have to wait a month or three as the guy I am getting to paint the body / neck does not do any nitro spraying in winter as the nitro goes milky. So I will have to wait until it warms up a bit… thank goodness for global warning.
==============================================================
Updated October 2007
Fitting Pickups to the guard
Next the pickups were fitted to the guard. I have elected to use the parchment guard as it will have a nice contrast with the yellowed PUP covers. The strat PUPs are secured to the guard via the the screws which self tap into the PUP bobbins. One can use either surgical tubing method (1950 – 1960, 1990 - ) or spring method (1970s) of fitment.
As the PUPs will have to be raised quite high because in the Jaguar the strings are set higher than Strat strings are above the guard, I felt it was best to use the springs as these have a constant spring coefficient (k), where as the surgical tubing will tend to get much stiffer (non linear) as the PUPs are raised high in the guard and the tubing is squished (thats's a technical term).


Painting
Prior to sending out the neck and body for painting [something that I may try myself in the distant future, but at this stage I do not have the clean dust free area, spare time or the ready access to paints], I decided to stick the neck with the body and tried them out in the case I had recently purchased for the guitar. While doing this I noticed something unusual ... the floor of the neck pocket is not parallel with the top and bottom surfaces of the guitar body, which produces a slight break angle of the neck to the body. This partially achieves what the shims do when normally fitted. I contacted John (Jetset) and asked whether he had seen the same in his "longneck" and he confirmed he had, so it must be a standard "thing" with USCG. John also noted that he fitted a shim anyway to the guitar.
Also noted was the fact that the truss rod in this USCG neck is actually quite lower set than say in a genuine Fender neck, resulting in that the neck must be half unscrewed from the body to adjust the truss rod.


Anyway .... today I picked up the painted body and neck from my luthier.
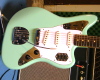
To say I was both impressed and excited is an understatement. The shell pink nitrocellulose paint colour was exactly as I has requested (see up at the start of this thread and check out the strat picture]. The depth and wetness of the paintwork is truly the best i have ever seen, even "outshining" my custom shop Strat and my Les Paul Standard. The colour is hard to photograph, like most pastel colours, but the shots are in the ballpark.
For those in Melbourne (or Australia) I had the body/neck refinished at REAL GUITARS. The cost is somewhat expensive, but after one has seen the quality of the work, it is well worth it. AU$495 for the body and AU$220 for the neck (with matching headstock)

Now to start fitting the hardwhere .... October 2007
Wiring up electronics and hardware.
Often when composite designs are used they pick the best features of each of the parts being used. This however is not the case with the “Long Neck 3 pickup Jaguar”. Although this design doesn’t take the bad features of a Jaguar or Stratocaster, the positive design features from a wiring perspective from the Jaguar and the Stratocaster appeared to cancel each other out from a build / fitment point of view.
The Jaguar has the good feature that the guard can be fully removed to show the pickups (which are mounted in the body) and the layout of the wiring, which included wiring traversing control routes to pick-up routes to switch plate routes.
The Stratocaster, on the other hand, has 99% of the wiring, the switch and the pick-ups themselves mounted to the guard. This allows for the entire guard/electronics just to be lowered onto the Stratocaster body without any concern of any other electronics.
In this Long Neck 3 pickup Jaguar design the guard had to be fitted to the body (with the pick-ups mounted to the guard) ensuring the wiring fell into place correctly, but also taking into account the remaining wiring that was needed for the lower and upper control plates and the PUP switch plate, still not secured or even necessarily soldered in place.
As I (and as Jetset) have shown it is possible to achieve a wiring success, but I can tell you that there was many a bad word spoken as I fitted guard/pups to the body.
One early point to remember … if you are using cloth covered wire you do not need to pair back the covering to reveal the wire, you can just push the cloth back and let it regain its position after you have finished soldering. I myself forgot tis fact for about half an hour … we are all allowed one Homer moment per day.
Thimbles
The thimbles were the first piece of hardware to be fitted to the body. The inside walls of the pre-drilled holes for the thimbles had been covered somewhat in paint during the finishing process. This paint needed to be removed.

Some have recommended using a heated soldering iron to push the thimbles into place and for those who are experienced in this method it appears to work quite successfully. [I can only assume that the heated soldering iron warms the thimble which in turn melts the paint and allows the thimble to “freely” push into the hole.]
I am always nervous about using heated soldering irons near areas of paint that can be ruined with a simple mistaken movement. So I used 800 grit sandpaper to slowly bore out the thimble holes. Although it takes some patience, you can achieve a very clean result and then it is just a matter of pushing/hitting (with a hammer) the thimbles into the holes.

Brass Plates & Glazier Points
The brass insulation plates were next to be fitted. The plates reside at the bottom of the routes and are held in mechanically by glazier points that are pushed into the side walls of the routes. The glazier point are kept from moving or working their way free by solder being puddle around them on the brass plates [note: the glazier points do not actually get soldered to the brass plates but rather are encapsulated by the pool of solder.].

At this point I hit a slight brick wall. As Shakespeare might have muttered if he was building an electric guitar, there was very little room to swing a cat, let alone room to hit / push / force the glazier points into the side walls of the routes. Even when I tried with a vintage glazier point I could at best push the glazier point half way in, rather than the “almost fully” pushed in condition which can be seen in vintage Fenders. I can only sumise that in the 60s Fender had an automatic (spring / air) tool that either punched the hole into the sidewall of the routes (ready for the glazier point to be fitted) or actually shot the glazier point in directly to the side wall (like a staple gun).
In the end the fourteen glazier points were all fitted, but in the majority they were at best half way in (a coupled went in a bit further). They were then puddle soldered in place. The end result was not a pretty as I would have liked, but then again no worse than some of the genuine vintage soldering performances I have seen over the years. Each brass plate was electrically connected via short earth leads soldered in place.


Control pots, jack & other bits and pieces
Now while Tune-a-matic maybe an arse hole (that is my personal opinion, not the opinion of this website or its administration) the photos he uses for selling his guitars are superb. They are great reference material for checking that your wiring is correct.


Note the insulation for the capacitor leg used on the tone pot. For this I used some automotive wiring which had an oiled cloth outer. Cut a short piece, removed the copper wiring from within and placed it over the capacitor leg.

The earth lead from the brass plates to the tremolo unit should not be forgotten.

One thing I did forget was the solid wire earth connection from the brass plate under the bridge PUP connecting to the aluminium shield on the guard. When I plugged the guitar into an amplifier after finishing the build there was no buzz or earth loop, so at this stage I have not removed the guard to add in the solid wire earth connection. Maybe this particular wiring set up does not require this solid wire earth connection or maybe one of the PUP mounting screws is making connection with the solder/glazier point, achieving the same result. If buzzing or earth loops start as some stage in the future then I will add in this solid wire earth connection.
Points noted during fitment of the Guard / Pickups & general wiring
- If I were to build another Long Neck 3 pickup Jaguar I would make the connecting route between the three PUP routes twice as wide and twice as deep, as in this case there is absolutely no more room for any additional wiring.
- I did not take (or I forgot about) Jetset’s advice to make the PUP routes deeper, from the standard route done by USCG. With the “puddle soldering” of the glazier points there was very little spare room below the (ends of the) PUPs for the wiring (especially cloth covered wire). I initially wanted to use the nickel coated PUP mounting screws, but in the end chose a slightly shorter, but darker coloured, PUP mounting screw just in case the first ones were too long and hit the puddles of solder.
- To allow for “ease of repair” at a later stage I had longer than normal leads fitted to the Pick-ups (so the guard can be removed and turned over and laid flat). These extra sections of wire had to be “stored” somewhere and there was just enough room in the connecting route between the lower control route and the pickup switch route. Any one attempting a future build should make this “connecting” route deeper and wider.
- Unlike the wiring diagram, I did not solder the Pick-Up earth lead to the brass plate directly below each individual pick-up. As mentioned above, to allow for ease of repair later, I left the long leads on and soldered all earth leads at a point in the “connecting route”. A revised design would have the holes connecting the PUP route to the “connecting” route much bigger, to allow ease of wire movement through the hole.
Mute
Next was the fitment of the Mute and slug. I placed the mute slug (with spring) into the hole on the guitar body, only to realize that I had not sanded/cleaned out the paint from with the hole. The mute slug was stuck 10mm down in the hole and would not budge. On hour later after various tools of destruction were tried, I grabbed the 800 grit sandpaper and slowly sanded out the hole, removing the excess paint. The slug was removed from the hole, further sanding completed the clean out of the slug hole and the slug re-fitted. This time it bounced back to be level with the surface of the body.
The mute was fitted, the foam stuck to the mute and all was well with the world. Just place the bridge into position and then make a cup of tea.
Oh crap, the bridge legs won’t fit into the thimbles ……
I had a close look and the cut outs in the mute for the bridge legs to go through were off center and blocking a small portion of the opening of the thimbles.

I could not understand why this should be the case, the holes for the mute slug and mute screws had been done by Pickguardian when they made the guard and they measured correctly. In the end I just used a metal file to file out the cut outs in the mute, so the bridge legs were able to move freely. The reason for this “problem” still eludes me.
Lastly the tremolo unit was fitted. Some good advice given by many, especially those who are experts with wood, is to always drill pilot holes for the screws. Except for a slight stuff up with the upper horn strap button screw, every screw went in perfectly first time with the aid of a drilled pilot hole.

When I fitted the upper horn strap button, I drilled the pilot hole and forgot that the body was actually a Jazzmaster body and not a Jaguar body, which resulted in the angle of the strap button being slightly off the vertical. This lasted about 5 minutes and then I re-drilled the hole, using the same starting point, filling the wrongly drilled hole with plastic wood and then mounting the strap button correctly. The slightly enlarged drill hole in the paint finish is covered by the strap button.
Tuners
For me the one area of building this guitar that I have been worried about the most is the fitment of the tuners to the headstock. Well not the tuners as such, but the ferrels (the metal bushes that the shaft of the tuners go through).
When I have removed the ferrels from the headstocks of the vintage guitars I have restored it has taken a bit of force to remove the ferrels as they are usually stuck in hard and the tines that are on the outside of the ferrels [to keep them in place] do their job very well.
I have asked many people about the process of fitting the ferrels into the headstock and quite often the usage of a hot soldering iron is spoken about. [it is also spoken about for removing the ferrels]
The following is what Rick [ thewizardofaz ] told me:
This is great advice and I recommend it to all …. but I didn’t follow it.What I do is this. I roll some sandpaper up and get as much lacquer out of the hole as you can. I'll explain why in a moment. While you're doing this, heat up your soldering iron. Once you have cleaned up as much as you can, seat the ferrule in solidly and straight (important). The you insert the soldering iron head into the ferrule. Wait just a few seconds and push. Do not let the iron stay on the ferrule too long, because it will push excess lacquer out of the hole onto the lacquer of the front of the headstock and can really mess it up if it squirts out if you don't work fast. As soon as it almost touches the headstock finish, stop and get one of those squeeze clamps and squeeze it in the rest of the way. You do it the same way when replacing ferrules, only from the backside
I just have a huge problem with hot soldering irons being anywhere near the painted headstock. Any fuckup or dropped lacquer onto the paint will make a mark that cannot be fixed without sending it back for a repaint. I admit it … when it comes to this type of thing I am a girly-man … I just don’t want to fuck it up.
So I took the first part of Rick’s advice and used (yet again) 800 grit sandpaper in thin rolls and very very slowly sanded the inside of the first tuner hole in the headstock. I sanded a little and then at a point where I thought I maybe close, I took one of the Kluson ferrels that I had purchased (same as what are used on AV jaguars and Jazzmasters) and placed it against the hole.
I was nowhere close. I then looked closely at this new ferrel and it looked a little different to what I was used to seeing with the ferrels from the vintage Fenders. I happen to have a set of 66 tuners and ferrels not yet refitted into the guitar they came from and compared the new and the old.

As you can see the vintage ferrel has much finer tines, but more importantly the section that goes into the headstock is tapered. With this tapering, once the ferrel is seated correctly in the opening of the tuner hole, whether one uses a hot soldering iron or a hammer, it will go in correctly.
However the modern reproduction ferrel is not tapered and cannot sit in the opening of the tuner hole, but rather will sit on top of the hole. This is also confirmed my concern about using a soldering iron to just push the ferrel into the hole – it may well slip sideways and damage may occur.
In the end I just kept on very slowly sanding the inside of the tuner hole and every now and then trying the vintage ferrel to see if it would fit in the hole. At some point the vintage ferrel did start to fit in the hole and at that point I took the modern reproduction ferrel and with all the strength one can muster in one’s thumb I pushed it in and got it seated in the hole.
[The taper of the vintage ferrel had produced a slight outward tapering of the outside of the hole, which allow the modern reproduction ferrel to sit in the hole and not just on the hole.]
Then with a hammer, again very slowly and carefully, I hammered the ferrel in all the way.
This was repeated for the remaining five ferrels. This took five hours, give or take a few minutes for making a cup or tea or two. Yes I am a girly-man, but the result was perfect.
The tuners were fitted and screwed into place. Again remember to use pilot holes for the screws, as maple is a lot harder than the Alder that bodies are made of. [a number of forumites have had cases of screw having their heads snap off leaving just the threaded section of the screw in the head stock. I suspect good pilot holes may help to eliminate this problem].

I am leaving the fitment of the string tree to my guitar man Brendan at REAL GUITARS, who will also fit and cut the nut. The decal will be fitted once the guitar is back from being set up.
A week later ….
Pick up the guitar back from my guitar man and it is such a delight to get a guitar back from being set up to find it perfect. He didn't appear to have used any shims in the neck, with the slight neck angle from the neck route mentioned above being suffcient.
Plugged it in and the guitar sang, grabbed the whammy bar and pushed it in the collette (Toni to its friends) went to bend a note or two and … clunk … tremolo is stuck.
Pushed it down and it stayed down, pulled it up and it stayed up ... a few swear words later, I had cleared away the crap on my work bench and had started removing the tremolo unit (still will the strings attached).
My initial thought was that the tremolo was sticking to the back wall of the trem route, where everyone says that USCG don't quite the route squarely. And although I had thought I had sanded this area enough before I had sent the body off to be painted, I gave it another sanding and put the trem unit back on the guitar body.
Tuned up the strings, pushed in the whammy, moved the tremolo and ... clunk, stuck again.
removed the trem unit yet again, sanded some more ....
fit again ...
tune up again ...

clunk again ...
Maybe the spring in the tremolo unit was incorrectly set, so I logged on and went to Webrocker' superb website on Offset guitars ... and checked out Fender’s Jazzmaster & Jaguar - The Higher Evolution Of Offset , where this a very detail explanation about the set up process for the Offset Tremolo unit.
I adjusted the spring this way, that way, any way it could be moved I did it. Still nothing seemed to to fix the problem of the stuck tremolo. Even tried various grades of automotive grease, but no joy. I must have unscrewed and scew back the tremolo unit (plus retuned the strings) something like 20 times.
Eventually I had to say ... fuck it ..... and cut the strings and the fitted a vintage tremolo unit I had on my shelves. Fitted new strings, tuned up the guitar and the tremolo worked perfectly. Sat there for about 10 minutes trying to comprehend what had just happened. Then I removed the tremolo unit from my AV Jazzmaster, which I knew worked perfectly and fitted it to the guitar, new set of strings, tuned it up and it worked perfectly as well.
So the AV tremolo from my Jazzmaster stayed on the guitar (have ordered a replacement trem for the Jazzmaster).
So why did this new AV tremolo unit not seem to function properly. As can be seen in the following pictures, no matter how I set it up, the collette (Toni) was jammed against the back edge of the hole in the tremolo plate. When I pulled the stuffed Tremolo unit apart and compared it to the vintage unit, with every piece sitting in the same position for ease of comparison, the vintage unit has the collette in the centre of the hole in the face plate of the tremolo (the two yellow lines show the gap between the collette and the hole edge) , where as the stuffed AV tremolo has no gap ... the collette touches the edge. Why ? I have no idea.


Another strange thing occured while attempting to fix the sticking tremolo ..... While I had the strings loose, I removed the bridge and the mute and fitted the spare AV mute that I has in my spares box. I fitted pefectly, with no problem with the bridge legs touching the mute.
So the brand new AV tremolo unit and new AV mute, both purchased from the same on line store (resource), were faulty .... mmmmmmmmmmmmmm
A second extra thing that I fixed up when I had the guiatr apart was the fact that the knobs sat to high up (as the actress said to the bishop). The solid shaft pots seemed to have slightly longer shafts than normal, and although this isn't a problem normally, they made the knobs sit a little high. I sollved this by adding an additional two star washers under the control plate, which lowered the top of the shaft, inturn allowing the knobs to sit lower/closer to the plate.
I would like to comment that I hate the allen key grub screws that Fender use with the modern the Jaguar / Jazz Bass knobs. I much prefer the flat head grub screws, because these modern grubscrews are mode out of such soft material that the hole for the allen key can be "rounded" very quickly/easily. Luckily when one purchases a set oif Jazz Bass control knobs for use on a Jaguar style guitar, the Jazz Bass tone knob is spare. So I replaced the fucked grub screw with the one from the tone knob.


Today, 31st October 2007, the guitar project, which I started back in January 2007 is now complete and I am extremely happy with the outcome from both visualy and sound wise. The guitarist I record with was blown away with what he heard when we plugged it into a Deluxe Reverb RI.
His comments were:
Bridge Pickup: like a more full bodied stratocaster neck pickup, less tinny than normal stratocaster bridge pickup sound is even all the way up the neck. Has a lot of similarities with a Jaguar neck pickup (somewhat biting sound) but not too over the top/treble which can occur on the AV Jaguars. Plenty of quack
Middle Pickup: Similar to bridge … more full bodied plenty of colour
Neck Pickup: Really lovely sound like a little more brighter than a stratocaster neck pickup. Has Jazzmaster characteristics.
Bridge and middle Pickup combination: Has a jaguar characteristics, not as over bright as the AV jags are, good colour without ear splitting.
Neck and middle Pickup combination: More darker sound than the neck on its own, like a dark stratocaster.
Neck, middle and Bridge Pickup combination: Similar to the Bridge and middle Pickup or the Neck and middle Pickup combinations, except doesn’t have as a pronounced “electric guitar “ sound, but more like a semi acoustic or acoustic with a pickup mounted inside.
Rhythm circuit on neck Pickup: Stratocaster characteristics combined with jazzmaster characteristics , reminded him of his early 60s Jazzmaster.
Most importantly All pickups are useful for both lead or rhythm sounds
For those that wish to produce a similar style guitar, here is the wiring diagram for this 3 (stratocaster) Pickup Jaguar: wiring diagram
So before I show the photos of the completed guitar I would like to thank:
- John (Jetset) for his great idea which inspired me to do my own version of the guitar he built late last year.
- Doug, Jon, Yannis, Jonas, Justin, Doc, Justin & Jay for their help and advice
- others on the board here who I have asked questions of and who have been kind to help me where they could (including sourcing a repro JAGUAR decal)
- my friend Carl who helped me immensely with the routing of the body
- Pam, Carl's wife, for letting me have him on that particular sunday to do the routing
Also I would recommend very highly:
US Custom Guitars, their product is of the highest quality. The sales guy I dealt with, Rob, is truly a gentleman and was very patient when I had a million email questions to ask him.
Pickguardian, the guards I received were perfect
Curtis Novak pickups - The Pickups he made for me ended up sounding exactly the way I had described how I wanted them to sound... he's also a cool guy to deal with.
REAL GUITARS here in Melbourne. Brendan does great work and the setups are spot on.
OK here are the completed pics. The colour of the guitar, like a lot of pastel colours, changed significantly depending upon the type of light it is viewed in. These are pretty close: