Amazing! Glad to see it's still underway! I'm Jonesing for one of these now. I was having talk with a local guitar tech in his shop and after about 20 minutes when I proved I knew my stuff, he brought out his collection that included '62 jag, but also a '65 SG-3. It was beautiful and sounded amazing, better than the jag! It had the old script logo and everything, I'm really digging them now.
Really want to see this finished.
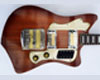
Yamaha SG-3 & SG-2 replicas - SG-2 Finished p15/18
-
empyrean

- PAT. # 2.972.923

- Posts: 2242
- Joined: Sat Jul 02, 2011 7:34 am
- Location: Tow-Ron-Toe
- Contact:
-
Stereordinary

- Expat

- Posts: 10662
- Joined: Fri Sep 15, 2006 11:55 am
- Location: Vancouver, WA USA
- Contact:
Re: Yamaha SG-3 replica project build(s) - PROGRESS!!
Welcome back (again) Ben!
By the way, I still have a plate for you. Hit me up.
By the way, I still have a plate for you. Hit me up.
Rhoney Guitars, 2010-2017.
-
EvLoutonian

- PAT. # 2.972.923
- Posts: 237
- Joined: Tue Aug 24, 2010 1:25 am
- Location: Melbourne, Australia
Re: Yamaha SG-3 replica project build(s) - PROGRESS!!
T A S T Y ! ! ! !
-
antisymmetric

- PAT. # 2.972.923
- Posts: 3628
- Joined: Mon Apr 26, 2010 11:32 pm
- Location: New Zealand
Re: Yamaha SG-3 replica project build(s) - PROGRESS!!
Welcome back, I've been missing your build threads. This is shaping up to be a beautiful guitar! Noticed your pic of the fret slotting done in the sliding compound mitre saw- I do the same- quick, easy and you can see what you're doing. 
Watching the corners turn corners
-
ludobag1
- PAT. # 2.972.923
- Posts: 2565
- Joined: Sun Nov 23, 2008 4:28 pm
- Location: france
Re: Yamaha SG-3 replica project build(s) - PROGRESS!!
nice jigs too
-
Jazzprod

- PAT. # 2.972.923
- Posts: 1821
- Joined: Tue Oct 24, 2006 6:03 am
- Location: Hammarö, Sweden
- Contact:
Re: Yamaha SG-3 replica project build(s) - PROGRESS!!
I'm so amazed by your jigs Ben! Awesome work as usual! Welcome back!!!
-
theworkoffire

- PAT. # 2.972.923
- Posts: 4143
- Joined: Sun Sep 02, 2007 12:59 am
- Location: Punching the future in the face, London
- Contact:
Re: Yamaha SG-3 replica project build(s) - PROGRESS!!
Cheers guys!
Should really have fretted it first, but I had a good stretch of daytime free today and wanted to get the back of the neck carved. In my new spirit of jigging up, I figured out a way of doing the bulk of the work with my router. This might need some more work to get it a bit more adjustable and robust for future builds, but it worked better than I'd hoped on this one.
First pass with the cutter as low as it will go without nicking the template:

It actually makes the earlier set-up for cutting the thickness taper pretty redundant - I'll know for next time. I put a bearing on the shaft of the cutter and made a template that sits under the neck - the bearing on the tip of the cutter is useful for setting up, but doesn't do any work.
End result after a second pass at the right height:


Then I bolted it to the counter and cut the transitions by hand. I have a newish microplane rasp that worked really, really well for this, finshing off with a half-round file and sandpaper:

All done:

A slight misalignment with the router jig put a little nick in the binding between the 2nd and 3rd frets. Something I want to find a way of anticipating better next time. I melted some binding shavings into solvent-based adhesive to form a sticky paste and slapped it on. I'll scrape/sand it back down once it cures.
Neck thickness is almost exactly what Michael measured for me off his original SG-3 - about 21mm at the first fret, 25mm at the 12th.
Should really have fretted it first, but I had a good stretch of daytime free today and wanted to get the back of the neck carved. In my new spirit of jigging up, I figured out a way of doing the bulk of the work with my router. This might need some more work to get it a bit more adjustable and robust for future builds, but it worked better than I'd hoped on this one.
First pass with the cutter as low as it will go without nicking the template:
It actually makes the earlier set-up for cutting the thickness taper pretty redundant - I'll know for next time. I put a bearing on the shaft of the cutter and made a template that sits under the neck - the bearing on the tip of the cutter is useful for setting up, but doesn't do any work.
End result after a second pass at the right height:
Then I bolted it to the counter and cut the transitions by hand. I have a newish microplane rasp that worked really, really well for this, finshing off with a half-round file and sandpaper:
All done:
A slight misalignment with the router jig put a little nick in the binding between the 2nd and 3rd frets. Something I want to find a way of anticipating better next time. I melted some binding shavings into solvent-based adhesive to form a sticky paste and slapped it on. I'll scrape/sand it back down once it cures.
Neck thickness is almost exactly what Michael measured for me off his original SG-3 - about 21mm at the first fret, 25mm at the 12th.
-
kikey

- PAT. # 2.972.923
- Posts: 126
- Joined: Mon Apr 27, 2009 6:16 am
- Location: Älvsjö, Stockholm, Sweden
- Contact:
Re: Yamaha SG-3 replica project build(s) - PROGRESS!!
Hi, impressive work !! 
I will be following this thread!
I have had similar ideas for carving the neck.
I suppose maple is pretty hard for router work...
What radius for the router bit did you use?
I will be following this thread!
I have had similar ideas for carving the neck.
I suppose maple is pretty hard for router work...
What radius for the router bit did you use?
-
CROSS_guitars
- PAT. # 2.972.923
- Posts: 3242
- Joined: Tue Sep 09, 2008 5:52 am
- Location: Thornbury Melbourne
Re: Yamaha SG-3 replica project build(s) - PROGRESS!!
what radius is that cutting bit for the neck?
-
Filly-Fuzz

- PAT. # 2.972.923
- Posts: 1236
- Joined: Sat Aug 13, 2011 10:04 pm
- Location: On the edge of the World
Re: Yamaha SG-3 replica project build(s) - PROGRESS!!
Soooooooooooooo good to have this awesome thread continue!!
Cheers
Cheers
I tell you all my secrets but I lie about my past....
-
Shorty

- PAT. # 2.972.923
- Posts: 420
- Joined: Thu Jun 14, 2012 8:14 pm
- Location: Tucson, AZ
Re: Yamaha SG-3 replica project build(s) - PROGRESS!!
I need one of these in my life before I die.
I like to build s***!
-
theworkoffire
- PAT. # 2.972.923
- Posts: 4143
- Joined: Sun Sep 02, 2007 12:59 am
- Location: Punching the future in the face, London
- Contact:
Re: Yamaha SG-3 replica project build(s) - PROGRESS!!
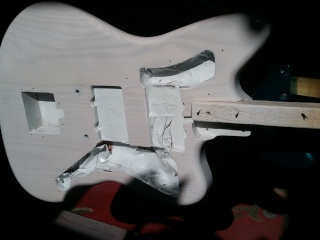
Spent some time on the second (SG-2) body today.
The bulk of the routing was the same as the SG-3, but when I got to the top cavity I had to improvise a little to make sure the rhythm circuit would fit properly. When I had all the original templates cut I included an SG-2 pickguard but never bothered with the upper cavity. I ended up making an MDF template for those bits:

All the cavities done and the rough cut of the roundover:

Couldn't resist a quick mock-up with the guard template and an SGV bridge:

Also, I've taken apart the trem I was so generously donated. It's a serious piece of engineering - even disassembling it took some working out. I've staightened out some kinks and dents here and there, and now all the visible parts are going off to get stripped and re-chromed at a specialist place in Lewisham. My local chrome plater isn't really geared up for fiddly stuff.

For those who asked the radius of the bit I used for the neck carve, I'm pretty sure the radius is 7/8"
The bulk of the routing was the same as the SG-3, but when I got to the top cavity I had to improvise a little to make sure the rhythm circuit would fit properly. When I had all the original templates cut I included an SG-2 pickguard but never bothered with the upper cavity. I ended up making an MDF template for those bits:
All the cavities done and the rough cut of the roundover:
Couldn't resist a quick mock-up with the guard template and an SGV bridge:
Also, I've taken apart the trem I was so generously donated. It's a serious piece of engineering - even disassembling it took some working out. I've staightened out some kinks and dents here and there, and now all the visible parts are going off to get stripped and re-chromed at a specialist place in Lewisham. My local chrome plater isn't really geared up for fiddly stuff.
For those who asked the radius of the bit I used for the neck carve, I'm pretty sure the radius is 7/8"
-
noisepunk

- PAT. # 2.972.923
- Posts: 16807
- Joined: Sat Apr 03, 2010 5:55 pm
- Location: glasgow, scotland
- Contact:
Re: Yamaha SG-3 & SG-2 replica project builds - PROGRESS!!
That neck "carving" is genius- I need to get a router table.
-
ludobag1
- PAT. # 2.972.923
- Posts: 2565
- Joined: Sun Nov 23, 2008 4:28 pm
- Location: france
Re: Yamaha SG-3 & SG-2 replica project builds - PROGRESS!!
this trem is really complicated 
yours guitar look nice and clean as always
but carefull with the routing for neck carve cause it is not a little bit
looks easy and fast but i am always scare with big bit like that
i am sure Ben you know it ,but for me it is not for all ,it is really near a (toupie in french) and this machine is really know to eat fingers
-
PoppaPopp

- PAT. # 2.972.923
- Posts: 1346
- Joined: Fri Sep 05, 2008 1:38 pm
- Location: Germany
- Contact:
Re: Yamaha SG-3 & SG-2 replica project builds - PROGRESS!!
Wow Ben, that looks super accurate! 
"...if you can't punkify a Mustang then something ain't right in the world!" (UlricvonCatalyst)