 |
|
|
|
|
|
|
|
|
|
|
|
|
|
|
|
|
|
|
|
|
|
|
|
|
|
|
|
|
|
|
|
|
|
|
|
|
|
|
|
|
|
|
|
|
|
|
|
|
|
|
|
|
|
|
|
|
|
|
|
|
|
|
|
|
|
|
|
|
|
|
|
|
|
|
|
|
|
Buildup of a 1963 Fender
Jaguar
By Doug Lesho
12/2004
Revised
2/2006 |
|
|
|
DAY THREE |
|
|
|
 |
|
|
|
 |
|
|
|
|
|
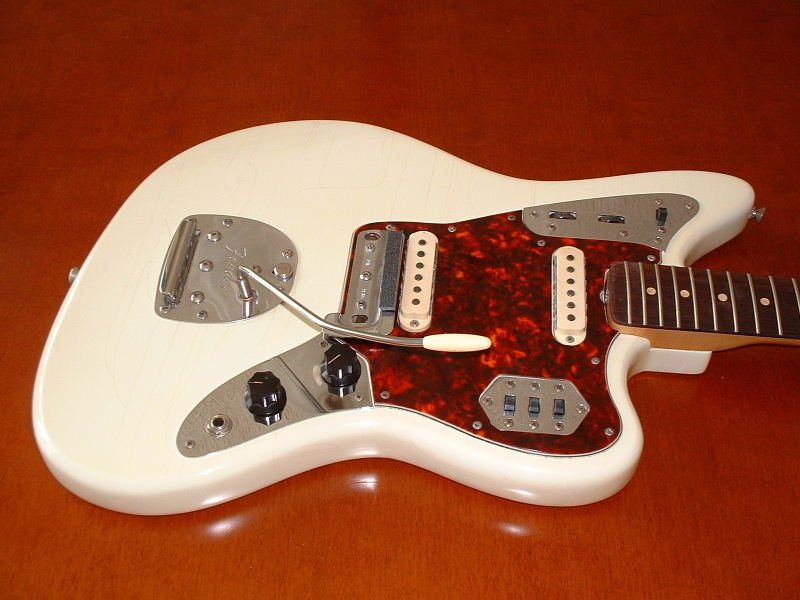
Here are today's players; namely the shrunken
pickguard, shield, bridge, cover, mute, and mute foam. It doesn't seem
like much, but this day will be as eventful as the
previous. |
|
|
|
I began by filing the pickguard, which had shrunk
as most all of the early nitrate-based guards do. It could be made to fit
as is, however it did not sit well over the bridge cups and the pickups
would not fit loosely enough through the cutouts to enable height
adjustment. I've learned it's best to slightly enlarge
all the openings, instead of just trying to oblong
the openings that seem to be causing the trouble. I used a
Craftsmen
mini file
and began the chore. Though tedious, It can actually be an enjoyable task.
It can be performed sitting in the recliner in front of the TV if you
choose. Remember, a good rule of thumb for filing is;
you can
always take off more, but you can never put any back!
Therefore, relax and take it slow. I would make a
few passes through the cutouts and then hold it in place on the body. Once
the pickups and the bridge cups popped through fairly easily, I then
concentrated on the tighter areas only. I carefully worked them until the
pickguard fit with ease. As for the 3-switch plate, I found that
simply loosening the mount screws and a bit of finagling enabled it to fit
through with little filing. |
|
|
|
 |
|
|
|
|
|
This nasty old pickguard shield was corroded and
someone had tried to clean it with something abrasive. Not very pretty but
still functional. I cleaned off all the old tape residue. Note: I've since
replaced this with a nicer one. |
|
|
|
|
|
The good folks at Fender originally taped these
shields in place with transparent tape. I cleaned off the old residue and
retaped it at the original locations. I then installed the guard and
shield assembly on the guitar. Next, I polished and waxed the mute plate,
then cleaned the area where the pad will go. I glued the pad in place with
Duco
Cement.
Many people use self-adhesive weatherstripping for the mute foam. That
works great, but I didn't have any. I did have a small piece of foam that
came in some pickup packaging, so I cut that to size. The correct
American
Vintage
replacement piece is available from Guitar Parts
Resource.
I'll probably end up swapping this out at a later point (I did), but the
homemade piece is just fine for now. |
|
|
 |
|
|
|
|
|
|
 |
|
|
|
 |
|
|
|
|
Duco Cement is good stuff. It has many uses, I've
used it to install replacement nuts as well. |
|
|
|
|
|
 |
|
|
|
|
|
|
Lookin' good! This is where it really gets
exciting. If your heart is not beating faster right now, just close the
browser and walk away. |
|
|
|
|
|
Decision time once again. I had three complete
bridges and a baggie of parts to choose from. Close inspection revealed
one bridge was apparently from an earlier Jazzmaster. Contrary to popular
belief, the bridges are not identical. When the Jaguar arrived on the
scene in '62, it showed up with longer bridge legs. This enables the
bridge extra height for the required clearance over the mute assembly. It
also leads to the installation of the neck pocket shim as discussed on day
one. The package was designed this way, but it is not
always mandatory to have the longer legs and a shim. It
is actually dependent on many factors such as saddle adjustment, truss
rod, neck, and neck pocket. But I've found that setup is much easier this
way and it just seems right to do it as it was intended. Some people feel
that a neck shim is somehow inferior and affects tone. To each his/her
own, build your Jag the way you want it. I prefer it this way and have not
discovered a downside. More on this later as we discuss bridge
adjustment... |
|
|
|
|
 |
|
|
|
|
|
All bridges are not created equal. Note the longer
legs of the bridge at right. |
|
|
|
|
|
|
 |
|
|
|
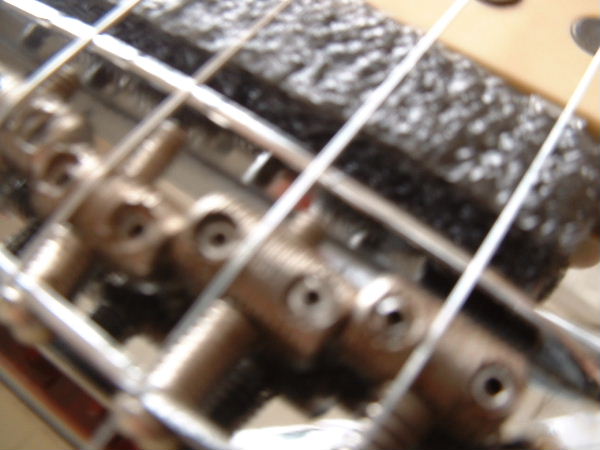
The bridge and cover cleaned up very well, beyond
my expectations. Notice two things in this picture that signify original
parts; the domed rivet heads holding the legs onto the bridge and the
little 'flip' at the bottom sides of the bridge cover. The reissues
pieces are not like this. Also, the saddle adjustment allen screws should
be .050" on original pieces. Note the three different thread sizes
on the saddles. Finally, check out the "pre-setup" as explained in the
text. |
|
|
|
The Jaguar bridge is a point of much contention,
although it doesn't have to be. This bridge has led to the Jaguar (and
Jazzmaster) being typecast as second-class citizens, even within Fender
circles. Many people replace it with a tuneomatic, replace the saddles
with Mustang or aftermarket, tape the bridge posts to keep it from moving
as it was intended, and/or install an aftermarket buzzstop device. Again,
to each his own. I am a staunch advocate of this bridge. I selected one
with the longer legs from my stash and disassembled it for cleaning. It
cleaned up very well. A little trick is to flip the saddles
over. On many a bridge that has not been terribly abused, the saddles are
much less corroded on the bottom side. I flipped the saddles, inverted the
height adjustment screws, and held the better side of the spring on top
with my thumb as I reassembled the bridge. The result was amazing! If I
didn't know better, II would almost assume this was a new bridge.
|
|
|
|
I like to do a little "pre-setup" on the bridge as
I assemble it. A major source of the dreaded buzz on this bridge is from
the saddles and hardware rattling. Much of the rattle, if not all, can be
eliminated by raising the saddles almost to the max. I go ahead and do
this before I ever install the bridge. First, I preset the intonation by
memory. The low e saddle gets cranked back as far as it can go by
turning the saddle screw until the spring is completely compressed. The
a saddle goes back until the trailing edge is
centered on the low e saddle. Likewise the d saddle gets cranked until it is
even with the center of the a. The g saddle gets cranked all the way back as did
the
low
e. Next, the b goes back even with the
a, that is, the trailing edge stops at the center
of the g. This leaves the high e, it gets the same treatment and
should end up near the end of the intonation screw. Next, I raise
the saddles using the curvature of the bridge plate as a guide. I raise
them until (by sight) the angle of the g intonation screw appears that it
may contact the string when installed. I apologize for this tedious
explanation and hope I haven't insulted anyone's intelligence. This was
explained to me years ago and has been an excellent rule of thumb. Your
mileage may vary, but I've found the intonation to be very close and the
absence of rattle with very little effort upon setup. |
|
|
 |
|
|
|
|
|
The saddles should follow the curve of the
bridgeplate and about half of the intonation screws should be visible when
viewed from this angle. This will save some grief later on. After dropping
it in the holes, you can site down the fretboard from the rear and
fine-tune the curve as necessary. |
|
|
|
|
|
|
Completing the pre-setup, I turned out the bridge
leg adjustment screws about halfway. This should give us enough clearance
for strings and will be fine-tuned later. This is accomplished by sticking
a .050" allen wrench down the holes at the domed rivets on either side of
the bridge, viewed from the top. I like to lower the pickups at this point
as well, they too will be adjusted later. |
|
|
|
Before stringing, I looked over the Jag and did
some tidying up and polishing. I like to use Mequier's automotive products for
detailing. I use their 3 step method. Step1(body cleaner) is not necessary
on a brand new finish, but works fantastic on a vintage finish. It removes
dirt, minor defects and oxidation without scratching. Step 2 (polish) is
used on the body, pickguard, and chrome parts. After buffing, I applied
step 3 (carnauba wax) as a protectorant. I've also used
3M Finesse
products to good effect. I've never had a bad experience
with either product, except for my own lack of adeptness with power tools.
Don't go too crazy with the elbow grease, and I don't recommend machine
polishing. Maybe you are more proficient than I, but ever since I buffed
through a perfect Desert Sand refin (that I had painstakingly
applied myself to a '60 Duo-Sonic), I have shied away from power buffers.
Obviously, the finish on this Jag was already extensively buffed
by Lay's. I only did enough to remove the fine dirt and grease from the
assembly process, and then applied the protective wax. By the way, I did
not wax the headstock as I felt it could use a little more aging to better
match the body. Time will take care of this sooner than you may think, the
nitro ages fast. I don't want to inhibit it. |
|
|
|
 |
|
|
|
 |
|
|
|
|
|
I happened to notice that a few of the tuner
ferrules were not flush with the headstock. I remedied this with my
faithful ball peen and a 7 mm deepwell socket. |
|
|
A bit of lemon oil does well for the
rosewood, I use Old English. I put on a good coat, let it sit and
soak, then wiped up the excess. |
|
|
|
|
|
|
Now it's time for stringing. I installed a set of
Fender XL Stainless Flats (.011s). Of course, this is a subjective choice.
I won't recommend any brand over any other, we all have our preference. I
will assume that if you're reading this, you know how to string a guitar
so I won't cover it in depth. If not, there are plenty of resources on the
web. I will mention one very basic thing; the string ends go
into those little holes in the Kluson tuner shafts! I only mention this
because I continually receive guitars that have been strung through the
slots with the ends flying out all crazy. It's a pet
peeve. |
|
|
|
 |
|
 |
|
|
|
|
Check for clearance between the strings and the
intonation screws. The g is the most likely place where it would
happen. |
|
|
|
|
|
 |
|
|
|
|
|
|
The bridge simply drops into the holes. I like to
sight down from the top and place the strings approximately over the
pickup poles. |
|
|
|
|
|
I tuned the guitar and checked the intonation. Due
to the pre-setup, it was very close and needed only minor tweaking. Again,
I will not cover this procedure in depth. Once set, I checked the strings
for contact with the intonation screws. I found I had to lower the saddles
slightly all in proportion to maintain the curve. Next I lowered the
bridge by adjusting through the leg holes in the rivets, and tuned again.
I repeated this procedure until the intonation, action and tuning were
spot-on (action again being a matter of preference). |
|
|
|
|
Raising the saddles and lowering the bridge
increases the break angle of the strings, increasing tension and reducing
buzz. This preload is essential . |
|
|
|
|
|
|
Although there was no bridge buzz, I did have an
annoying fret buzz on between the 5th and 7th frets. I loosened up the
neck plate screws, tilted the neck back slightly, and tightened the truss.
I had to adjust it twice; the first attempt was too much and I had buzz on
the 1st and 2nd frets. I backed it off just bit, and with that little
compromise, I had it nailed! At this point I adjusted the pickups.
There are instructions for a certain measurement on Fender's Mr. Gearhead
page, but I just did it by sight. |
|
|
|
 |
|
|
|
 |
|
|
|
|
Raise and/or lower the pickups by rotating the
mount screws. Too far away and you lose output. Too close may cause false
tones and possibly cause the strings to stick on the
poles. |
|
|
|
|
|
Now I'm finally ready to plug it in and wring it
out! I used the aforementioned Champion 110, and ended up playing
for about an hour before calling it quits for the day. It felt right and
sounded great, and I am very happy with the completed project.
|
|
|
|
|
|
|
This concludes the saga of the buildup of my 1963
Fender Jaguar. I hope you enjoyed it and that you will be able to use it
as a resource. However, I have a small disclaimer; I am not a professional
guitar repairman. I've found these procedures to work well, without
adverse affects. They may or may not be technically correct. Likewise, the
products I used are only my preference. The maufacturers of the products, nor
myself, are responsible if harm comes to your precious guitar! I showed
them here in a good faith effort, because they have worked for me.
Last words:
Remember, anyone can just go
buy
a
guitar. It's much more fun (not to mention personally satisfying) to
build, maintain, or restore one! Play on! |
|
|
|
 |
|
|
|
 |
|
|
|
|
I treated my new baby to an original '63
white tolex case! |
|
|
|
|
|
|
Acknowledgements:
I owe a debt of gratitude
and possibly an apology to Clay Harrell, the author of the best vintage
website that I have ever seen, Vintage Guitar Info. The apology is because I have
read that site so many times that it got imprinted into my brain. I may
have inadvertantly mimmicked some phrasology. Anyway, he gets the credit
here. Finally, thanks to Dan Shinn and the team at
Lay's
Guitar Shop. |
|
|
|
Links: |
|
|
Vintage Guitar Info
The Higher Evolution of Off-Set Waist
Guitars |
|
|
|
www.fenderjaguar.net |
|
|
|
Mel Waldorf's Jaguar and Jazzmaster
Page |
|
|
| Lay's Guitar Shop |
|
|
|
OffsetGuitars.com Forums
/ Day One / Day Two / Day Three
|
|