Hey Everyone,
first post here
I was given a 67ish mustang, that had been drilled out to accommodate humbuckers, looks like that to me any way. There's also a channel cut to the upper horn for what I guess was a pickup selector switch, also I think there is some kind of split or checking just behind the trem, doesn't look like it has propagated much tho'. Lot's of damage. I've seen restorations where the plug inserted is a close match and the the gaps are filled and sanded, and others where things were smoothed out to a regular shape and and much more precise plug was inserted. Are there any pros or cons to either method? Effects on sound?
Also the bridge legs were sawn off and are lost, having a hard time finding replacements, I will search for DIY alternatives on the site but tips and trick advice appreciated.
I know... this post is nothing without pics, but I am unable to upload images yet. I imagine because I am new to the site (I read the FAQ when I was unable to locate a GUI element for uploading images) so mods if you are listening I would be in your debt if the ability to upload was granted.
Thanks for listening pics soon...
Milkshape
Restore Mustang advice
-
countertext

- PAT. # 2.972.923

- Posts: 4293
- Joined: Wed Sep 28, 2011 6:25 pm
- Location: Tacoma
Re: Restore Mustang advice
Posting Images thread
Simple answer for images: insert a link to an image on the web.
Real answer: read through the thread above and practice until you figure it out. Your images have to be hosted on the web already to link them here.
Seems like serious repair folks always rout out a nice, clean, regular shape so they can perfectly fit a plug in it. It does seem easier than trying to carve a plug to fit an irregular hole.
-
hulakatt

- PAT. # 2.972.923
- Posts: 1243
- Joined: Sat May 08, 2010 7:58 pm
- Location: Pittsburgh
Re: Restore Mustang advice
Hard yep. Just so much easier to do. I've patched so many holes in wood by drilling the holes slightly larger and much cleaner and plugging the holes with a dowel rod and wood glue, let it set and saw it flush, and then sand or plane it smooth and get to finishing.countertext wrote: ↑Thu Nov 28, 2024 10:54 amSeems like serious repair folks always rout out a nice, clean, regular shape so they can perfectly fit a plug in it. It does seem easier than trying to carve a plug to fit an irregular hole.
She/Her
-
Milkshape

- PAT PEND

- Posts: 8
- Joined: Sun Jan 16, 2022 7:22 am
-
interceptör

- PAT. # 2.972.923
- Posts: 673
- Joined: Sat Jan 06, 2024 11:30 am
Re: Restore Mustang advice
Any close-up photos from under the vibrato plate and the possible crack in the wood?
Do you want to just get it working, or do a full restoration with refinish, or something in-between? Are you doing it for yourself or for resale?
If it were mine, I'd probably just clean up the routing, cover any visible issues with a sticker, get a black pickguard and rock as is.
Do you want to just get it working, or do a full restoration with refinish, or something in-between? Are you doing it for yourself or for resale?
If it were mine, I'd probably just clean up the routing, cover any visible issues with a sticker, get a black pickguard and rock as is.
-
Highnumbers
- PAT. # 2.972.923
- Posts: 710
- Joined: Sat Apr 25, 2009 1:21 am
- Location: Orange County, CA
Re: Restore Mustang advice
It's virtually impossible to get a clean fit on an irregular hole.
You have to route to a template that takes a bit more wood out, to the template shape, then cut a plug to fit.
Personally, given that it's a Mustang and it's under the guard... I wouldn't bother plugging the hole at all, it won't affect the sound either way. Just cover it up with the pickguard and enjoy.
-
MrSparkle

- PAT. # 2.972.923
- Posts: 383
- Joined: Mon Jun 17, 2024 11:48 am
Re: Restore Mustang advice
Rationally... yeah, there's no *need* to plug that. Emotionally? I want to see that cutie made whole again. So mine is a vote to plug everything and reroute to vintage. And yeah - reroute to a clean, predictable shape you can easily fit a plug to is the only way to go. But; I do not have the skills to do this, so you should take my response with that context. I am literally not the expert.
The bridge... well, I have two problems there: 1, I like slightly narrower string spacing and 2: from the description it feels like that bridge is gonna be a toughie to save. So my move here would be to case-candy it and stick something else on - I'd wait for a Staytrem, but something like a Johnny Marr Knockoff from Fender would be entirely invisible and easier to get. Even if you don't like narrower spacing - getting something new is the sane option here.
The bridge... well, I have two problems there: 1, I like slightly narrower string spacing and 2: from the description it feels like that bridge is gonna be a toughie to save. So my move here would be to case-candy it and stick something else on - I'd wait for a Staytrem, but something like a Johnny Marr Knockoff from Fender would be entirely invisible and easier to get. Even if you don't like narrower spacing - getting something new is the sane option here.
-
Milkshape
- PAT PEND
- Posts: 8
- Joined: Sun Jan 16, 2022 7:22 am
Re: Restore Mustang advice
Thanks for all the replies,
I could not emotionally/rationally deal with the damage just hiding under the pickguard. Poplar is plentiful in my area and I may even have enough laying around so given the comments here I will for sure clean it up and fill with a more regularly shaped plug. I am in the middle of some other builds I have a 3d printer and recently printed a pickguard template that I will mount on a sheet of plastic and route. Depending on how that goes I will use the same method to produce a template for cleaning it up and another for producing the plug. I am a bit concerned with it melting the PLA so caution will be a watch word.
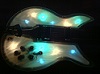
It was hard to get a good pic of the crack but I am 99% sure it is just something separating on a grain line, maybe inject some wood glue and clamp, if there is a better procedure please let me know.
More damage under the trem than I remembered and it looks like the pots have lost the battle to time.
The tuning pegs are present but the bushings are not, more sadness, and I have a suspicion that the diameter of the holes has increased. As soon as I find a battery for my calipers I will check it and see.
Again thanks for listening...
Cabronita pickguard template PLA
Superficial crack
Trem cavity damage
Pot damage
I could not emotionally/rationally deal with the damage just hiding under the pickguard. Poplar is plentiful in my area and I may even have enough laying around so given the comments here I will for sure clean it up and fill with a more regularly shaped plug. I am in the middle of some other builds I have a 3d printer and recently printed a pickguard template that I will mount on a sheet of plastic and route. Depending on how that goes I will use the same method to produce a template for cleaning it up and another for producing the plug. I am a bit concerned with it melting the PLA so caution will be a watch word.
It was hard to get a good pic of the crack but I am 99% sure it is just something separating on a grain line, maybe inject some wood glue and clamp, if there is a better procedure please let me know.
More damage under the trem than I remembered and it looks like the pots have lost the battle to time.
The tuning pegs are present but the bushings are not, more sadness, and I have a suspicion that the diameter of the holes has increased. As soon as I find a battery for my calipers I will check it and see.
Again thanks for listening...
Cabronita pickguard template PLA
Superficial crack
Trem cavity damage
Pot damage
-
Milkshape
- PAT PEND
- Posts: 8
- Joined: Sun Jan 16, 2022 7:22 am
Re: Restore Mustang advice
Hey Mr Sparkle,
Thanks for the bridge response, I'd like to keep as much as I can original. But I think that is a loosing battle. I've ordered a Fender mustang bridge manufactured in Japan. I'm probably either going to use use it out right or see if I can swap the legs (long shot for sure).
I'm not a fan of the tortoise shell pickguard but I will use it and try and get the original white slider switches working, or at least I think they are the originals. I need to look up the serial number ot find out what i can, I am assuming that it was white given the tortoise guard based on images I have seen.
-
MrSparkle
- PAT. # 2.972.923
- Posts: 383
- Joined: Mon Jun 17, 2024 11:48 am
Re: Restore Mustang advice
Oof. What a shitshow those two dowels are.
You're going to need plugs plural to minimise gaps. I'd start with the bridge - route out all that congealed mucus, insert a plug in each of those and glue up (do these first since it'll probably protrude into the pickup cavity, at least on the treble side). Then you'll want to do each of the pickup cavities (don't forget to take the metal plates out first, unlike the previous person), then the two "new cable runs" on the treble side of the pickups and to the new Switch cavity, then finally the new switch hole. This thing is going to be a bit of a patchwork, to say the least. Make sure your poplar is very well seasoned!
Nice idea on the printed templates - make sure you use 100% infill (you could probably get away with honeycombing for areas over a centimetre from the edge of the template, but I don't think I'd risk it), and make them thick. Remember "real" templates are often 3/4" thick MDF. PLA should be fine as long as you're using a good bearing guide - it won't move against the plastic, so there won't be any direct friction - just make sure you don't try to do too much per pass - that'll prevent the collar becoming a heatsink for anything else.
Oh, and if you're printing the original Mustang routing template - do that first, so you can test-fit it against the original switch-route on the bass side; and your pickguard.
-
Alex!
- PAT. # 2.972.923
- Posts: 221
- Joined: Mon Oct 17, 2022 10:27 am
Re: Restore Mustang advice
Why so much fucking glue?Milkshape wrote: ↑Sat Dec 07, 2024 5:41 amThanks for all the replies,
I could not emotionally/rationally deal with the damage just hiding under the pickguard. Poplar is plentiful in my area and I may even have enough laying around so given the comments here I will for sure clean it up and fill with a more regularly shaped plug. I am in the middle of some other builds I have a 3d printer and recently printed a pickguard template that I will mount on a sheet of plastic and route. Depending on how that goes I will use the same method to produce a template for cleaning it up and another for producing the plug. I am a bit concerned with it melting the PLA so caution will be a watch word.
It was hard to get a good pic of the crack but I am 99% sure it is just something separating on a grain line, maybe inject some wood glue and clamp, if there is a better procedure please let me know.
More damage under the trem than I remembered and it looks like the pots have lost the battle to time.
The tuning pegs are present but the bushings are not, more sadness, and I have a suspicion that the diameter of the holes has increased. As soon as I find a battery for my calipers I will check it and see.
Again thanks for listening...
Cabronita pickguard template PLA
Superficial crack
Trem cavity damage
Pot damage

I ❤️ fuzz pedals!
-
Milkshape
- PAT PEND
- Posts: 8
- Joined: Sun Jan 16, 2022 7:22 am
Re: Restore Mustang advice
I have no Idea. I believe the person who gave it to me, who is an exceptional player, did this when they were quite young.
This thread is going to go a bit quite for a while until finish the Cabronita (in the assembly phase), the Johnny Marr jag clone (finishing the body), and the Esquire (Finishing the body).
Maybe I should set up a kanban trello board, lots to plan and do. The goal is get as close to original as possible.
Thanks everyone, be good...