Because the bottom of the pickguard has a painted edge, replacing it isn't as easy as just buying a replacement. You either find someone selling one or try to have one made. I ended up trying the latter. Over the last 6 months, I've made some replacement pickguards for a few other guitars in my collection by making MDF templates of the original and then cutting my own out of acrylic. You can skip this step if you don't have a router & scrollsaw as I think you can source some clear MIJ jazzmaster pickguards from places like WD Music (they currently sell for $50).
I didn't want the fatigue cracking to happen again so I opted for 1/8" acrylic but this does present a few gotchas which I'll detail later. Anyways, making the acrylic replacement wasn't a big deal, save for the rhythm circuit area where you need to use some files to make the the rectangular openings for the slide switch and wheel knobs. This leaves you with the main issue- what about the paint component? Enter one of Fender's painters, Jay Nelson (jncolor on Instagram) who posted a video about painting a pink paisley jazzmaster:
https://www.youtube.com/watch?v=NuzqCbU ... p=gAQBiAQB
In it, he lays down a silver base, followed by the red/magenta top coat. I ended up commenting on this video and had a brief back & forth with Jay about this and he suggested a specific Testor model paint as being a possible match to use for the pink. As I later learned, the process is slightly different for the pickguards- first- unlike the bodies, the pickguard painting uses white instead of silver so I substituted a flat white instead of a silver color. The second difference is that the order of painting is switched because the end result is looked at in reverse. You first lay down your magenta and then apply the white. If you do white first (like I first did on a test piece), the visible side is all wrong.

Looking at my original pickguard, I noticed that the painted edge only came in about 1/2" from the edge of the pickguard so the first step was simply to apply pieces of pinstripe masking tape on the top side so I had some visual reference to know where to stop when I was painting. Like I mentioned, I first tried to paint a scrap piece of acrylic to get a feel for the process and that was great since I learned that the order of paint colors needed to be different.

Then I jumped in and painted the megenta followed by the white. If you have experience with an airbrush, this will be easy. I'm still learning so I did struggle with this in terms of applying a consistent amount of paint at the same height above the surface. The end result is far from perfect but doesn't look that bad. The color is a tad darker than the original but perhaps the color intensity could be altered with dillution. I just wanted to share this because I did see that this had been a previous topic on here before. YMMV.
Here's the painted side after I had just finished:

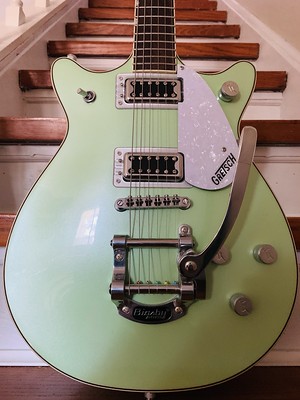
Here is the original pickguard on the guitar:

And finally, here is my replacement installed:

I mentioned that the 1/8" acrylic had some gotchas. What I discovered during reassembly was that the 3 way toggle barely popped up through the acrylic I had to remove an underside washer in order to get enough threads to show up on the top side to secure it. This same issue also occured with the output jack- it's a little recessed compared to how it was originally but still functional. An aftermarket jack like a Puretone might work better since it has a longer threaded barrel.
The last area where the acrylic thickness is an issue is with the two rhythm circuit wheel knobs. While I was able to secure the bracket to the pickguard the surface of the roller knobs *barely* makes the level of the top of the pickguard. I'm fine with that if that means I can avoid having the pickguard spider crack again but it's something you should be aware of.