
I sold the Buickmaster neck to forum member Rexter, but the Allparts body he was going to put it on had been really badly set up by his tech: neck pocket widened with a blunt chisel, bridge posts drilled by hand off-centre and not vertically etc. I took pity on it, and offered to swap it for my body; it seemed like a waste for such a good combination to be split up, and I was planning a change of finish at some stage anyway. So this thread is the complicated story of the resurrection of the Buickmaster.
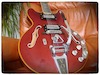
My target is this - yellowed charcoal frost, vintage black anodised guard, Peter Leonard 60s pickups, AVRI hardware, swamp ash modified Allparts body, scratchbuilt b&b neck:

The neck is one I've been on with for ages; originally a commission for another forumite that was taking me too long to make so I backed out of the sale. I've been slowly finishing it for about a year, doing most of it alongside the MOTORIK II neck:


The plan was to use it on the Buickmaster, and I had just enough sherwood green left in the bottom of a can to give it a thin coat, but I ran out before I could get it perfect, and that started me thinking about doing a re-fin and going for something different. So the other day I removed the tuner bushings with a reversed drill bit and a rubber mallet, and sanded the headstock back down nice and smooth.

Once the bushings were out I bolted it onto my workbench and re-shaped the back, having left it far too fat to begin with. Every neck I've ever made has had to be re-done like this after it's been fully finished. One day I'll learn to do it properly straight off...

Then I gave it a coat of charcoal frost (from Manchester Guitar Tech) and it's getting its clearcoats at the moment.

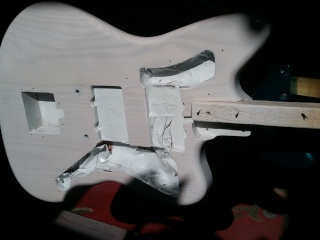
I don't have any pics of the first part of the body restoration. Rexter had sprayed it sherwood green, which I sanded off, then while I was filling the shoddy bridge posts and neck pocket I decided I wanted to do a few modifications. I glued alder dowels into the bridge posts, then lined the neck pocket with a thick layer of epoxy filler. Then I took a few mm off the top and bottom of the body to drop it down to about 38mm thick, same as a Mustang. The Buickmaster was this thick, and I liked the feel of it. I re-routed the body and cavities using my vintage JM template, then re-cut the neck pocket...

...into the epoxy repair, and re-rounded the body edges to a more vintage-correct radius. The differences between the Allparts and the vintage bodies aren't massive, but you can see where the sherwood is left on some of the cavity edges that didn't quite align.
I sanded it down to about 180 grit, applied a cellulose sanding sealer by hand, then grain filled and re-sanded down to 320 before another coat of sanding sealer and another sand. Then I sprayed a coat of Behlen's Vinyl Sealer, which I think is the same stuff as Fullerplast in the US. It's the first time I've used it, and it's incredible. After one coat I was able to sand out most of the grain wave that ash always ends up with. Another first for me, and another revelation, is wet-sanding with white spirit. I've tried all manner of things in the past, but this is by far the best. This is the body after one coat of sealer and a first wet sand (400 grit):


The second coat of sealer and wet sand (400 grit) left a perfect smooth matt surface ready for priming.
Next job was the bridge post holes - I left it until now so drilling through the sealer would leave a nice crisp edge with less chance of the drilling tearing up the dowel inserts.
I measured and drew a centre-line, then drew lines 30mm either side of the centre to allow me to line the holes on the guard up centrally, then drew round the inside of the guard holes:

Then I drew lines joining the outside edges of the two circles, measured the centre of these, and drew in the centre-line for the new holes. Then I marked out 1 7/16" either side of the body centre-line to give the 2 7/8" bridge post spacing:

I double-checked this was right with the bridge, then used a sharp nail to punch indents into the wood...

...then I drilled 1.5mm pilot holes about 20mm deep:

Without the masking tape you can see how off the previous bridge holes were. They were way off vertical, too:

Next I measured the diameter of the bridge posts I'll be using - these are AVRI ones, 3/8". Other Japanese/aftermarket ones I've had have been 9mm - I learned to double-check this the hard way:

I drew a line in a cavity just beyond the depth of the post, lined the drill bit up with it, and set the depth-stop on the press...

...then drilled the holes with a 3/8" wood bit:

Re-checking with the guard, they're nice and clean and central:

Then I shot a coat of primer:

When I took it off to give it a sand between coats I realised I'd forgotten to drill through to ground the trem, so I did that with a 1/4" pilot bit from a mortice drill:

There were just a couple of spots where I needed to sand down past the primer to smooth out the sealer a little more (again, wet sanding with white spirit and 400/600 grit), then on with a second coat, which I just managed to finish before my compressor died.
More progress when I get myself a new HVLP spray system.