Clue - that's the middle seat...in the front.
So, I've been too busy to update this last week. I have about three days of day-job work left and then I'm stating a full-time PhD (my attempt to fit one in part-time a couple of years ago misfired - I've won a proper scholarship this time) so now that my time is my own my plan is to schedule in one full day a week of guitar work and see where it goes. Mustn't forget to actually do some studying, though.
Anyway, this is where it all get's a bit tricksy. I think I underestimated just how much customization this one was going to need.
The neck was more or less straightforward. Levelled and polished the frets, more than usual to give it a nice worn-in feel:


The lacquer was cracking slightly around the holes on the front of the headstock as I tried to insert the bushings, so I stupidly tried to drill them out a little. Sure enough, I managed to chip around the first hole, and I ended up having to drop-fill a little with some clear and flash the whole face with another coat of very thin lacquer to re-melt the cracks. Rather than bodge it with the reamer I decided to use the router and a makeshift template to open them up a bit.

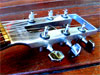
Lining the tuners up and marking for the screws:

Drilling 2mm pilot holes after making centre-point holes with a sharp point:


All done. The spacing is loads wider than on a Fender neck - these Schallers were the most appropriate I could find. They're basically F-funers with Kluson buttons:

Cutting a brass nut - I drew up a spacing template specially for it. I normally just use old nuts to guess the spacing but nothing I had seemed right for this one.

Now it gets messy. I'm using TonePros locking posts for the bridge, but the shafts are designed for wraparounds and are way too tall for what I need. Plus, the top screws are really ugly, and have shitty little M3 threads that feel like they'll snap or strip in an instant. The bridge base here is one I had a friend of Ludo's in France make for me ages ago - just using it for now until I get the correct ones. This is the stock post/screw combo:

First, I drilled them out, wider and deeper with a 4mm bit:

Then I tapped them out with an M5 thread:

Then I dropped them into a hole in a block of wood and sanded the tops down on my disk sander:

Checking the level with a screw as a makeshift level gauge. Excuse the filthy thumb - I was restoring my new 1940s drill press at the same time:

Checking the look with an M5 machine screw - I have nicer stainless steel ones on the way. Much closer to the original Yamaha - in looks, not function. The original bridge floats on strong springs and the screw goes straight into a threaded insert in the body. I might try that next time.

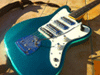
Borrowing saddles from a re-issue Yamaha bridge. I cocked up the string spacing on the base I had made (I used JM spacing which is too wide) but it will do for testing:

It actually makes a really nice bridge. I'll have to find a use for it some day:

I swapped the ugly flat head pivot plate screws for some nice oval-head stainless ones. Much better - thanks Mark!


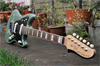
Drilling through from the trem to the controls for a ground wire. Hate doing this, ever since I drilled right through on that body for Dug a couple of years ago. Should have done this before finishing, but I always forget:

Marked up and drilling pilot holes for everything:

Drilling 11mm holes for the bridge inserts, praying for no chips in the lacquer:

I also drilled recesses for neck screw inserts - I made a template for this with the four holes in it, clamped it to the body and drilled through that. Must have been absolutely shitting myself about chipping the lacquer because I clean forgot to take a photo of the jig, but it turned out fine. This will all be covered with a plate, but there's barely 1mm either side so no room for error. This is after I'd mounted the neck - you can see the slotted end of the microtilt screw I made. Slightly rough around the hole, but it will be hidden:

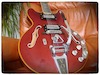
Strung up with the temporary bridge for testing:

I decided I wanted the option of using a series circuit instead of the rhythm circuit, so I needed to rout the switch cavity out a bit to accommodate the massive 4PDT switch it needs. Again, terrified of chipping the lacquer:


I mounted the guard and packed the pickup covers into place with a chopped up credit card, then used the covers a a guide for drilling pilot holes in the cavities:

I tested the conductivity of the cavity paint I was using, and it seemed way higher than the last stuff I used, so I panicked and bought a couple of vials of very expensive silver paint from Maplin and gave the cavities a coat of that. Not as pretty as the black, but much more conductive:

When I had it strung up, I tested the trem and it was just awful. I've only used AVRI and vintage JM trems before, which have been virtually silent and clean-running. This one, which uses the guts of a Classic Player, made a horrible scraping sound as it rocked, and wouldn't pull up properly because the ball ends of the strings rammed straight into the plate. Another classic example of Fender making products that are just a shadow of their former glory. But easily fixed. First problem was the square-ended pivot plate:

I used my belt sander to sharpen it up, and at the same time made it slightly smaller so the string plate would sit a little higher up and further forward. I actually over-cooked this a little:

Because of the string plate sitting further forward more than I originally planned, I needed to make the collet hole a little larger and file a small indent for good trem-lock clearance:


The string holes in the classic player trems are just drilled holes with no countersinking like on AVRI ones. I used a drill bit to countersink these, then cleaned them up with a dremmel grinder:


End result: a nice sharp pivot and string ends safely away from the top plate. It's now absolutely silent when in use. It's funny - the Classic player threaded arm and collet (with tension spring inside) is a massive improvement on the AVRI one - weird how they would go to the trouble of re-thinking that but not bother to get the pivot and the string holes functioning properly:


...
Today I picked up some bridge bases, neck plates and string trees I've had specially made by Aitchee engineering down in East Grinstead. I discovered that the saddles on certain old Kahler bridges are almost exact copies of the original Yamaha ones, and I've managed to hunt down a couple of them to sacrifice for the greater good. They're actually really well designed units, and I'm sure there's a community of Kahler aficionados out there who will hate me for this...never mind.

This is the finished bridge installed. The only immediate difference from the vintage Yamaha one is the lack of support bracket at the sides. I'm pretty sure it will be fine without, since the stainless steel base is slightly softer than the original chrome one - if not, I might try to dremmel a slight channel for the outer saddle height screws to rest in.


Lastly, the nut, which still needs refining:

EDIT: The last image would have spoiled a big surprise for the recipient - I'll re-post it later.
Sorry for the avalanche of images. Not long to go now.