 |
|
|
|
|
|
|
|
|
|
|
|
|
|
|
|
|
|
|
|
|
|
|
|
|
|
|
|
|
|
|
|
|
|
|
|
|
|
|
|
|
|
|
|
|
|
|
|
|
|
|
|
|
|
|
|
|
|
|
|
|
|
|
|
|
|
|
|
|
|
|
|
|
|
|
|
|
|
|
Buildup of a 1963 Fender
Jaguar
by Doug Lesho
12/2004
(Revised
2/2006) |
|
|
|
DAY ONE |
|
|
|
The following chronicles the assembly of a 1963
Fender Jaguar electric guitar. This Jaguar had been professionally
refinished at world-renowned Lay's Guitar Shop in Akron, Ohio. The Jaguar was a
parts-grade guitar project that I bought off eBay last year to replace a
beloved '64 Jag that I regretted selling some months earlier. This time, I
decided to build a Jaguar exactly how I wanted it, with the goal of
recreating the look and feel of a low-use original. I will use only
original and date-specific parts for the assembly, no reissue or reproduction parts.
The body
and neck were at Lay's for about 9 months, I spent this time gathering the
best parts I could find. I did not seek perfect parts, but those that
would be matched well and capture the flavor of a 41 year old guitar, used
but not abused.
To that end, I had Lay's strip a previously applied
Candy Apple Red refinish from the body and headstock. They then applied
the yellow fullerplast sealer, shot a coat of white primer, then applied
the Olympic White topcoat in nitrocellouse lacquer, just as Fender would
have done in 1963. Next came a clearcoat of nitro, after which a junk set
of control plates and pickguard were installed and the clearcoat was
slightly tinted on just the exposed areas. This left the untinted Oly
White under the guard and plates, and lends realism to a finish that had
been yellowed by UV exposure. Finally, the finish was aged to provide the
fine lacquer checking which typically occurs over time with nitro lacquer.
Following is the glorious result: |
|
|
|
 |
|
|
|
 |
|
|
|
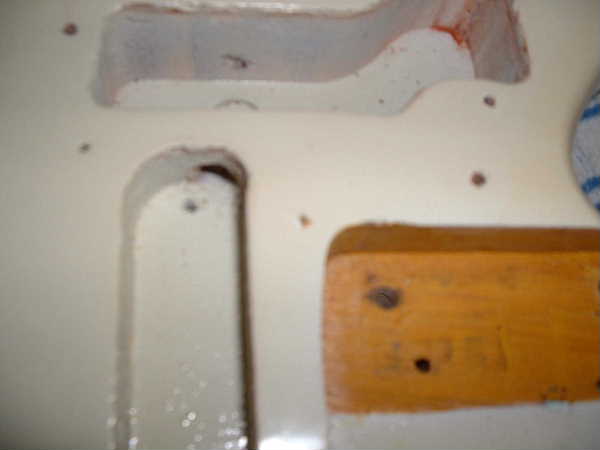
Note the white “shadow” under the pickguard and
control plate areas, and the paint stick marking in the neck pocket. The
stick markings originally occurred at the Fender factory due to the body
being bolted to a flattened piece of conduit to support it while painting.
Also note the fine pink compound left in the cavities from
polishing. |
|
|
|
Prior to assembly, there were a few small detail
items that I wanted to recreate. First, I made small nail holes in four
places on the body to recreate the method that Fender used to dry the
bodies. The nails were used as legs and the body set on them for drying.
This practice was used all along by Fender through the 50s and into the
60s, even after the advent of the paint stick in 1963.
However, sometime during the following year Fender created a drying tree
which also utilized the paint stick, and eliminated the nails completely.
Thus, 1963 and '64 are the only years in which one will see
both the paint stick shadow and the nail holes. But
please remember that Pre-CBS Fender was largely a by-hand operation,
timeline dates are approximate and features often
overlap. |
|
|
|
 |
|
|
 |
|
|
|
|
 |
|
|
|
|
|
 |
|
 |
|
|
|
|
|
|
|
|
These numbers were hastily scrawled in and no
particular care was given to them by Fender originally, or myself
now. An authentic factory date would include a month as well,
example: 3/63 |
|
|
|
|
The nail holes are approximate, as this was a
manual operation. Research has found these locations to be somewhat
typical. |
|
|
|
|
|
|
My
next order of business was to start assembling the neck. This is not a
mandatory step at this point, I was simply anxious to see the major pieces
bolted together. When I purchased the guitar, I discovered the neck had a
broken truss rod anchor (that the eBay seller conveniently forgot to
mention). Lay's had to remove a section of the brazilian rosewood
fingerboard to effect the repair. This was largely the reason for the 9
month lead time, this repair is very tricky and often a neck with this
deficiency is simply scrapped. Even though I know the repair is there,
it's difficult (impossible?) to see. There may be a slight difference in
wood tone of the replaced section, but I cannot detect a seam and not for
lack of trying! I find this repair nothing short of
amazing. |
|
|
|
 |
|
|
|
 |
|
|
|
|
|
 |
|
|
|
|
This neck was manufactured in November of 1963,
indicating that the guitar could not have been produced any earlier than
this. People sometimes make the mistake that this date is definitive for
determining the time of manufacture. Another common misconception is the
model code 1. Often mistaken for a date, it rather signifies the model
Jaguar. B is the width code, being medium (or standard)
width. |
|
|
|
|
|
|
I
decided based on past experience, it would be best to start the tuner
installation by dowelling the tuner holes. These holes are often wallowed
out even if the tuners have only been removed once. Being a parts-guitar,
there is no way of knowing how many sets have been on this neck how many
times. It is safe to assume that at least some of the holes will be
stripped. |
|
|
|
 |
|
|
 |
|
|
|
|
|
For tuner holes, I’ve found that toothpicks and
good old Elmer’s Glue work just fine. They are readily available and often
are already around the house somewhere. |
|
|
|
|
|
|
After a short cure time, I cut the toothpicks off
with diagonal pliers and flattened them with a ball peen hammer and small
drift. |
|
|
|
|
 |
|
|
|
|
|
|
I
set the tuners in place and drilled two small pilot holes in the headstock
at each of the end tuner pieces. With the ends installed, it is easier to
fit the remaining inside pieces and they are held together semi-tightly. I
carefully drilled the remaining pilots and installed the
tuners. |
|
|
|
|
|
 |
|
|
|
|
The tuners and string tree. These are original
Kluson Deluxe single-lines as evidenced by the patent number on the
bottom. The string tree spacer is metal, later these were changed to a
nylon plastic. |
|
|
|
|
|
 |
|
|
|
|
|
|
 |
|
|
|
|
The JAGUAR spacing on the repro (bottom) was a bit
too wide, but I really liked the yellowed background and browned-out
Fender lettering as opposed to the clean look of the genuine reissue decal
at top. |
|
|
|
|
|
|
At
this point, I had a big decision to make. I had two decals on hand, one
was a genuine Fender reissue logo, and the other was an excellent
reproduction. I am normally prone to using only genuine Fender parts, but
the repro was a quality aged silkscreen that I thought would look good
with the slightly aged finish. Which to choose? I deliberated over this
for awhile, setting each on the headstock and taking turns admiring
them. |
|
|
|
 |
|
|
|
The repro logo won out, and I’m happy with it. I
can always swap it later if I have a change of heart. Now I’m ready
to bolt the neck to the body. I will use an original-equipment plastic
shim as called for in the Fender drawing. This allows the bridge
additional height for clearance over the string mute, without compromising
string action. (Since this article was initially published, I did in fact
remove the repro logo shown here, and installed the correct Fender reissue
logo. As a bonus, the repro logo left a yellowed area that looks quite
realistic under the reissue logo!) |
|
|
|
 |
|
 |
|
 |
|
|
|
|
|
Difficult to photograph, the serial number on the
plate is L11207. This picture of the neck pocket displays the shim
installed. It will simply lay there and be sandwiched between the
body and neck. |
|
|
|
Now the body and neck are reunited
... |
|
|
|
 |
|
|
 |
|
|
|
|
|
 |
|
|
|
|
|
I had to reprise the Elmer's / Toothpick trick on
the lower strap button. |
|
|
|
|
|
|
It’s starting to look
like a guitar |
|
|
|
|
|
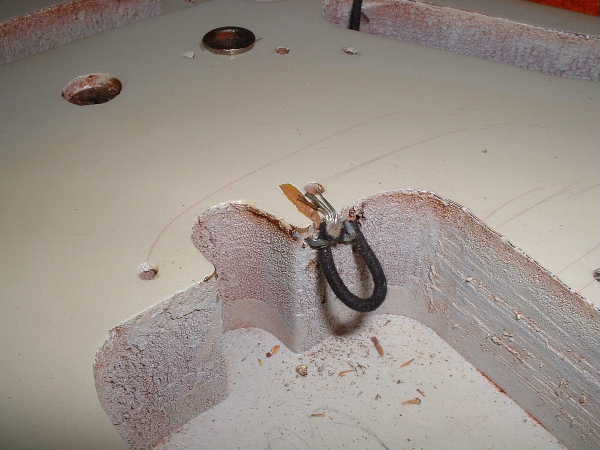
I
decided to go ahead and install the tremolo / tail piece next. But first
the ground wire will be run from the main control cavity to the tail
cavity. It will be stapled in place as was the original. Please note that
the staple location shown here is erroneous. There should be a very thin
staple applied to the face of the guitar, over the bare conductor that is
fanned out. Though the method shown here will function fine, it is not
truly "vintage correct". I'lll change it next time I
restring! |
|
|
|
 |
|
|
|
 |
|
|
|
|
I used an original cloth-insulated black wire and
fanned out the conductor near the top right screw hole (as viewed
vertically). I later pulled the slack out of the wire back through the
hole, which is necessary to ensure the tail fits properly in the cavity
and the tremolo operates correctly. The mute slug is also visible in this
photo, recessed into the body just left of the right bridge cup. The
tailpiece as installed (right). |
|
|
|
|
|
|
It’s now time to install the body
cavity shielding. They are held in place with small triangular pieces of
aluminum known as Glazier Points. This is where I met my
next challenge; I was short 4 glazier points. This is very frustrating as
I just know I have a small baggie of them somewhere around here! Now at
work stoppage, I decide to quit for today and plan to manufacture some
glaziers tomorrow. I will need to procure a sheet of thin aluminum from
the hardware store. It’s just as well; I need some new tips for my
soldering iron anyway. (As a side note and bit of trivia; a kind reader
emailed to inform me that glazier points are commonly sold intact at
hardware stores. They are used to secure a glass window into the frame
prior to glazing, hence the name!) |
|
|
|
 |
|
 |
|
|
|
|
|
I left the pickups attached to the cavity
shielding with the ground leads, in order to preserve as many of the
original solder joints as possible. Both hot leads will have to be
replaced to lengthen them and eliminate the gaudy
splices. |
|
|
|
|
The brass cavity shielding with ground wires
attached. Note the small triangular pieces known as glazier
points. |
|
|
|
|
|
|
OffsetGuitars.com Forums
/ Day One / Day Two / Day Three
|
|