Yamaha SG-3 & SG-2 replicas - SG-2 Finished p15/18
-
egosheep

- PAT. # 2.972.923

- Posts: 1243
- Joined: Sun Jul 19, 2009 10:41 am
- Location: Toronto
Re: Yamaha SG-3 replica project build - STARTED!
Wasn't the WRHB made of two Tele bridge bobbins? I thought that's what made it that width, the turning of the angled pickup strait.
-
chase

- PAT. # 2.972.923
- Posts: 926
- Joined: Mon Jan 14, 2008 3:22 pm
- Contact:
Re: Yamaha SG-3 replica project build - STARTED!
Yeah, I'm pretty intrigued by these pickups too. Especially the hybrid Jag/Jazzmaster with the baseplate, in the neck.
-
EvLoutonian

- PAT. # 2.972.923
- Posts: 237
- Joined: Tue Aug 24, 2010 1:25 am
- Location: Melbourne, Australia
Re: Yamaha SG-3 replica project build - STARTED!
Post a picture or two "under the hood" of the 'Narrow Range' P90 when you get your hands on it, Ben?
(:
(:
-
EvLoutonian
- PAT. # 2.972.923
- Posts: 237
- Joined: Tue Aug 24, 2010 1:25 am
- Location: Melbourne, Australia
Re: Yamaha SG-3 replica project build - STARTED!
Here's a post on Cutris Novak's page, showing (and explaining) the differences between the original Fender Wide Range Humbuckers, and the modern reissue.
http://curtisnovak.com/pickups/repairs/WRHB-ri/" onclick="window.open(this.href);return false;
This gives a good idea how the wide range humbuckers are constructed, and some idea how his 'Narrow Range' P90 must be made (with threaded magnetic pole pieces, and similar bobbin size and winding, presumably.)
-
anrque
- PAT PEND

- Posts: 44
- Joined: Sat Jan 17, 2009 10:22 pm
- Location: Portland
Re: Yamaha SG-3 replica project build - STARTED!
This body is looking absolutely fantastic! Now more than ever I would like to get a PDF of that template for the neck and body.
However, luck was on my side last month when I picked up this mislabeled bass from GC online from their used listings.

My once in a lifetime score for $260 shipped!
Now it is just waiting for me to build it a 6 string brother.
However, luck was on my side last month when I picked up this mislabeled bass from GC online from their used listings.
My once in a lifetime score for $260 shipped!
Now it is just waiting for me to build it a 6 string brother.
-
EvLoutonian
- PAT. # 2.972.923
- Posts: 237
- Joined: Tue Aug 24, 2010 1:25 am
- Location: Melbourne, Australia
Re: Yamaha SG-3 replica project build - STARTED!
anrque wrote:.. luck was on my side last month when I picked up this mislabeled bass from GC online from their used listings ..
Shit yeah! NiiiiiiicE!
-
ngtblues

- PAT PEND
- Posts: 2
- Joined: Fri Mar 09, 2012 12:21 pm
Re: Yamaha SG-3 replica project build - STARTED!
Hi people, i have a problem with my SG3... accidentally disconnect cables from the system, and I don't know how to reconnect them (the wires from the neck pickup, and the wires from the humbucker) do you have the wiring diagram?
Sorry for my English , Thanks
Sorry for my English
-
EdGrip

- PAT. # 2.972.923
- Posts: 546
- Joined: Thu Feb 24, 2011 2:53 pm
- Location: Norfolk, BUH
Re: Yamaha SG-3 replica project build - STARTED!
I really love that neck joint/truss rod access bit. Very cool.
"The Gear Page are a bunch of cork-sniffing hedge fund managers who collect $5,000 boutique amps like an old lady collects cats. I wouldn't waste any angst over dilettante amp hoarders who judge tone by the number of zeros on the price tag."
-
chase
- PAT. # 2.972.923
- Posts: 926
- Joined: Mon Jan 14, 2008 3:22 pm
- Contact:
Re: Yamaha SG-3 replica project build - STARTED!
What's the status on this build? We need MOAR PITCHERS!
-
PoppaPopp

- PAT. # 2.972.923
- Posts: 1346
- Joined: Fri Sep 05, 2008 1:38 pm
- Location: Germany
- Contact:
Re: Yamaha SG-3 replica project build - STARTED!
ngtblues wrote:Hi people, i have a problem with my SG3... accidentally disconnect cables from the system, and I don't know how to reconnect them (the wires from the neck pickup, and the wires from the humbucker) do you have the wiring diagram?
Sorry for my English , Thanks
Don't know if it helps but I have a few photos that I shot a while ago showing the wiring of my SG3...
Here you go:
http://m.flickr.com/#/photos/25734976@N ... 093871318/" onclick="window.open(this.href);return false;
"...if you can't punkify a Mustang then something ain't right in the world!" (UlricvonCatalyst)
-
ngtblues
- PAT PEND
- Posts: 2
- Joined: Fri Mar 09, 2012 12:21 pm
Re: Yamaha SG-3 replica project build - STARTED!
Thanks a lot!! looking at your pictures I realized that the green wire of the neck pickup is the Ground wire...!?!?
this is my incomplete diagram:
http://dl.dropbox.com/u/63421172/sg3.jpg" onclick="window.open(this.href);return false;
In my case I have a two-position switch for the humbucker (I can see that your guitar has a potentiometer in this place)
¿Is this a Balance pot between the two capsules a bridge?
Thanks!
-
croatan

- PAT. # 2.972.923
- Posts: 1725
- Joined: Tue May 10, 2011 10:01 am
- Location: Charlotte, NC
- Contact:
Re: Yamaha SG-3 replica project build - STARTED!
this build is all kinds of sexy. polar bear color scheme like the original pic?
"To you whose souls are lured by noise to every treacherous abyss, for you do not feel for a rope like cowards, and where you can guess you hate to calculate. And where others would poison, you dismember." -Nietzche/Nation of Ulysses
-
noisepunk

- PAT. # 2.972.923
- Posts: 16807
- Joined: Sat Apr 03, 2010 5:55 pm
- Location: glasgow, scotland
- Contact:
Re: Yamaha SG-3 replica project build - STARTED!
Progress! Progress! Progress!
-
Murph

- PAT. # 2.972.923
- Posts: 1745
- Joined: Mon Aug 25, 2008 3:07 pm
- Location: in the bar with my head on the bar
Re: Yamaha SG-3 replica project build - STARTED!
Yeah, any recent progress on this? Coolest build ever.
-
theworkoffire

- PAT. # 2.972.923
- Posts: 4143
- Joined: Sun Sep 02, 2007 12:59 am
- Location: Punching the future in the face, London
- Contact:
Re: Yamaha SG-3 replica project builds - PROGRESS!
Eight months later...
Sorry for the extended hiatus - I still don't really have the time to work on this, but it has an absolutely fixed deadline, so by hook or by crook there will be a finished guitar in this thread some time in the next ten weeks. I've been squeezing shed-time into the hour between finishing work and router-noise getting too anti-social. You'll have to excuse my rustiness - seems like forever since I was building regularly.
Anyway, it's nice to be back, with a photobomb:
Competence atrophy, exhibit a. - routing the neck I managed to snap the tip off the nose. Not the most forgiving of shapes to trim; luckily I found the end and it glued back on without too much fuss:

Routing the hole for the truss adjuster using a 10mm template bush and a 6mm bit:

I seem to have changed loads of my tools since I last made a neck, so I've been making new jigs for loads of things, and trying to make everything repeatable and multi-functional. This one's for routing straight channels for two-way truss rods:

End of the truss rod dropped into place:

The whole thing in place. I had to shorten it quite a bit and trim off the excess thread from the end. It finishes just before the nut.

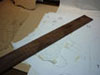
Gluing the fingerboard on - this is the first time I've used an uncut slab of rosewood. I've always used pre-slotted boards in the past, but the zero-fret on this one put paid to that. I glued it on slightly oversize...

...then trimmed it down on the router:

My SG-5 has a bound neck, so I figured this one should have the honour, too. I wanted the binding pretty thin, so built up the sides with three layers of tape before cutting the channel:

Competence atrophy, exhibit b. Spot the embarrassing rookie error:

I was so eager to use my new fingerboard-radiusing jig that I forgot to cut the fret slots before gluing on the binding. Nothing for it but to feed the binding to the router - the new channel ended up having to be a tiny bit deeper and thicker than I had originally planned, but not so it should be noticeable when I'm done. The jig is made on the underside of the truss-rod jig. I've only made a 9.5" radius carriage so far, but it will take a 7.25" one with the neck sitting a little higher. The radius of the carriage sides is 9.75", the bit drops down 1/4" lower to give the right radius on the neck.
This is my new fret-slotting jig - my sliding mitre-saw has a very accurate trenching adjustment, so with the right blade I can set it up and cut all the slots in just a few seconds:

I cut the slots so they were the right depth in the centre, then finished them off at the ends by hand with my fret-saw:

Gluing the binding on, second time around:

I don't have a pic of re-cutting the binding channel, but it was done with my small router above the table using the jig on the right here. Binding finished:

Drilling for dots rather than blocks made a pleasant change - these are smaller 5mm holes accurate to the vintage Yamaha ones:

Dropping a little thick superglue in the holes...

...and pressing the dots into place with my drill press and a flat-ended rod. The pressure was forcing glue through holes in the rosewood out into the fret slots, so I had to keep scraping them out with a knife blade:

The dots sanded flush:

Gluing the side-dots in place - thin superglue run around the rim of the holes, and the rods dipped in a puddle of it before they go in:

All trimmed flush. Managed to remember to drill two at the 12th fret this build, which felt like a minor triumph - twice in the past I've cocked that up with an attention drift.

Competence atrophy, exhibit c. - This jig is to thickness and radius the headstock, made using the reverse side of the slotting jig. Works an absolute treat, but the end of the fingerboard was in the way, so I really should have done this before gluing that on. Wouldn't be a problem with a Fender-style neck.

The headstock transition finished by hand:

My ad-hoc method for getting a nice straight thickness taper to the underside of the neck. Maybe this will get a proper jig next time; would be easy enough to do but I was in too much of a rush:

Marking the tuner holes. I normally drill them from the back, but find it a bit risky, so this time I went in from the front, marking with a centre-point and drilling a 2mm pilot hole to be on the safe side:


Couldn't resist a mock-up:

Having discovered the hard way how out of practice I am, and knowing that this build is spoken for, I've decided to try to make two of these side-by-side. That way I have a spare if anything goes drastically wrong towards the end, and I get to keep the other! The second neck should be a lot faster now I have all the jigs on the go and I've remembered what order to knock them together.
So, I glued up a new body blank made from two parts of a very light plank I bought ages ago, and a scrap offcut that was knocking around:

A bandsaw, a few trips through the thicknesser and a trim on the router later, it looks like this:

I'm thinking this one will have a non-vintage trem - possibly a hybrid based on a JM one if I can get my shit together in time, and this will be the one that fulfills the commission. Thanks to the extreme generosity of another forum member I now have a vintage Yamaha trem which will go on the first body which I'll keep for myself and finish at leisure.
Cheers!
Sorry for the extended hiatus - I still don't really have the time to work on this, but it has an absolutely fixed deadline, so by hook or by crook there will be a finished guitar in this thread some time in the next ten weeks. I've been squeezing shed-time into the hour between finishing work and router-noise getting too anti-social. You'll have to excuse my rustiness - seems like forever since I was building regularly.
Anyway, it's nice to be back, with a photobomb:
Competence atrophy, exhibit a. - routing the neck I managed to snap the tip off the nose. Not the most forgiving of shapes to trim; luckily I found the end and it glued back on without too much fuss:
Routing the hole for the truss adjuster using a 10mm template bush and a 6mm bit:
I seem to have changed loads of my tools since I last made a neck, so I've been making new jigs for loads of things, and trying to make everything repeatable and multi-functional. This one's for routing straight channels for two-way truss rods:
End of the truss rod dropped into place:
The whole thing in place. I had to shorten it quite a bit and trim off the excess thread from the end. It finishes just before the nut.
Gluing the fingerboard on - this is the first time I've used an uncut slab of rosewood. I've always used pre-slotted boards in the past, but the zero-fret on this one put paid to that. I glued it on slightly oversize...
...then trimmed it down on the router:
My SG-5 has a bound neck, so I figured this one should have the honour, too. I wanted the binding pretty thin, so built up the sides with three layers of tape before cutting the channel:
Competence atrophy, exhibit b. Spot the embarrassing rookie error:
I was so eager to use my new fingerboard-radiusing jig that I forgot to cut the fret slots before gluing on the binding. Nothing for it but to feed the binding to the router - the new channel ended up having to be a tiny bit deeper and thicker than I had originally planned, but not so it should be noticeable when I'm done. The jig is made on the underside of the truss-rod jig. I've only made a 9.5" radius carriage so far, but it will take a 7.25" one with the neck sitting a little higher. The radius of the carriage sides is 9.75", the bit drops down 1/4" lower to give the right radius on the neck.
This is my new fret-slotting jig - my sliding mitre-saw has a very accurate trenching adjustment, so with the right blade I can set it up and cut all the slots in just a few seconds:
I cut the slots so they were the right depth in the centre, then finished them off at the ends by hand with my fret-saw:
Gluing the binding on, second time around:
I don't have a pic of re-cutting the binding channel, but it was done with my small router above the table using the jig on the right here. Binding finished:
Drilling for dots rather than blocks made a pleasant change - these are smaller 5mm holes accurate to the vintage Yamaha ones:
Dropping a little thick superglue in the holes...
...and pressing the dots into place with my drill press and a flat-ended rod. The pressure was forcing glue through holes in the rosewood out into the fret slots, so I had to keep scraping them out with a knife blade:
The dots sanded flush:
Gluing the side-dots in place - thin superglue run around the rim of the holes, and the rods dipped in a puddle of it before they go in:
All trimmed flush. Managed to remember to drill two at the 12th fret this build, which felt like a minor triumph - twice in the past I've cocked that up with an attention drift.
Competence atrophy, exhibit c. - This jig is to thickness and radius the headstock, made using the reverse side of the slotting jig. Works an absolute treat, but the end of the fingerboard was in the way, so I really should have done this before gluing that on. Wouldn't be a problem with a Fender-style neck.
The headstock transition finished by hand:
My ad-hoc method for getting a nice straight thickness taper to the underside of the neck. Maybe this will get a proper jig next time; would be easy enough to do but I was in too much of a rush:
Marking the tuner holes. I normally drill them from the back, but find it a bit risky, so this time I went in from the front, marking with a centre-point and drilling a 2mm pilot hole to be on the safe side:
Couldn't resist a mock-up:
Having discovered the hard way how out of practice I am, and knowing that this build is spoken for, I've decided to try to make two of these side-by-side. That way I have a spare if anything goes drastically wrong towards the end, and I get to keep the other! The second neck should be a lot faster now I have all the jigs on the go and I've remembered what order to knock them together.
So, I glued up a new body blank made from two parts of a very light plank I bought ages ago, and a scrap offcut that was knocking around:
A bandsaw, a few trips through the thicknesser and a trim on the router later, it looks like this:
I'm thinking this one will have a non-vintage trem - possibly a hybrid based on a JM one if I can get my shit together in time, and this will be the one that fulfills the commission. Thanks to the extreme generosity of another forum member I now have a vintage Yamaha trem which will go on the first body which I'll keep for myself and finish at leisure.
Cheers!