Yamaha SG-3 & SG-2 replicas - SG-2 Finished p15/18
-
surfin_bird

- PAT. # 2.972.923

- Posts: 1378
- Joined: Fri Jan 08, 2010 11:06 am
- Location: Amsterdam
Re: Yamaha SG-3 & SG-2 replica project builds - PROGRESS!!
You need to make your own trem arms, I would buy 2 in a instant! (Since they're missing always)
-
theworkoffire

- PAT. # 2.972.923
- Posts: 4143
- Joined: Sun Sep 02, 2007 12:59 am
- Location: Punching the future in the face, London
- Contact:
Re: Yamaha SG-3 & SG-2 replica project builds - PROGRESS!!
I'll see what I can do for you on that.surfin_bird wrote:You need to make your own trem arms, I would buy 2 in a instant! (Since they're missing always)
Stand by for late-to-the-party microtilt shenanigans.
-
theworkoffire
- PAT. # 2.972.923
- Posts: 4143
- Joined: Sun Sep 02, 2007 12:59 am
- Location: Punching the future in the face, London
- Contact:
Re: Yamaha SG-3 & SG-2 replica project builds - PROGRESS!!
Look what came in the post from Paul today

It's the same footprint as the original Yamaha trem cover, now loaded with the guts from a CP Fender trem:

I need to modify the cavity a little to accommodate the undercarriage, but other than that, good to go!
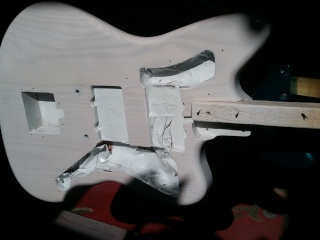
I've grain filled the SG-2 body, and while that was drying I decided to experiment a little with a microtilt mechanism on the SG-3. First off, a three-stage hole in the neck pocket, right through the body:

Then fitting a threaded insert, keeping it as vertical as possible - they sometimes skew off as the outer thread bites:

Testing with a wide flat-headed bolt - I just need to decide on the right length for the bolt and cut a slot in the other end so it can be adjusted with a screwdriver through the neck plate. So far as I can tell it's going to work just fine.

It's the same footprint as the original Yamaha trem cover, now loaded with the guts from a CP Fender trem:
I need to modify the cavity a little to accommodate the undercarriage, but other than that, good to go!
I've grain filled the SG-2 body, and while that was drying I decided to experiment a little with a microtilt mechanism on the SG-3. First off, a three-stage hole in the neck pocket, right through the body:
Then fitting a threaded insert, keeping it as vertical as possible - they sometimes skew off as the outer thread bites:
Testing with a wide flat-headed bolt - I just need to decide on the right length for the bolt and cut a slot in the other end so it can be adjusted with a screwdriver through the neck plate. So far as I can tell it's going to work just fine.
-
Leviman

- PAT. # 2.972.923
- Posts: 858
- Joined: Wed Mar 23, 2011 11:47 pm
Re: Yamaha SG-3 & SG-2 replica project builds - PROGRESS!!
That's badass! Great idea, thanks for sharing!
Longhorn build http://www.offsetguitars.com/forums/viewtopic.php?f=8&t=62236
-
chase

- PAT. # 2.972.923
- Posts: 926
- Joined: Mon Jan 14, 2008 3:22 pm
- Contact:
Re: Yamaha SG-3 & SG-2 replica project builds - PROGRESS!!
Oh man, I don't need any more guitars but I REALLY WANT one of these...
-
theworkoffire
- PAT. # 2.972.923
- Posts: 4143
- Joined: Sun Sep 02, 2007 12:59 am
- Location: Punching the future in the face, London
- Contact:
Re: Yamaha SG-3 & SG-2 replica project builds - PROGRESS!!
Some more progress to report. Desperately need to get the spraying done by the end of the week.
Cutting the contours on the second body:

After grain-filling, making first use of the spray boothette I added to the back of my shed last year for a sealer coat:

Both bodies sealed with a wet coat of Behlen's vinyl sealer:

While those were drying, I cobbled together my fret bender again to tighten the radius of the coil a bit:

Down from about 9.5" to just under 6". The board is tapered slightly from 9.5 down to about 7.25, and I want the edges to sit in first when I press them in:

Clipping the tangs with a new tang clipper from Tonetech. It's 100% better than the last one I tried, which I think came from Stewmac. My new favourite tool:

Cleaning out the slots with a hooked blade:

Then my son came and kept me company for a bit, and picked up the camera for some ultra-rare action shots. I was using a slip of paper dipped in thin superglue to line the slots, he was very much enjoying using my SLR for the first time - not too shoddy for a seven-yr-old...

Pressing the frets in with a 9.5" caul:

Checking the levels with some weird double-chin thing going on:


When all the frets were in I re-pressed them with a 7.25" caul to make sure the ends were nice and tight to the binding.

And lastly, clipping the ends:

Nearly forgot - I've just ordered a couple of pickup covers from Shapeways, too. They fit Jag pickups (the SG-2 is going to have a pair of Vintage Vibe Jag P-90s, which are as close as I can find to the original pickups) and have the same massive exterior dimensions as the Yamaha covers:

Cutting the contours on the second body:
After grain-filling, making first use of the spray boothette I added to the back of my shed last year for a sealer coat:
Both bodies sealed with a wet coat of Behlen's vinyl sealer:
While those were drying, I cobbled together my fret bender again to tighten the radius of the coil a bit:
Down from about 9.5" to just under 6". The board is tapered slightly from 9.5 down to about 7.25, and I want the edges to sit in first when I press them in:
Clipping the tangs with a new tang clipper from Tonetech. It's 100% better than the last one I tried, which I think came from Stewmac. My new favourite tool:
Cleaning out the slots with a hooked blade:
Then my son came and kept me company for a bit, and picked up the camera for some ultra-rare action shots. I was using a slip of paper dipped in thin superglue to line the slots, he was very much enjoying using my SLR for the first time - not too shoddy for a seven-yr-old...
Pressing the frets in with a 9.5" caul:
Checking the levels with some weird double-chin thing going on:
When all the frets were in I re-pressed them with a 7.25" caul to make sure the ends were nice and tight to the binding.
And lastly, clipping the ends:
Nearly forgot - I've just ordered a couple of pickup covers from Shapeways, too. They fit Jag pickups (the SG-2 is going to have a pair of Vintage Vibe Jag P-90s, which are as close as I can find to the original pickups) and have the same massive exterior dimensions as the Yamaha covers:
Last edited by theworkoffire on Sun Aug 12, 2012 3:28 pm, edited 1 time in total.
-
fullerplast

- Mods

- Posts: 12710
- Joined: Tue Sep 12, 2006 4:53 am
- Location: In My Room
-
bubba899

- PAT. # 2.972.923
- Posts: 830
- Joined: Mon Jan 25, 2010 10:22 am
- Location: Chelmsford, UK
Re: Yamaha SG-3 & SG-2 replica project builds - frets & spra
this is a fantastic piece of work! can't wait to see the finish article
-
PoppaPopp

- PAT. # 2.972.923
- Posts: 1346
- Joined: Fri Sep 05, 2008 1:38 pm
- Location: Germany
- Contact:
Re: Yamaha SG-3 & SG-2 replica project builds - frets & spra
All awesomeness (fantastic!) of this build aside: I really dig your shirt! 
"...if you can't punkify a Mustang then something ain't right in the world!" (UlricvonCatalyst)
-
Filly-Fuzz

- PAT. # 2.972.923
- Posts: 1236
- Joined: Sat Aug 13, 2011 10:04 pm
- Location: On the edge of the World
Re: Yamaha SG-3 & SG-2 replica project builds - frets & spra
I'm soooo jelly of your beautiful workshop!!!

I tell you all my secrets but I lie about my past....
-
antisymmetric

- PAT. # 2.972.923
- Posts: 3637
- Joined: Mon Apr 26, 2010 11:32 pm
- Location: New Zealand
Re: Yamaha SG-3 & SG-2 replica project builds - frets & spra
I don't like where this is going... you'll get up in the morning, search in vain for that shirt, settle for another, then walk outside to find an empty space where your workshop used to be.
OSG strikes again....
OSG strikes again....
Watching the corners turn corners
-
Filly-Fuzz
- PAT. # 2.972.923
- Posts: 1236
- Joined: Sat Aug 13, 2011 10:04 pm
- Location: On the edge of the World
Re: Yamaha SG-3 & SG-2 replica project builds - frets & spra
I tell you all my secrets but I lie about my past....
-
ludobag1
- PAT. # 2.972.923
- Posts: 2565
- Joined: Sun Nov 23, 2008 4:28 pm
- Location: france
Re: Yamaha SG-3 & SG-2 replica project builds - frets & spra
nice as always 
you re not scare for your drill press for using it for pressing fret ? i have broken my little drill press cause of that
but as i see the fret are well engaged better than hammering
do you glue fret or only the end ?
you re not scare for your drill press for using it for pressing fret ? i have broken my little drill press cause of that
but as i see the fret are well engaged better than hammering
do you glue fret or only the end ?
-
theworkoffire
- PAT. # 2.972.923
- Posts: 4143
- Joined: Sun Sep 02, 2007 12:59 am
- Location: Punching the future in the face, London
- Contact:
Re: Yamaha SG-3 & SG-2 replica project builds - frets & spra
Luckily not! Shirt's in the wash stinking of nitro, and this morning I managed to sand both bodies down and give them a coat of primerantisymmetric wrote:I don't like where this is going... you'll get up in the morning, search in vain for that shirt, settle for another, then walk outside to find an empty space where your workshop used to be.
OSG strikes again....
It's not a normal drill drill press, it's a morticer with a drill adapter on it - it's designed to give about 1/2" ton of down force, hence the really long arm. I glued the full length of the slots.ludobag1 wrote:nice as always
you re not scare for your drill press for using it for pressing fret ? i have broken my little drill press cause of that
but as i see the fret are well engaged better than hammering
do you glue fret or only the end ?
-
theworkoffire
- PAT. # 2.972.923
- Posts: 4143
- Joined: Sun Sep 02, 2007 12:59 am
- Location: Punching the future in the face, London
- Contact:
Re: Yamaha SG-3 & SG-2 replica project builds - frets & spra
I'm just concentrating on getting the SG-2 sprayed now - the SG-3 body has just one coat of primer and will have to stay like that until I get the second neck made and the colour sorted for it. It's just for me, so there's no hurry.
This is the SG-2 after three coats of a combined sealer/primer I got from Rothko & Frost, wet sanding with 400 and 600 paper inbetween coats to sort any blemishes. I was a little skeptical at first, but it's gone on really well, and dries rock hard very quickly.

Not sure if I've talked about the colour of this one yet. It's going to be Shoreline Gold - the design reference we used was this old Mercedes colour:

But...I'm not 100% sure what colour guard to go for. Instinct says parchment, habit says black. The top on the Merc says blue .The pickup covers will be white with a large black area in the centre. I'll try to do some mock-ups later, but any suggestions very welcome.
This is the SG-2 after three coats of a combined sealer/primer I got from Rothko & Frost, wet sanding with 400 and 600 paper inbetween coats to sort any blemishes. I was a little skeptical at first, but it's gone on really well, and dries rock hard very quickly.
Not sure if I've talked about the colour of this one yet. It's going to be Shoreline Gold - the design reference we used was this old Mercedes colour:
But...I'm not 100% sure what colour guard to go for. Instinct says parchment, habit says black. The top on the Merc says blue